


to do list (Admin only)
End of 16 is talking about single leaves, but then no follow up happens
Intro video could do with a polish pass from Sunny
LESSON OVERVIEW
In the previous course we created our leaves and branches texture for this asset, as well a berries. We also analyzed our references thoroughly. Now, let’s take a look at the overall branch structure again as recap and then we can get started with the bush creation.
⚠️
Missing LESSON OVERVIEW
Initial Setup
Before we get started in the creation of our holly bush, we need to get some initial setup out of the way. Starting with researching and breaking down the structure of the foliage.
Getting a good understanding of what separates one pieces of foliage from another from the actual underlying structure is going to help make them more unique and separate them from each other, so let's start with that.
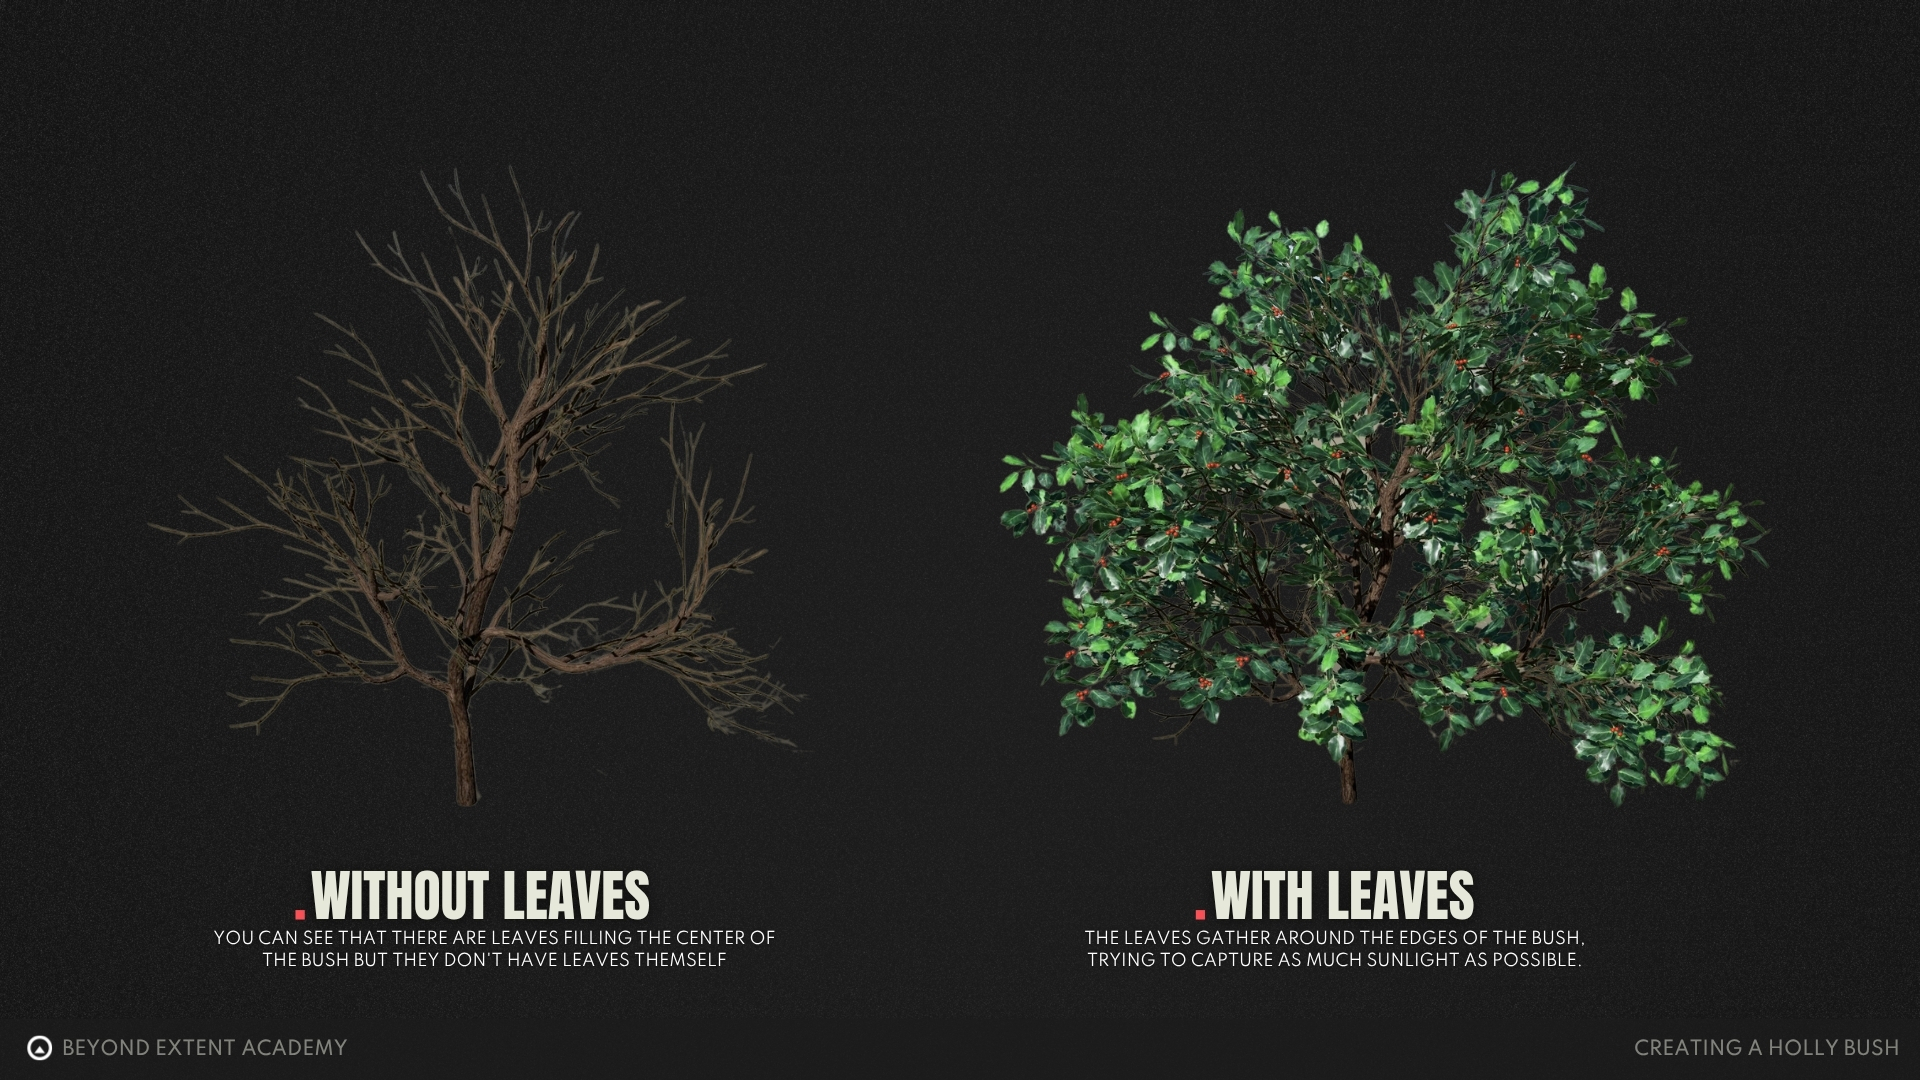
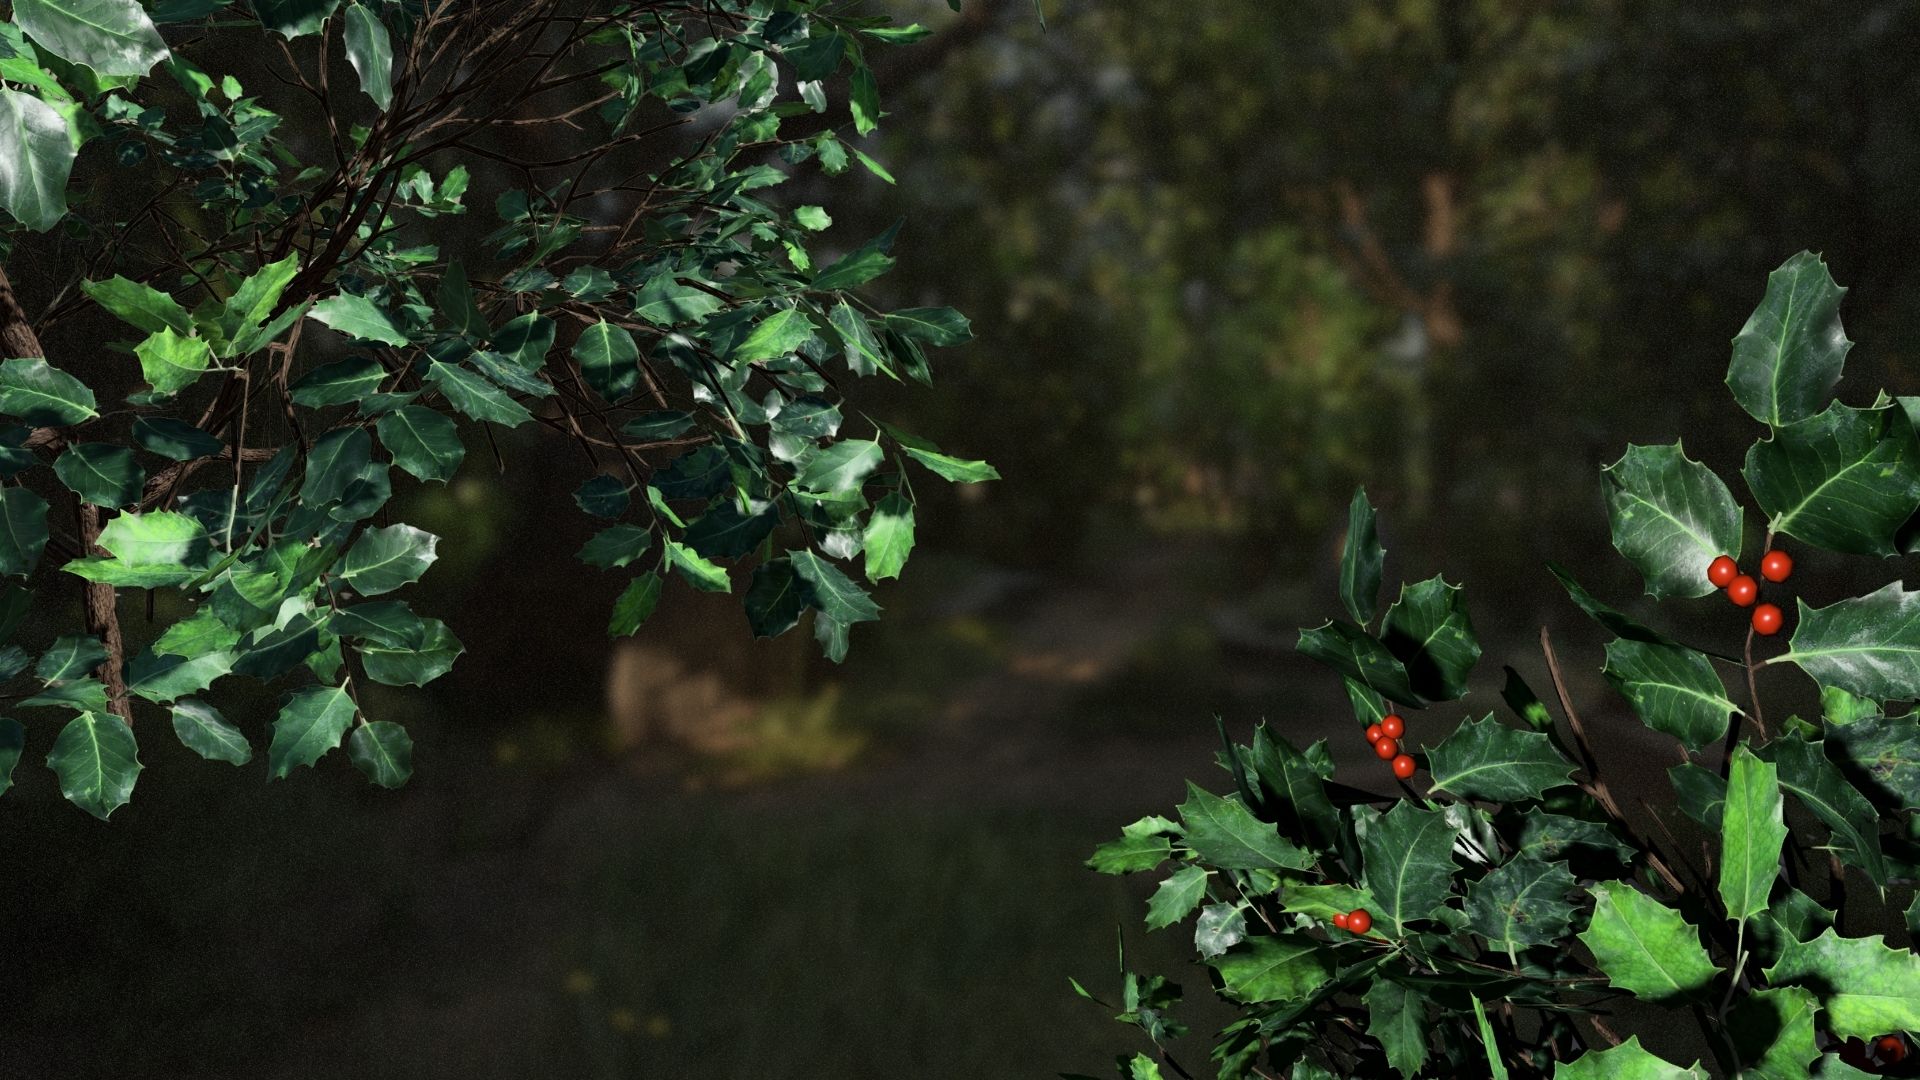
The interior of the tree is not filled with leaves, the core of any bush is usually filled with empty branches all trying to reach out towards the light at the edges instead.
Once we have a good understanding of what makes a nice piece piece of foliage, we can get started with our initial setup in Speedtree.
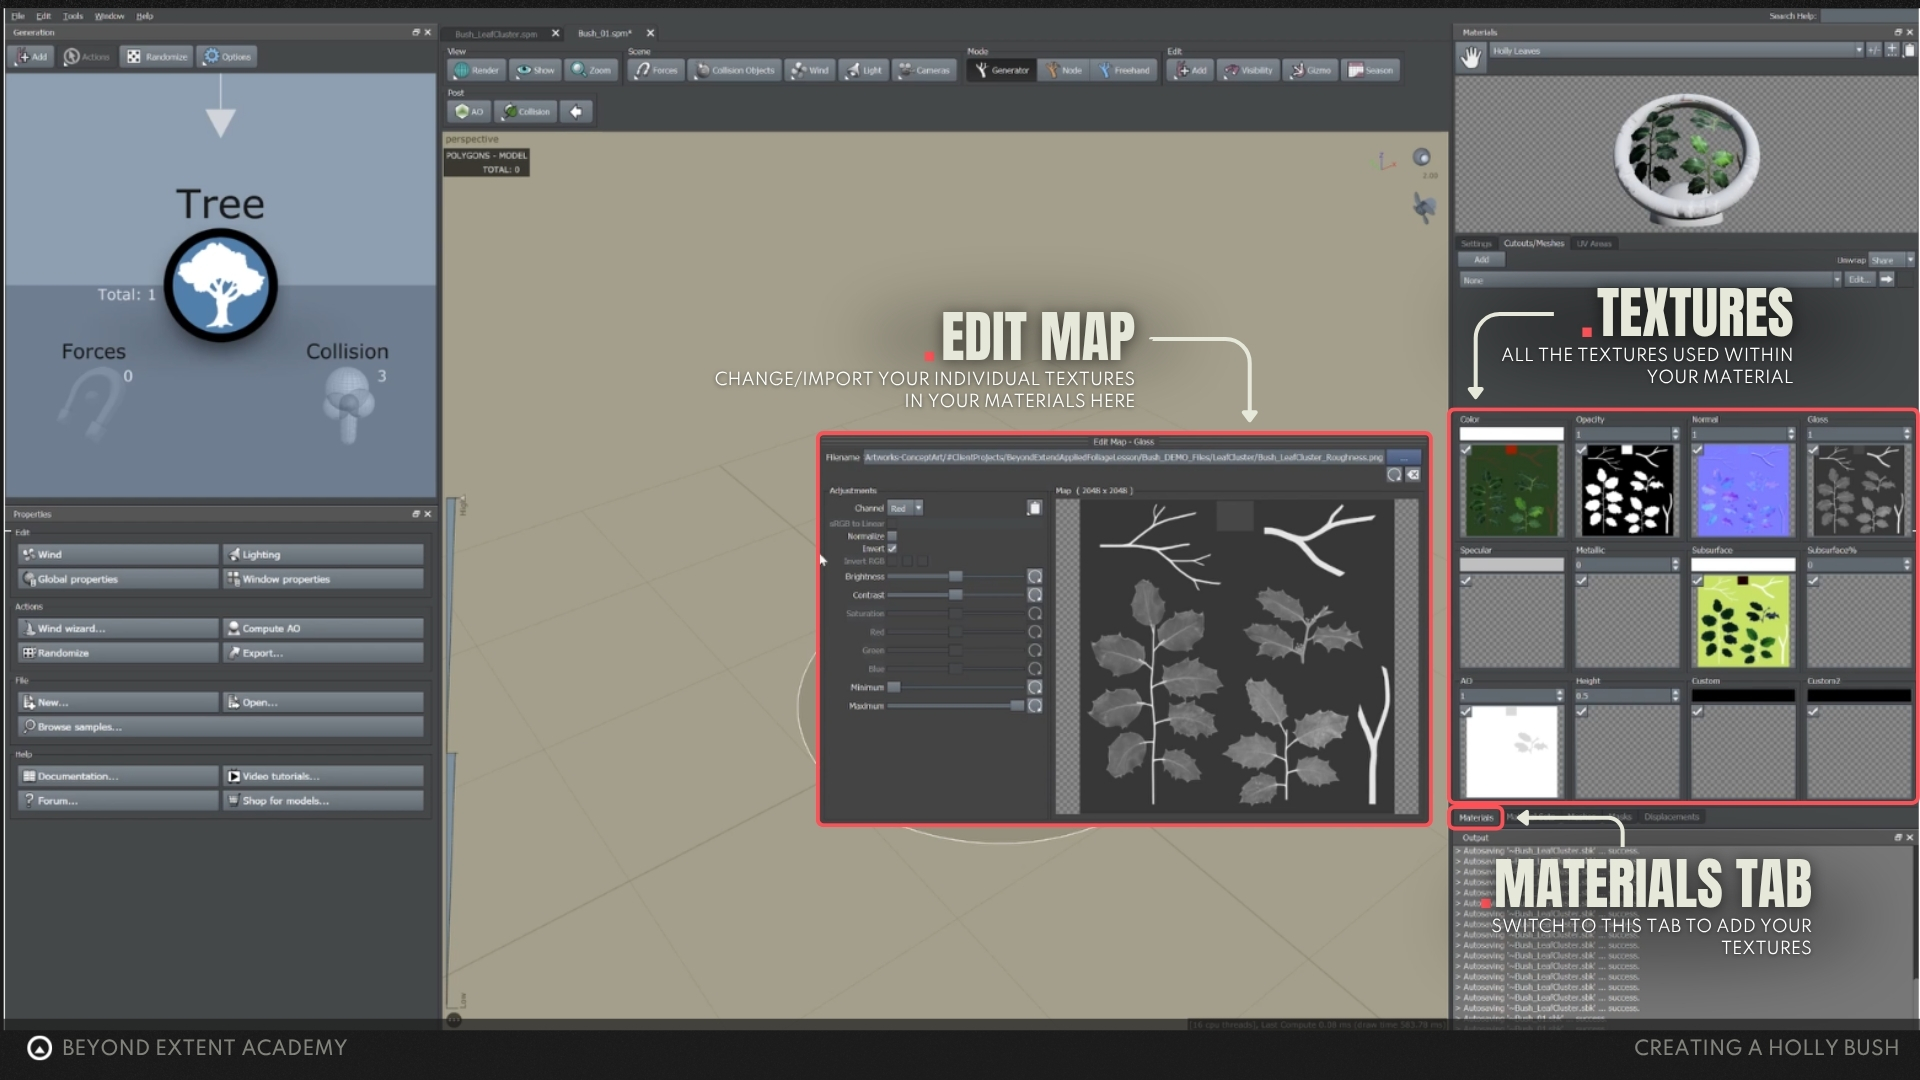
We're going to assume you are coming from previous lessons and have build your own foliage atlas, which we will be setting up now, so have your textures ready and get them into the material slots as seen in the images below.
Creating FROND MESHES
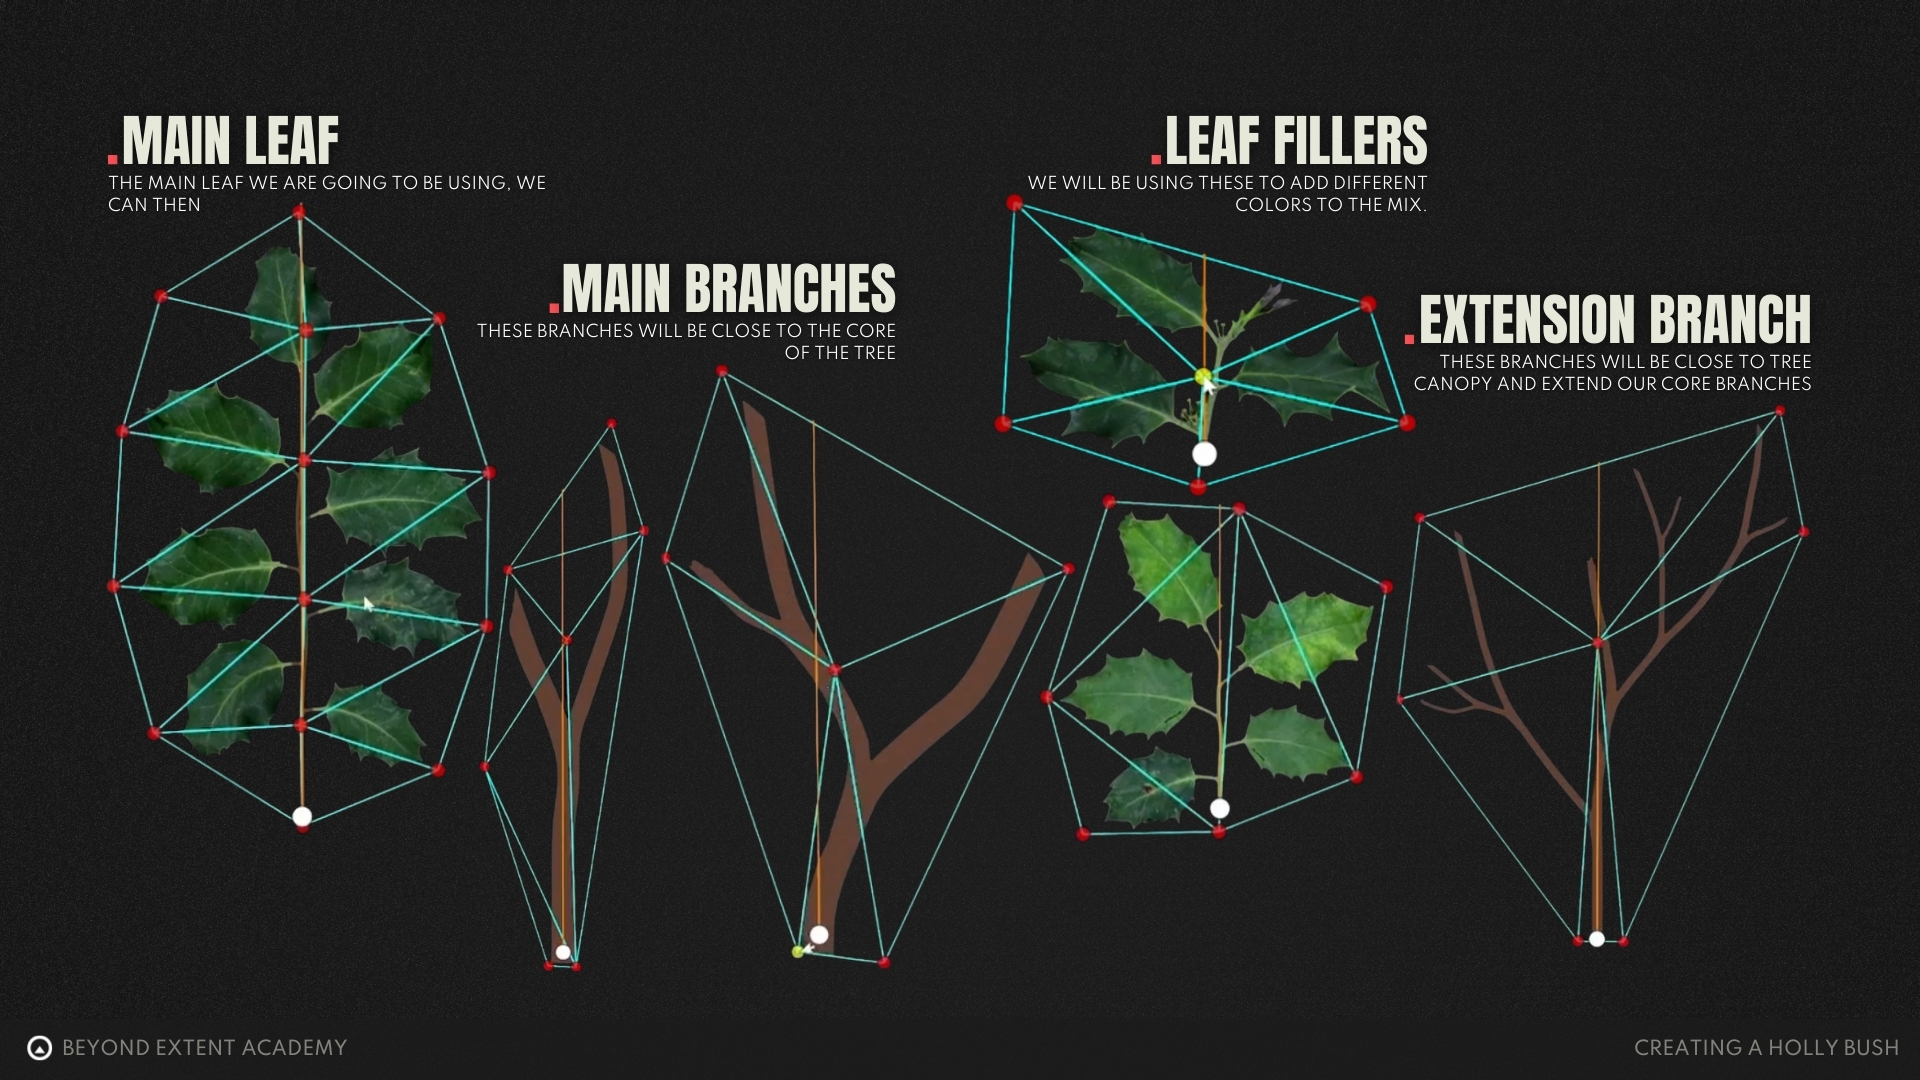
Now, that we have our texture imported, we can start with creating the frond meshes and branch cards for plant creation. We can also import the berry that we have created so we can later attach it to the bush.
When creating your frond meshes, we use speedtree's cutout editor for this, which is used to cut out the geometry based on our foliage atlas. The editor itself is pretty self explanatory, so let me highlight the most commong things we will be using.
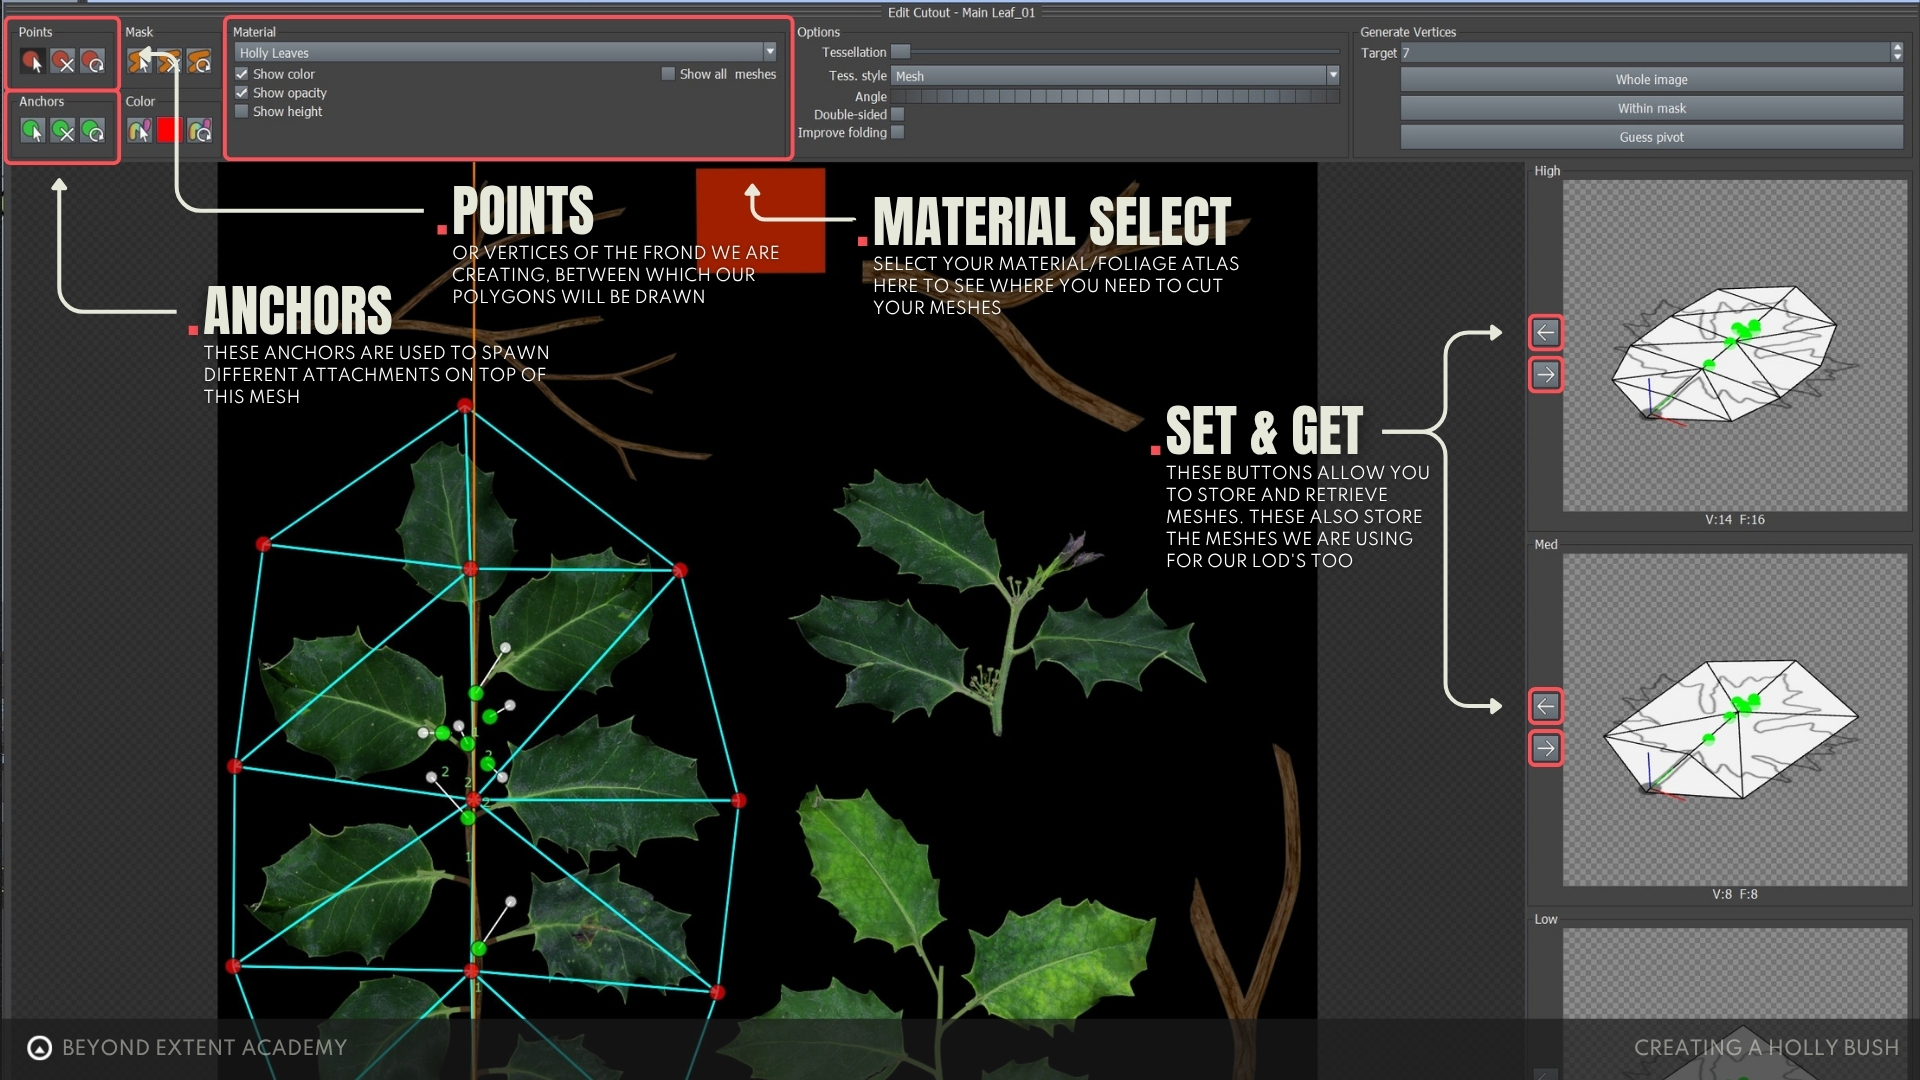
But for a deeper dive intro the actual process, we are going to be using the following video to prepared all our frond meshes for the next steps.
At this point with all our mesh fronds prepared we will be ending up with the example as show before using our holly bush texture as our example.
If you are using your own textures, it's important to keep in mind the following:
- Minimize opacity were possible, cut geometry close to the actual leaves and branches(Opacity is costly in games)
- Keep polycount as low as possible (Foliage is often scattered in large numbers, so saving yourself 500 triangles on one bush can quickly become 500,000 triangles)
Trunk Creation
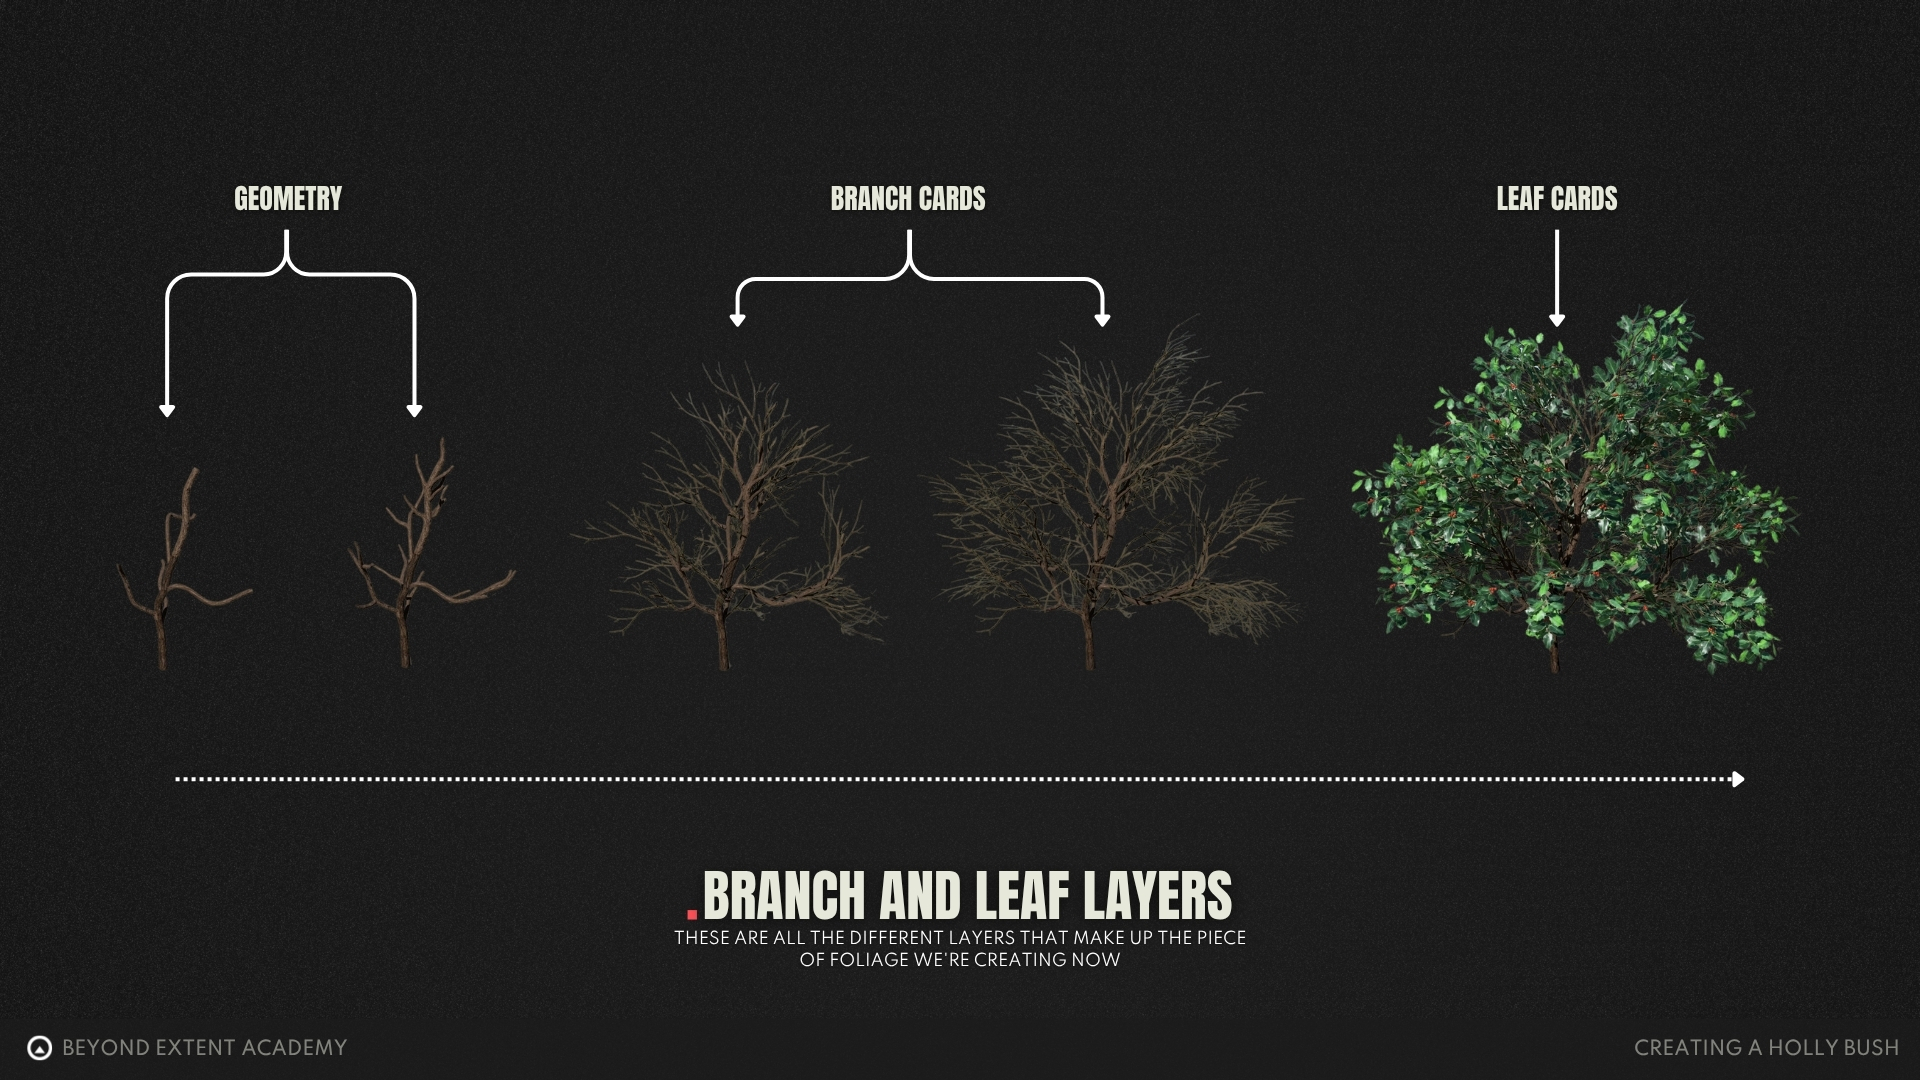
With both of our leaves and fronds textures setup and setup as individual meshes it's time to go into the actual geometry creation part of the bush.
Our first step will be to create a trunk to use as a base your foliage, this can them be used to scatter additional layers on top of later in this lesson.
For this lesson we are using a single trunk, but some trees can also be bifurcated, meaning that the trunk splits in equal parts, creating this weird dual tree. While this can look amazing and unique, that unique factor is also a downsize, since it will make it stand out more from other trees in the environment.
Creating Branches
Now that the trunk is set up, we can work on the next level of branches, which are the big branches that are directly attached to the trunk. They define the structure of the entire bush, so we need to be careful when creating them.
Adding Branch Geometry
Depending on the foliage and how close the player can get to it, the first layer and sometimes even the second layer of branches is almost always going to be make out of actual geometry. After a certain point we can then transition this actual geometry into our mesh fronds we've setup earlier.
For our holly bush we are going to use two layers of branches made out of geometry. Do keep in mind that this completely depends on the type of foliage you are working on, so always refer back to your references.
As our geometry branches are all in place, we can now add our branch cards.
First Branch fronds
Branch cards are used to reduce the amount of geometry we require for all the smaller branches and little pieces of leaves we will need. To make this look seamless we are going to transition a lot of our actual geometry based branches to texture planes (the very ones we setup in the beginning of the lesson)
This saves performance in legacy workflows and suggests a higher detail than actually present. However, in more modern engines it seems that we are transitioning more and more from opacity based to using actual geometry, especially with technologies such as nanite.
Branch Extenders
To finish up our layer structure we're going to add a layer of branch extenders, these meshes are also texture based and will be added on top of our current branch frond to extend them further and add even smaller sections of branches.
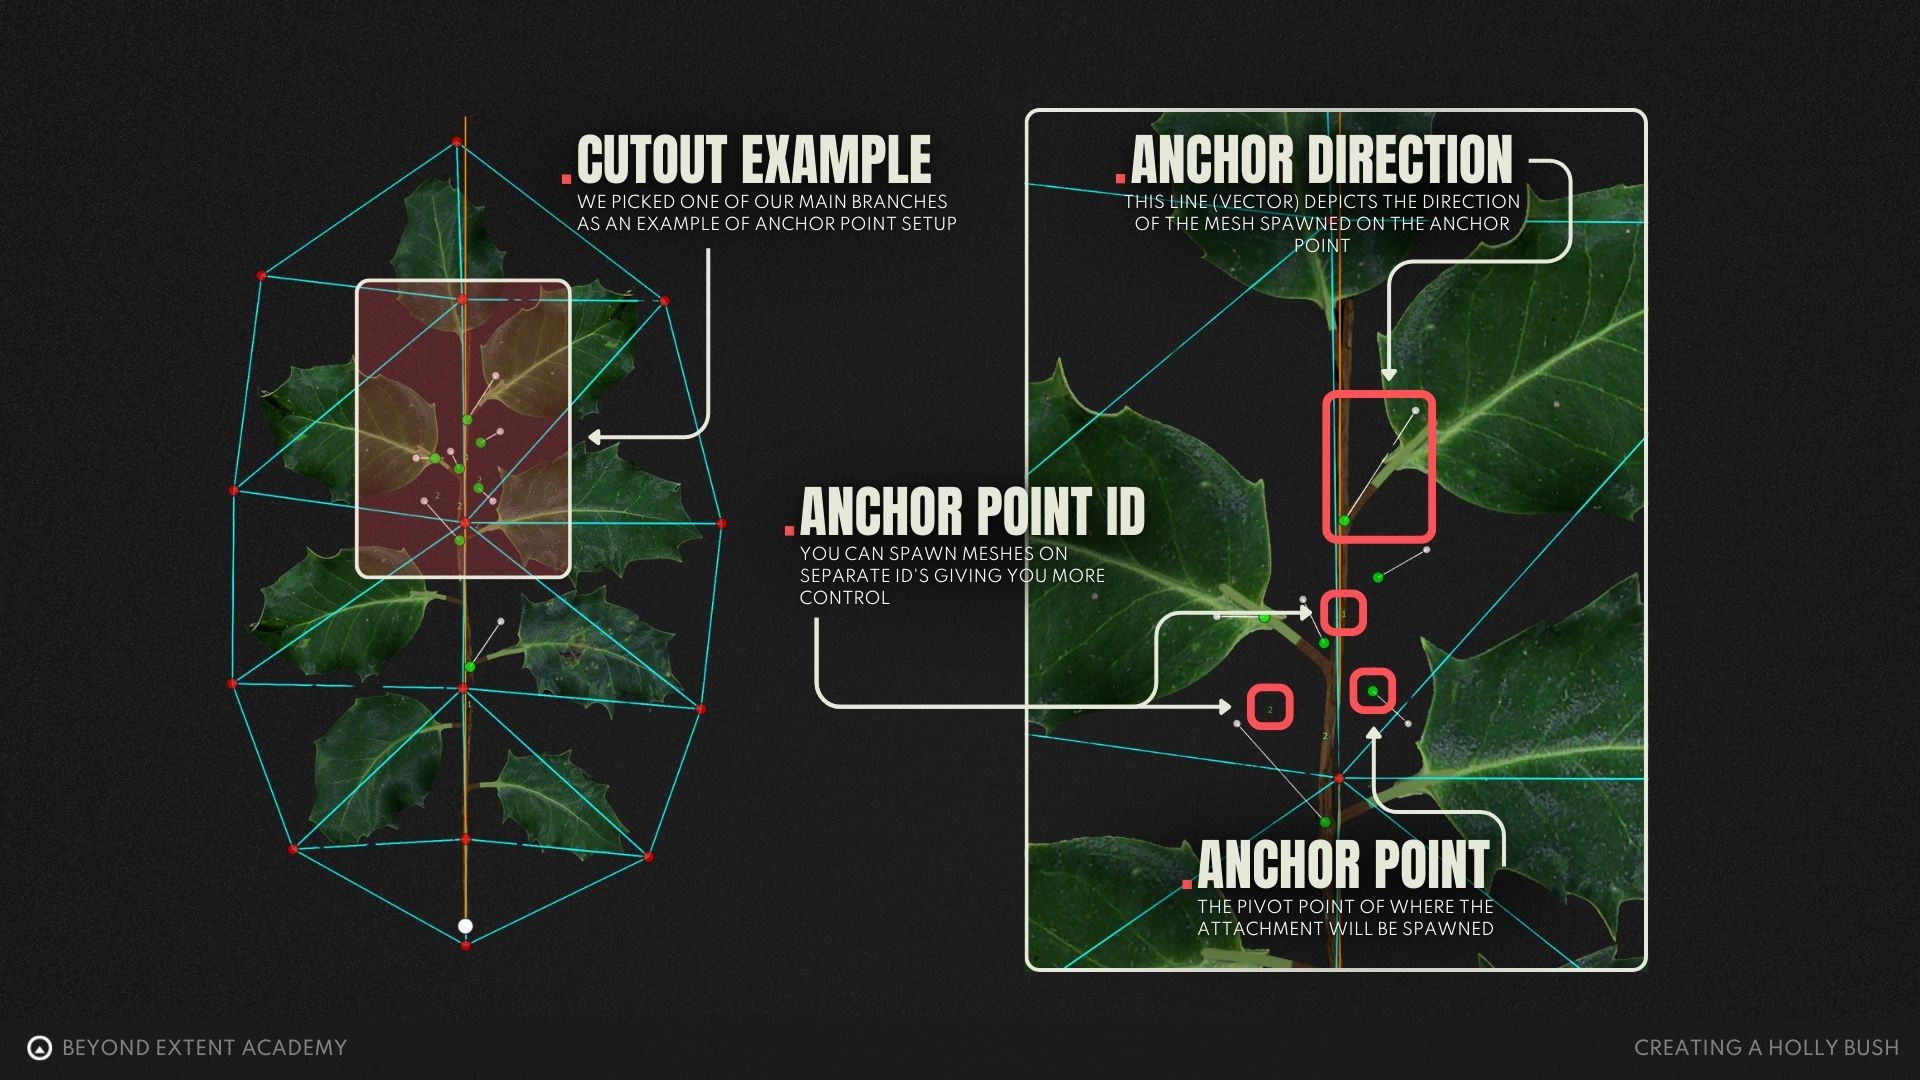
To decide where these branches will be placed we are also going to add anchor points on our previous layer. These allow us to pick the specific spawn point of a layer we add op top of it.
This modular system with multiple modular layers of branches gives you a lot of control of your foliage and allows you easier control of the individual sections of a piece of foliage compares to working with less layers.
As we have all branches set up correctly with anchors now, we can finally start adding some greenery to our foliage, which is what we will be doing next.
Setting up leaves
When setting up our leaves keep in mind that this does not mean that we won't ever have to go back to previous sections to adjust our branches or even the trunk, as we will see later in this lesson.
If it does not look right, there is nothing that speaks against tweaking branches again in order to fix anything that comes up.
First Leaf Cards
Let's start with our big leaf fronds, a branch with leaves attached to them.
Cutting Single Leaves
We just created our main canopy fill, however we are still far away from a good looking result. This is because our current bush is lacking depth and variation. We will now take a look at how to use single leaves and smaller leaf cards to complement the ones we already have attached to the bush.
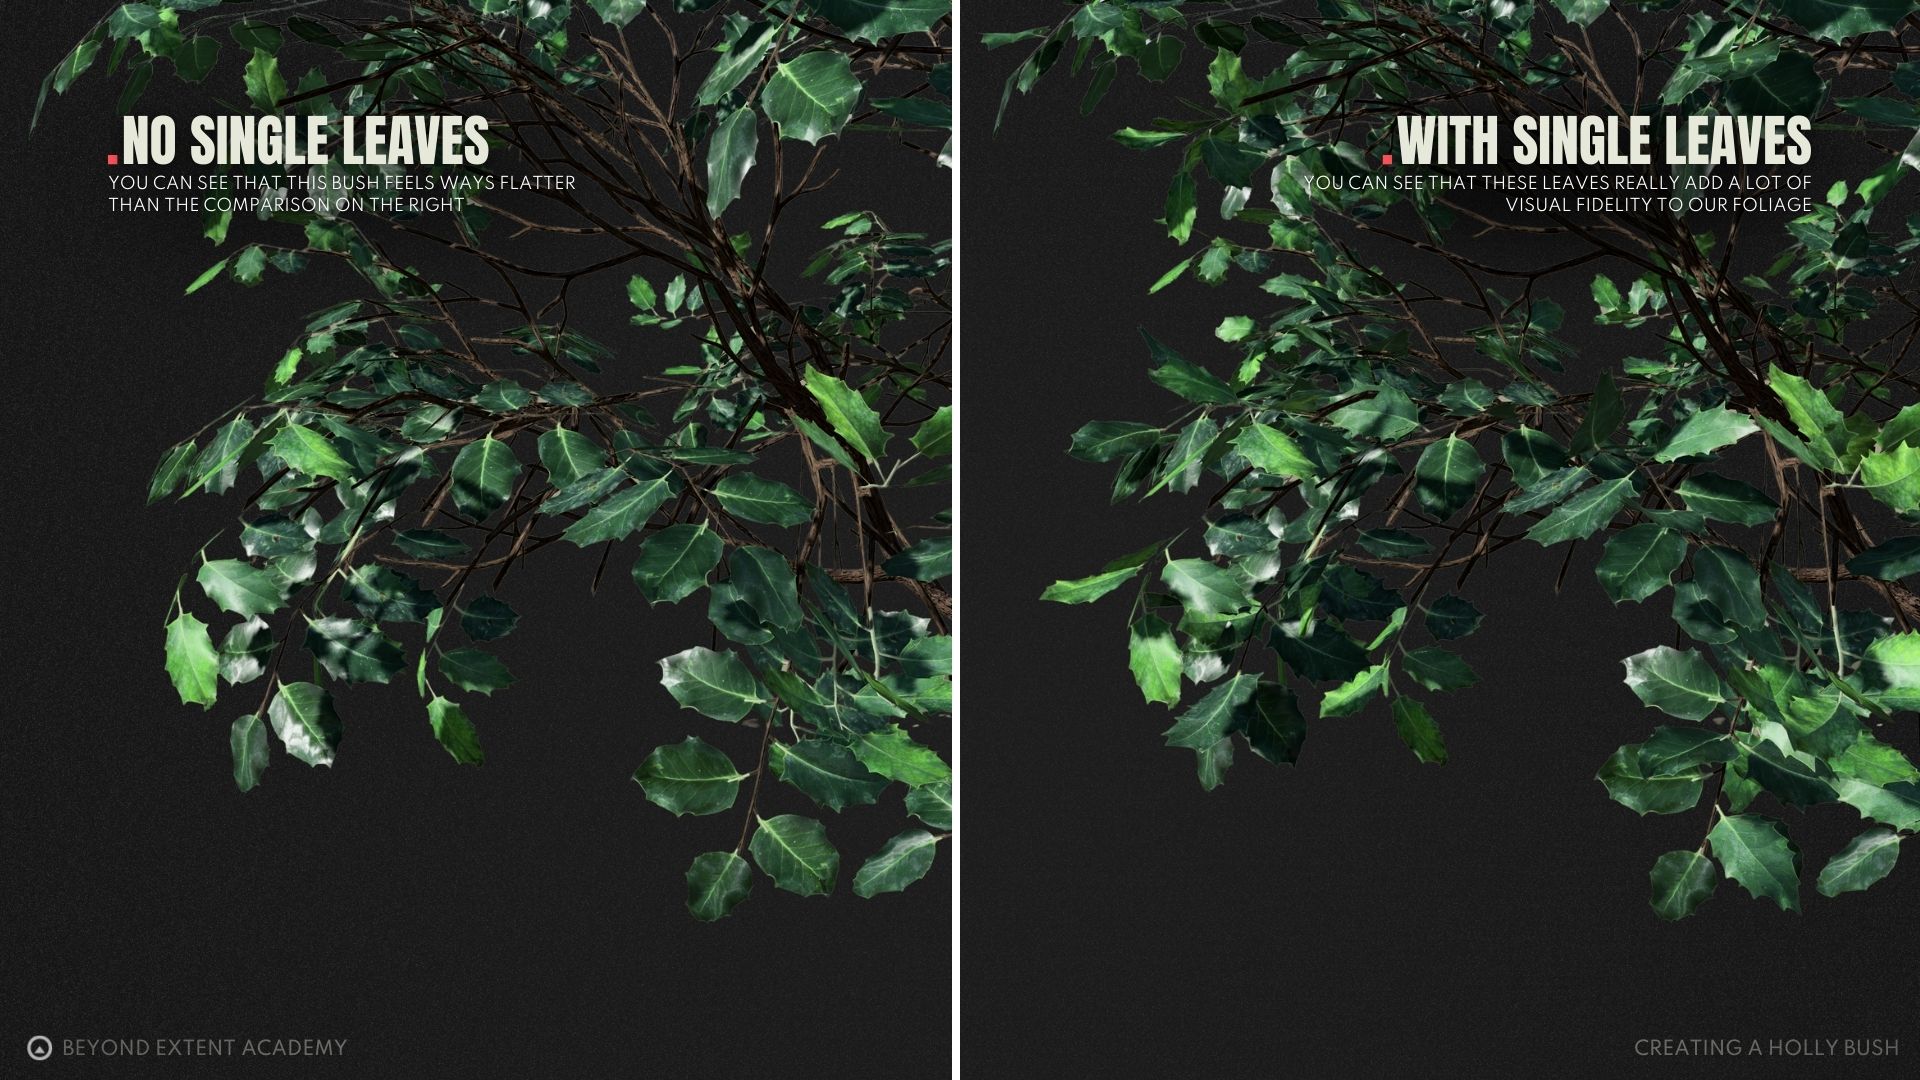
Adding in individual leaves on top of these frond will greatly increase the visual fidelity of them, but to do so we need to more anchor points to our mesh to spawn our individual leaves, so let's start by doing that.
Setting Up Anchor Points
We're going to do the same thing as we've done before, going into our cutout editor again to add some anchor points to our branch cards. These will allow us to then spawn our individual leaves.
Adding Single Leaves
Anchor points are now all setup and in the correct location, so it's time to attach our single leaves to our main fronds. This individual leaves really help the canopy and silhouette stand out and feel more realistic and detailed.
These single leaves can be heavy in poly count but they pay off when it comes to adding realism to the model, so we allow ourselves a few single leaves here and there to push the canopy density.
complex anchor points
To this point we've used anchor points in a very simple way. But we've gotten to the point where we need additional control for multiple separate spawn locations.
One for our branches with individual leaves and one for the ones without these additional leaves.
- ID 1 - Our branches with the individual leaves.
- ID 2 - Our branches without these individual leaves.
polish
Our bush could now be called done. However, there can be still made some fine tuning to our plant to make it look stand out.
When using SpeedTree, we use procedural generation systems to our benefit. These follow specific rules, are really easy to tweak but they can sometimes create unwanted or wonky results.
It could happen that some leaves intersect by accident or branches spawn in areas they should not logically be spawning. This can be fixed when doing some final adjustments, which are part of hand tweaking the foliage to bring it to final quality.
branch setup fine tuning
First section of this polish pass will be going through the different layers of branches and making sure that all of them are correctly rotated, look unique and create a nice fill effect for the entire bush.
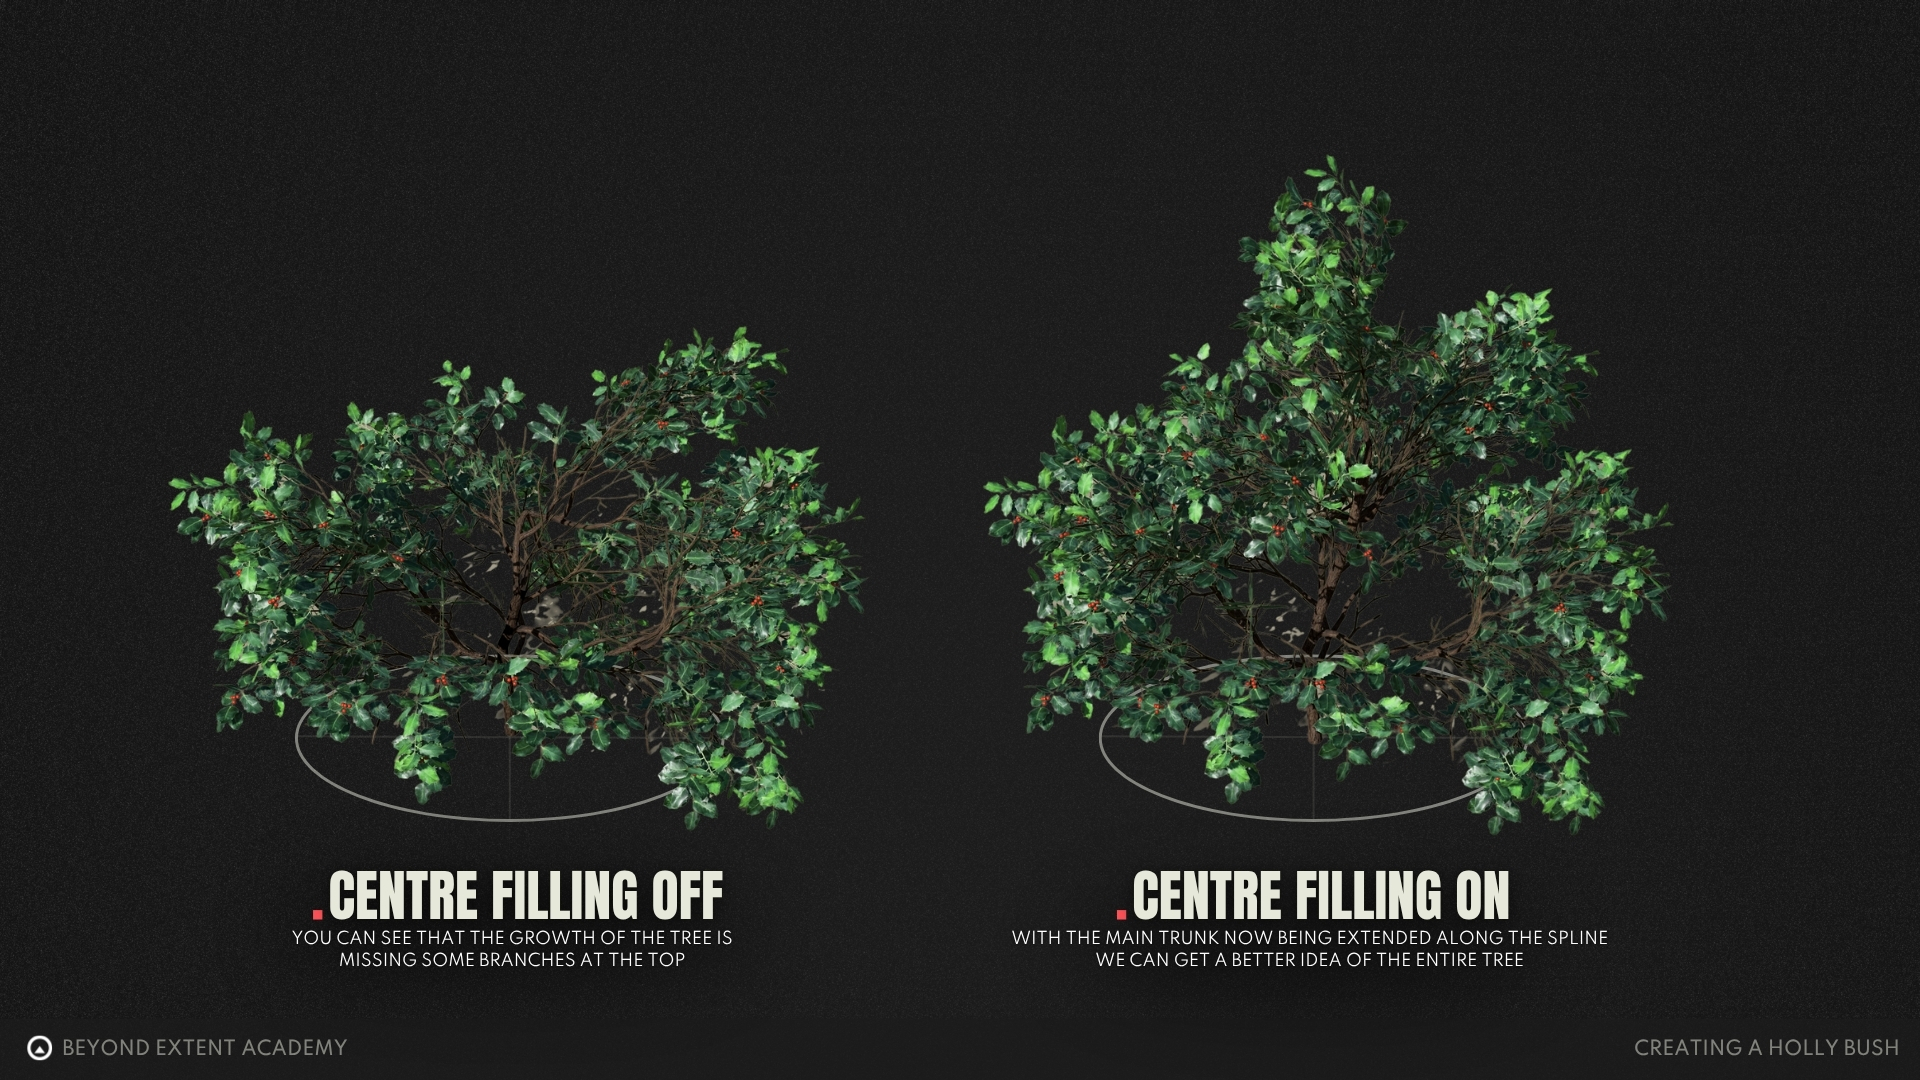
Filling in the Center
During the polish phase I also notices that the center of the tree is not as dense as they usually are in real life, so let’s get this fixed.
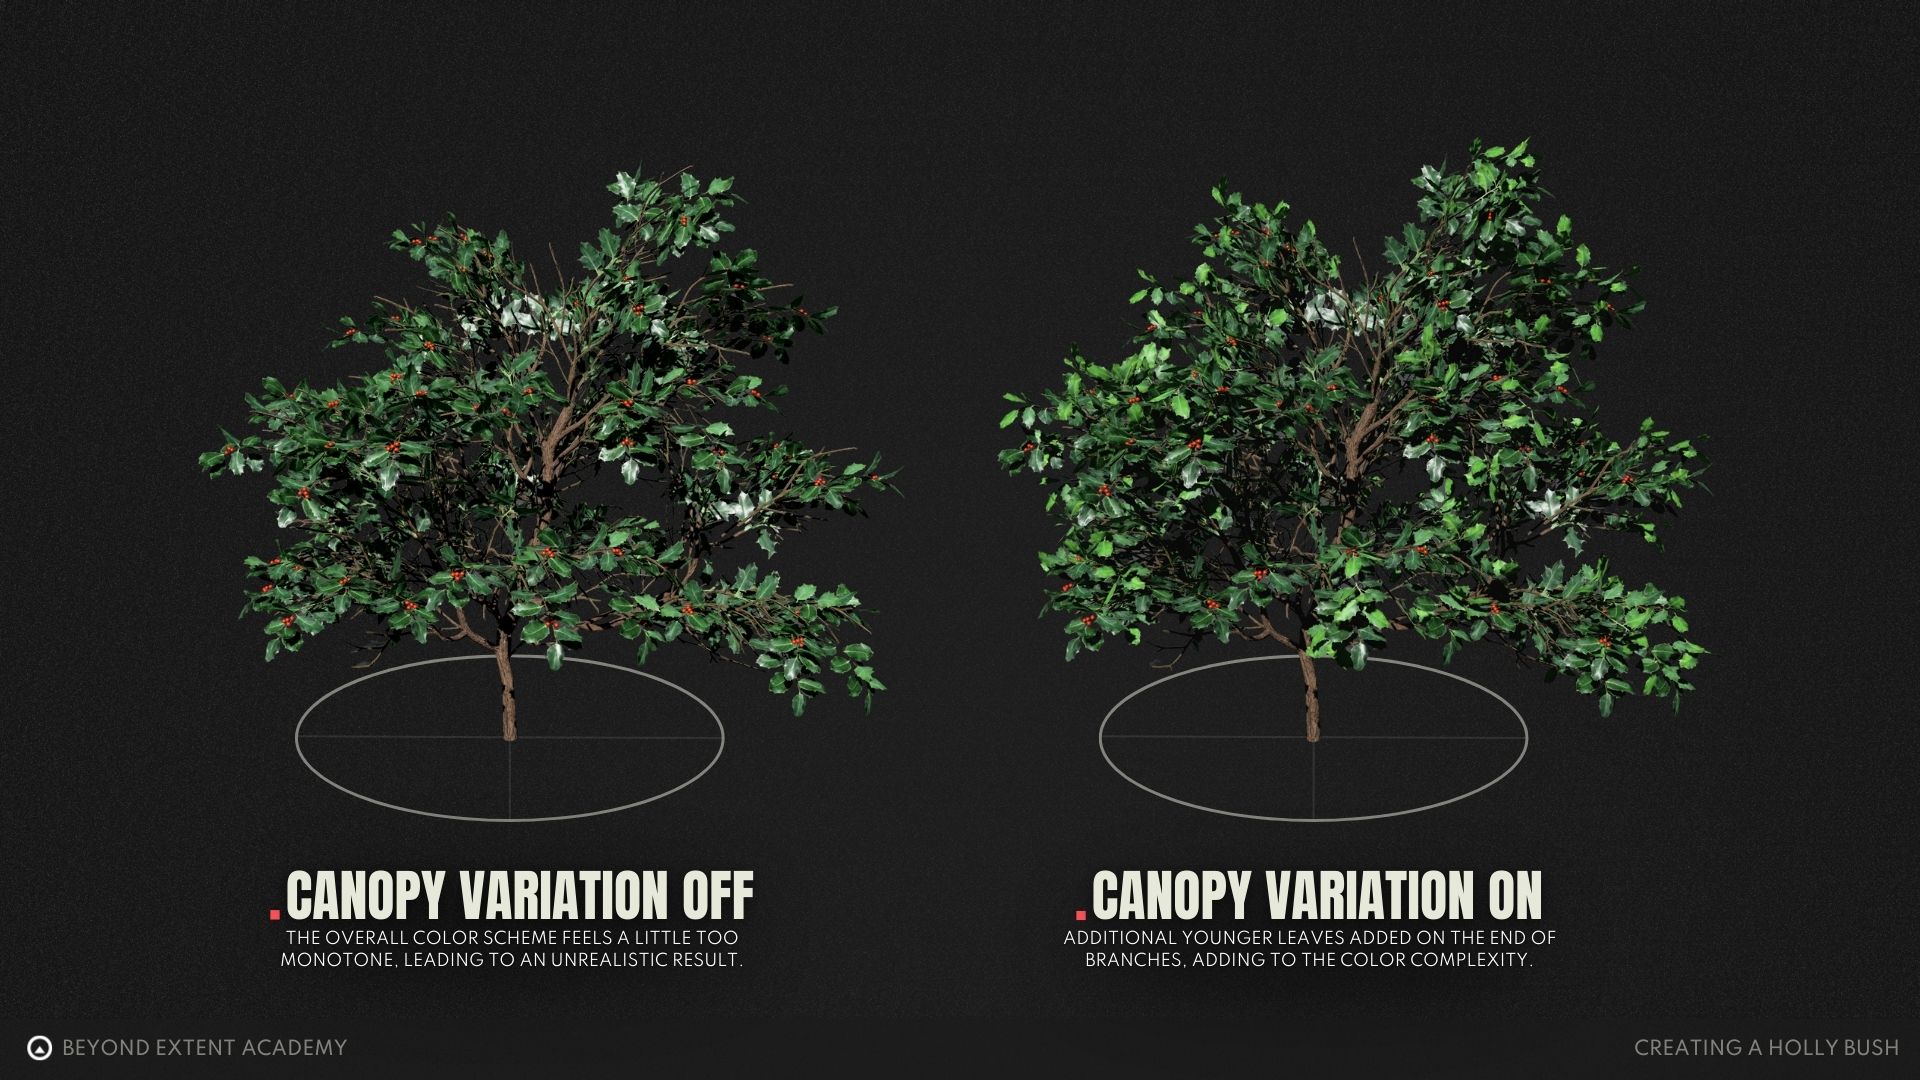
adding canopy variation
At this point we've not really made use of our leaves that have different colors. Doing this will add a layer of color complexity which will really add a nice bit of variation to our bush.
This section works in two parts, first let's add our young leaf branches that extend out of the canopy and then continue by adding individual leaves to our canopy for additional details that look really nice.
Adding Leaf Extensions
Next, some leaf adjustments can be made to add some more variation.
VIDEO EDITING NOTICE:
Merge this video with "Adding Young Leaves"
Interior leaves and structural polish
Materials
Up until this point we've been ignoring our bark and branch materials, for our bush this setup is pretty easy, so let's take care of that now that we are getting closer to getting this foliage into our engine.
Bark Material
Now that our bush is completed, we can add a quick bark texture to the holly plant. For that we will take a scanned texture, as this is not main part of the course. Look at your references and pick what fits the best. Do not forget to also use the same bark in your texture branches, otherwise they will look disconnected.
Just as a reminder, this is where you have to all your textures when setting up a new material.

Berry attachments
Last but not least, we should attach the berries to the bush. In the following section we will take a look at ways to properly get the berries attached to the bush.
These additional pieces like berries can then potentially be used for gameplay systems by other members of the team later down the line, for example to build a system of resource gathering in the game you are working on.
final polish
Now that we have all the components in place it's time to put some final handcrafted polish on the entire bush so we can really push it to the next level.
LOD SETUP
Before exporting to the engine, there is one final step we need to ctake into account, which is creating and setting up proper LOD's. This helps reduce the geometry based on the distance to the camera, making it more efficient to render more on your screen.
More information on optimisation and LOD's can be found in our OPTIMISATION Lesson
Importing and exporting
The final step in this session is to get our plant into game engine. We will look into how to export the holly bush to Unreal Engine, set up a material and check it out in the viewport.
We can now finally enjoy all the hard work of our foliage in our environment. Handcrafting a piece of foliage from scratch takes a lot of time but with this all out of the way you now know how to craft a piece of foliage from scratch yourself.
RESOURCES
⚠️
MISSING RESOURCES