


to do list (Admin only)
⚠️ lesson in EARLY ACCESS ⚠️
Please keep this in mind when viewing this lesson as we still need to do a final pass on it.
Feel free to share anything that is out of place in the feedback form at the bottom of the lesson to help us improve it.
Thanks and happy learning!
LESSON OVERVIEW
Once you understand the fundamentals of lowpoly modeling [lowpoly modeling lesson link] it’s time to take the next step and add all the final touches with a highpoly. It’s the step that can transform a model into looking real, or if you’re doing something stylized it can give it the final polished look.
We’ll be covering the various methods to create a highpoly model, but first we’ll establish the difference between a lowpoly and highpoly and when they should be used. You’ll also learn how to choose the correct highpoly method to achieve your desired result.
⚠️
Missing LESSON OVERVIEW
WHAT IS HIGHPOLY MODELLING?
Pretty much every industry that uses 3D models uses highpoly assets. For many like advertising, film, or 3D printing the highpoly is the final asset that is rendered or fabricated. For video games though, the lowpoly is the one that the players see and the highpoly is just a texturing aid. So let’s break down what a highpoly is.
A highpoly is essentially a version of your asset that looks exactly how you want the final result to look. It has all the little details, curved surfaces, bevels, and rounded corners that make a model look finished. With all that added detail the model becomes far more complex though. So you want to make sure you’re ready before you dive in because it becomes far more difficult to make changes.
In video games it’s important to create two assets, the lowpoly and highpoly. The lowpoly will contain all the important shapes, but it’s efficient and doesn’t waste triangles so that the game can run smoothly. We can use a process called Baking to transfer all the details and smoothness of a highpoly onto the lowpoly so that the in-game model can be both efficient and look great. We’ll cover the process of baking in another lesson.
For video games specifically it will be very important to have good topology for the lowpoly to make it performant (another word for an efficient model that doesn’t make the game run slow). If it’s being animated, topology is even more important because the layout of the polygons can effect how things look when the model is bent or deformed.
The highpoly topology, fortunately, doesn’t matter at all in the end. The only concern is the possibility of making changes and the challenges of doing that on something that is messy. Since the highpoly model won’t be going into the game it only needs to exist to bake its details onto the lowpoly. As long as it does that cleanly nothing else matters too much. Because of that, there is a lot of freedom in how you create it.
CORE CONCEPTS
DIFFERENT WAYS TO CREATE A HIGHPOLY
There are a handful of ways to create a highpoly model. There are tradeoffs for each when it comes to control and speed. The most common methods are: Subdivision Modeling, Polishing in Zbrush, using the Bevel Shader in Marmoset Toolbag, Sculpting, and Photogrammetry. We’ll go over each but go into more detail on the most relevant ones to this lesson which are Subdivisioni Modeling, Polishing in Zbrush, and the Bevel Shader. Then we’ll talk about how a professional environment would choose which method they are going to use to help you make your own choice.
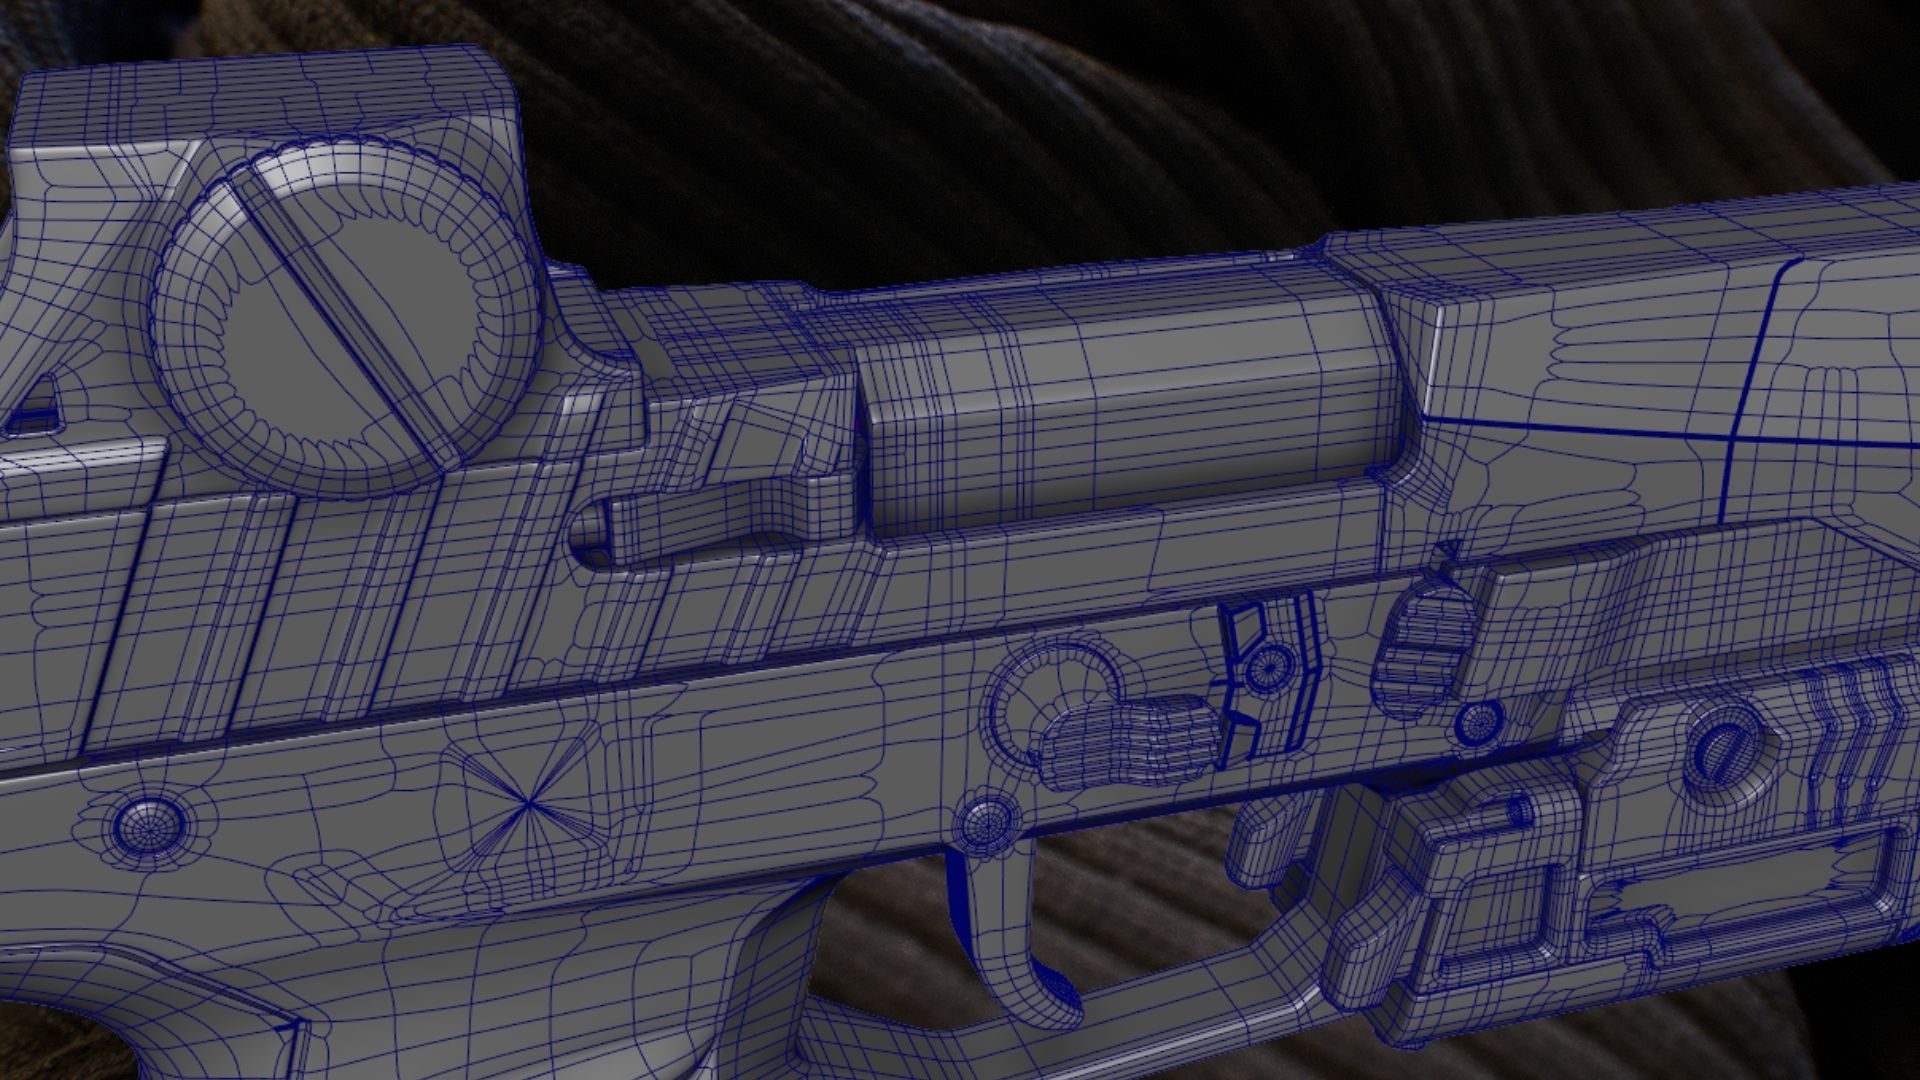
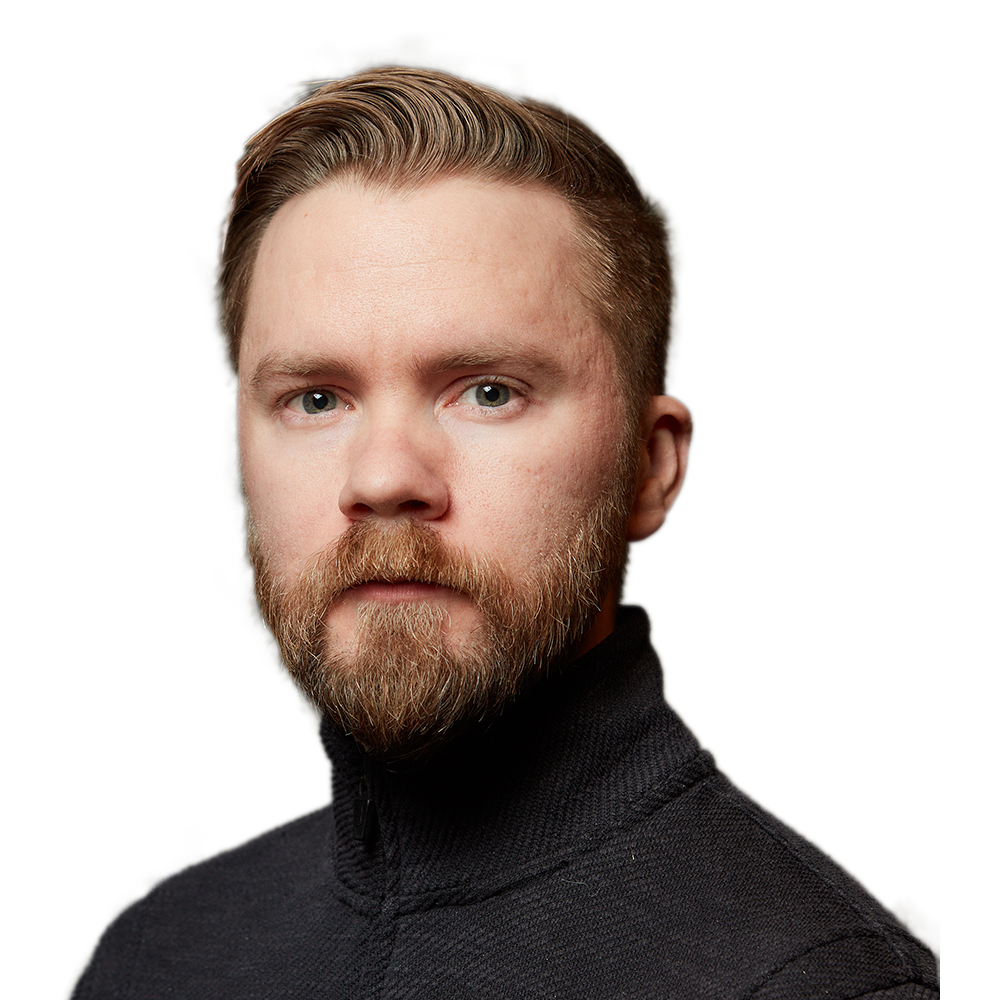
Subdivision Modelling
Subdivision modeling, commonly shortened to SubD, has been the go-to method of creating the highpoly for a long time. It’s a way of adding extra divisions that smooth out your model. It’s probably the oldest method and gives you the finest amount of control. It’s an essential technique to learn and when you’re looking for the way to have the most control over the highpoly you will probably use this. It’s also a common requirement for many final assets outside of the game industry. SubD can create some fantastic results, but it is a time intensive process.
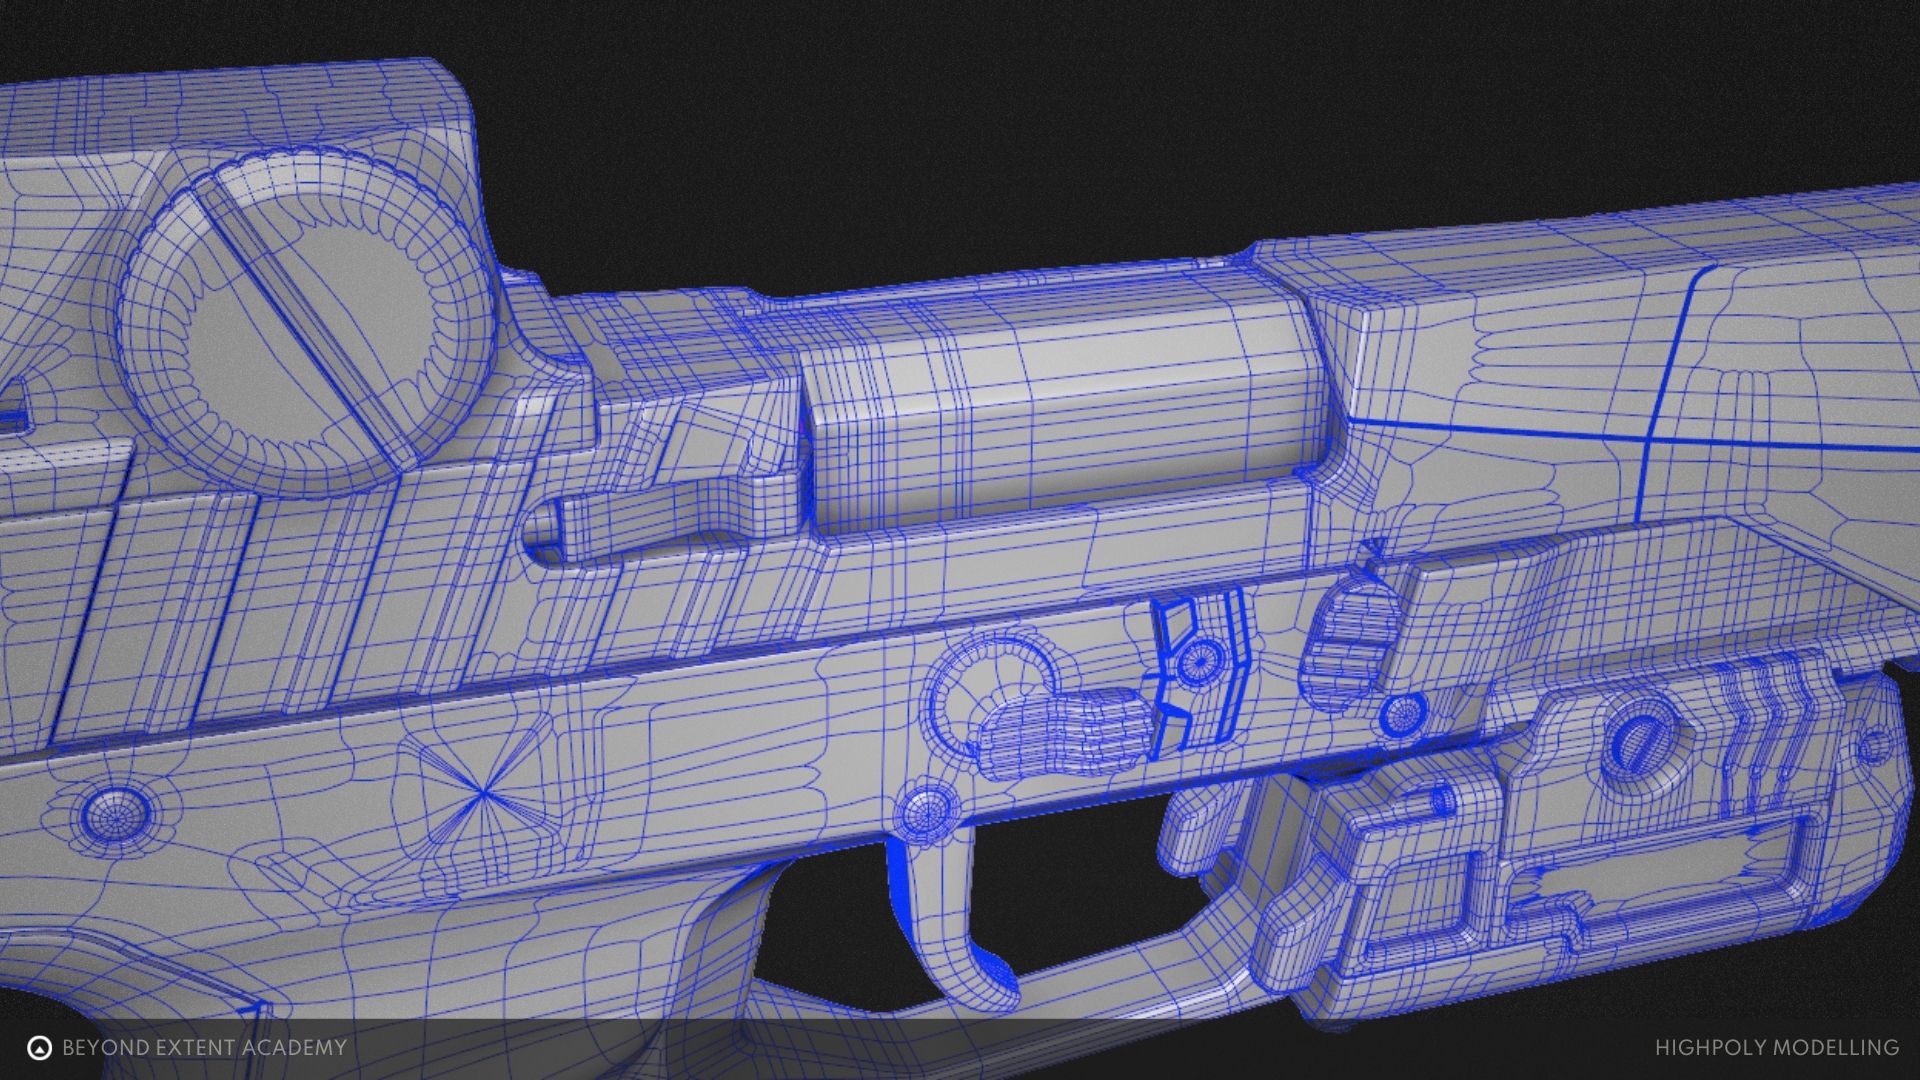
Subdivision Levels
Using subdivisions generates a certain number of extra edges between the existing edges on the model. Then it uses an algorithm to smooth between all edges.
You can control how smooth your model appears by altering the subdivision levels. Higher levels will add more divisions, or edges, and produce smoother results, but it can also effect computer performance. Leaving it at the default works well in most situations.
Different software use different words and slightly different tools to achieve the same SubD results.
In Maya it is called Smooth Mesh Preview
- Toggle it on by tapping the “3” key.
- Toggle it off by tapping the “1” key.
- You can also see the outline of the unsmoothed mesh by tapping the “2” key.
- You can adjust the level of subdivisions in the Attribute Editor.
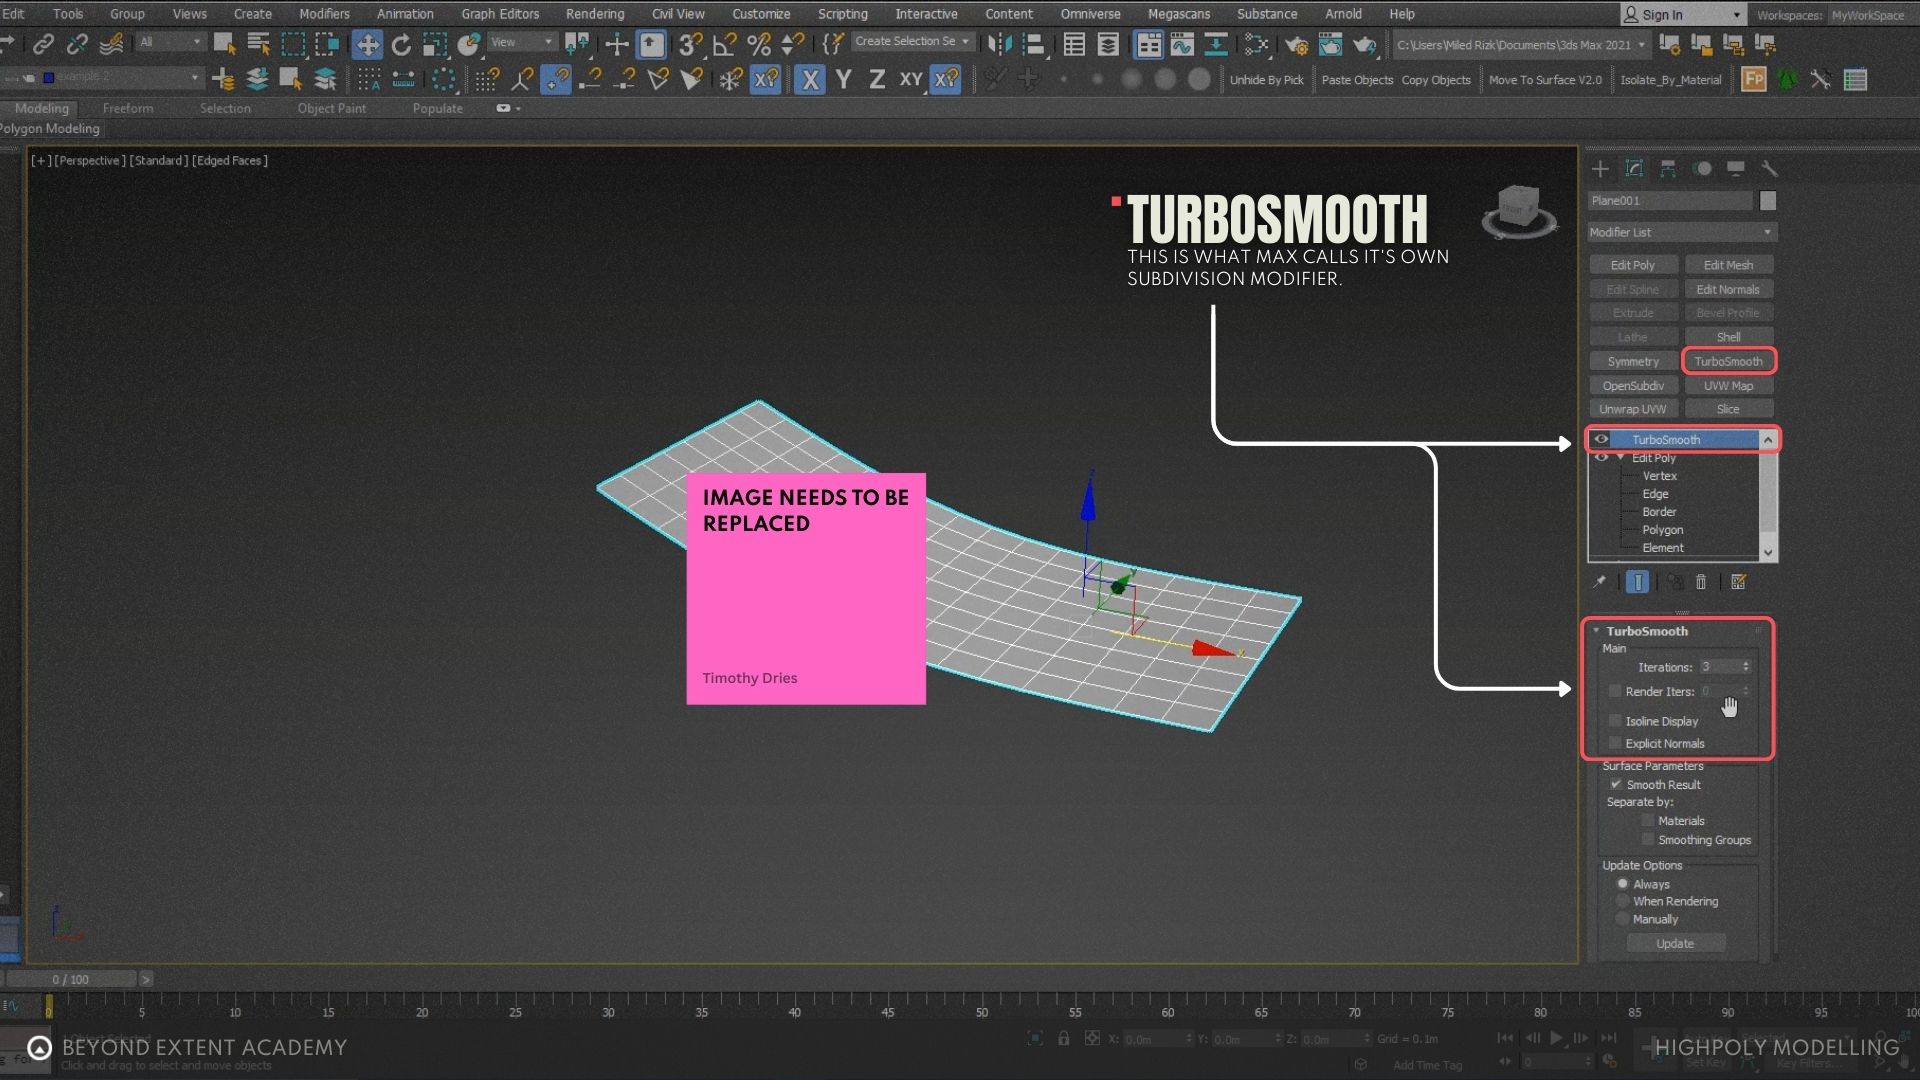
In 3ds Max you can use the modifier called Turbosmooth.
- You can toggle the visibility of the modifier in the tool pane to see the original mesh.
- Adjust the amount of subdivisions by changing the number of Iterations in the options.
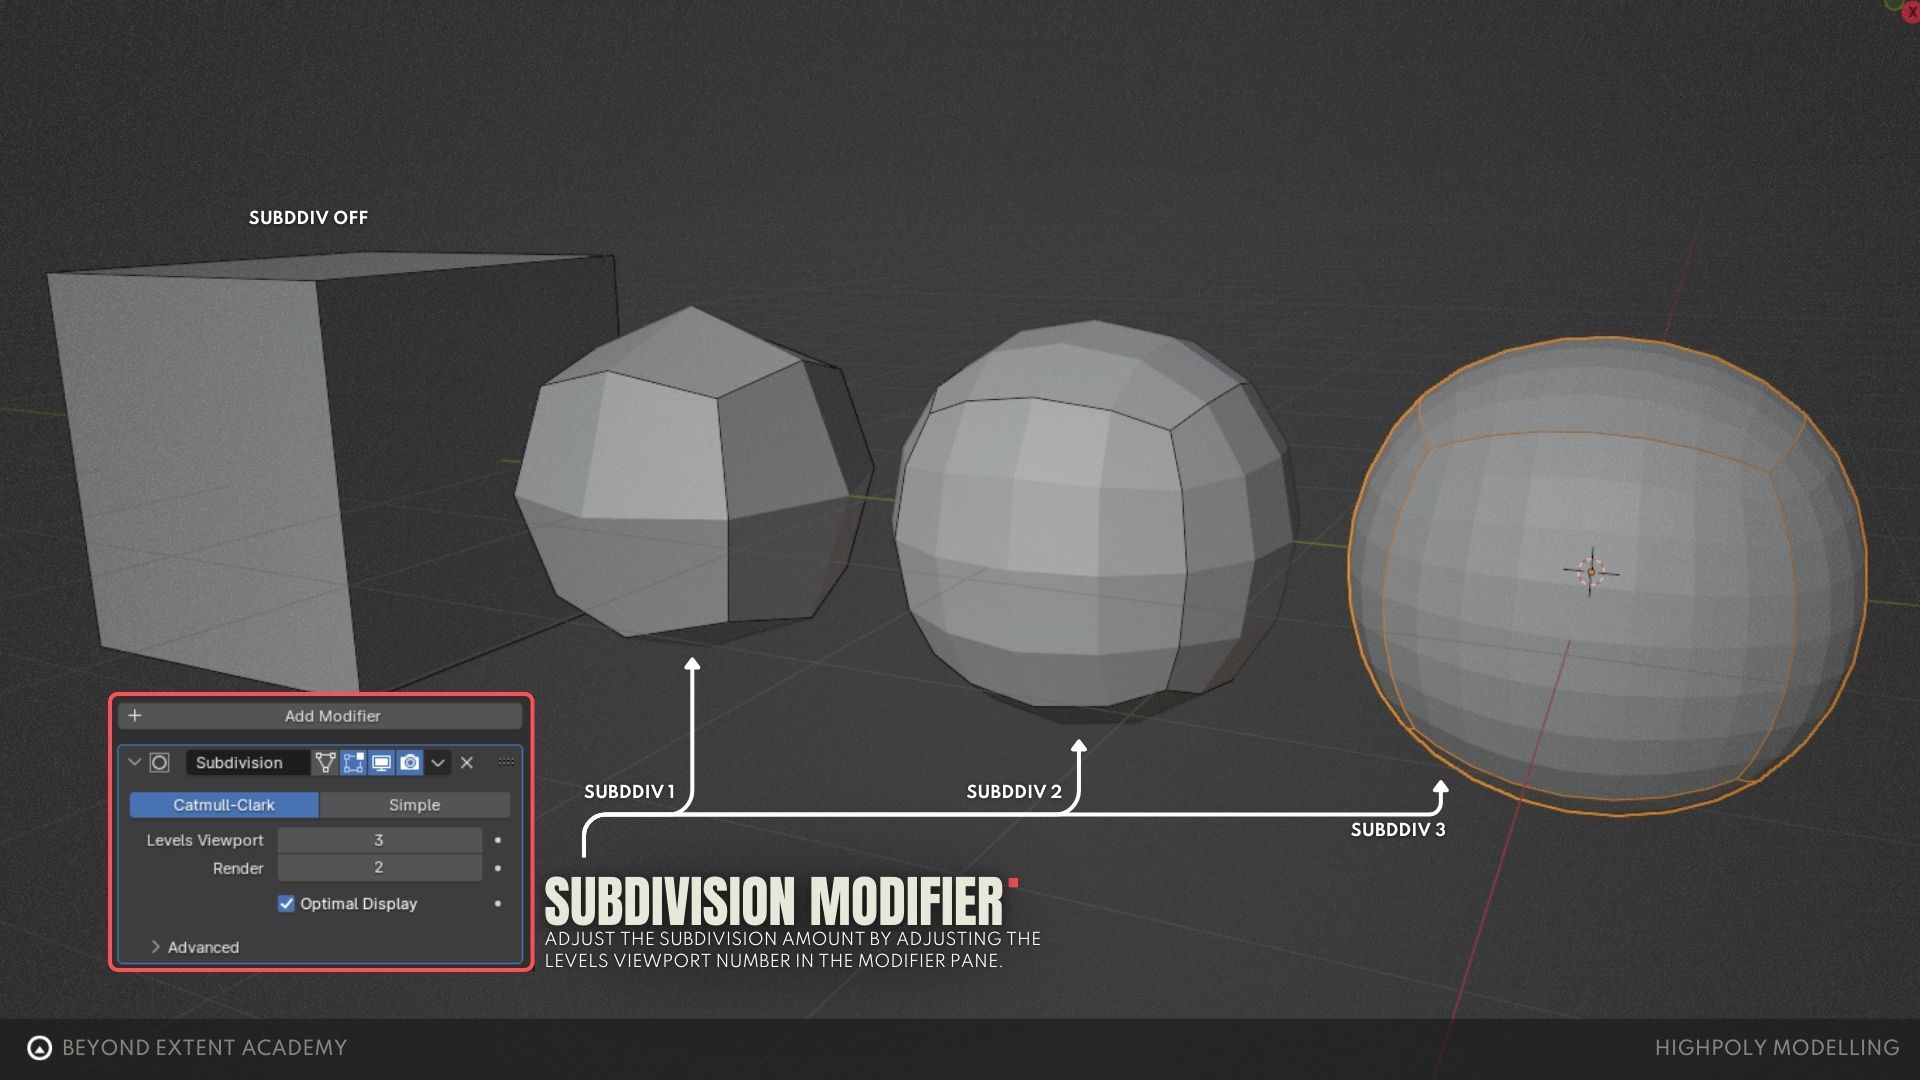
In Blender use the modifier called Subdivision Surface.
- Adjust the subdivision amount by adjusting the Levels Viewport number in the modifier pane.
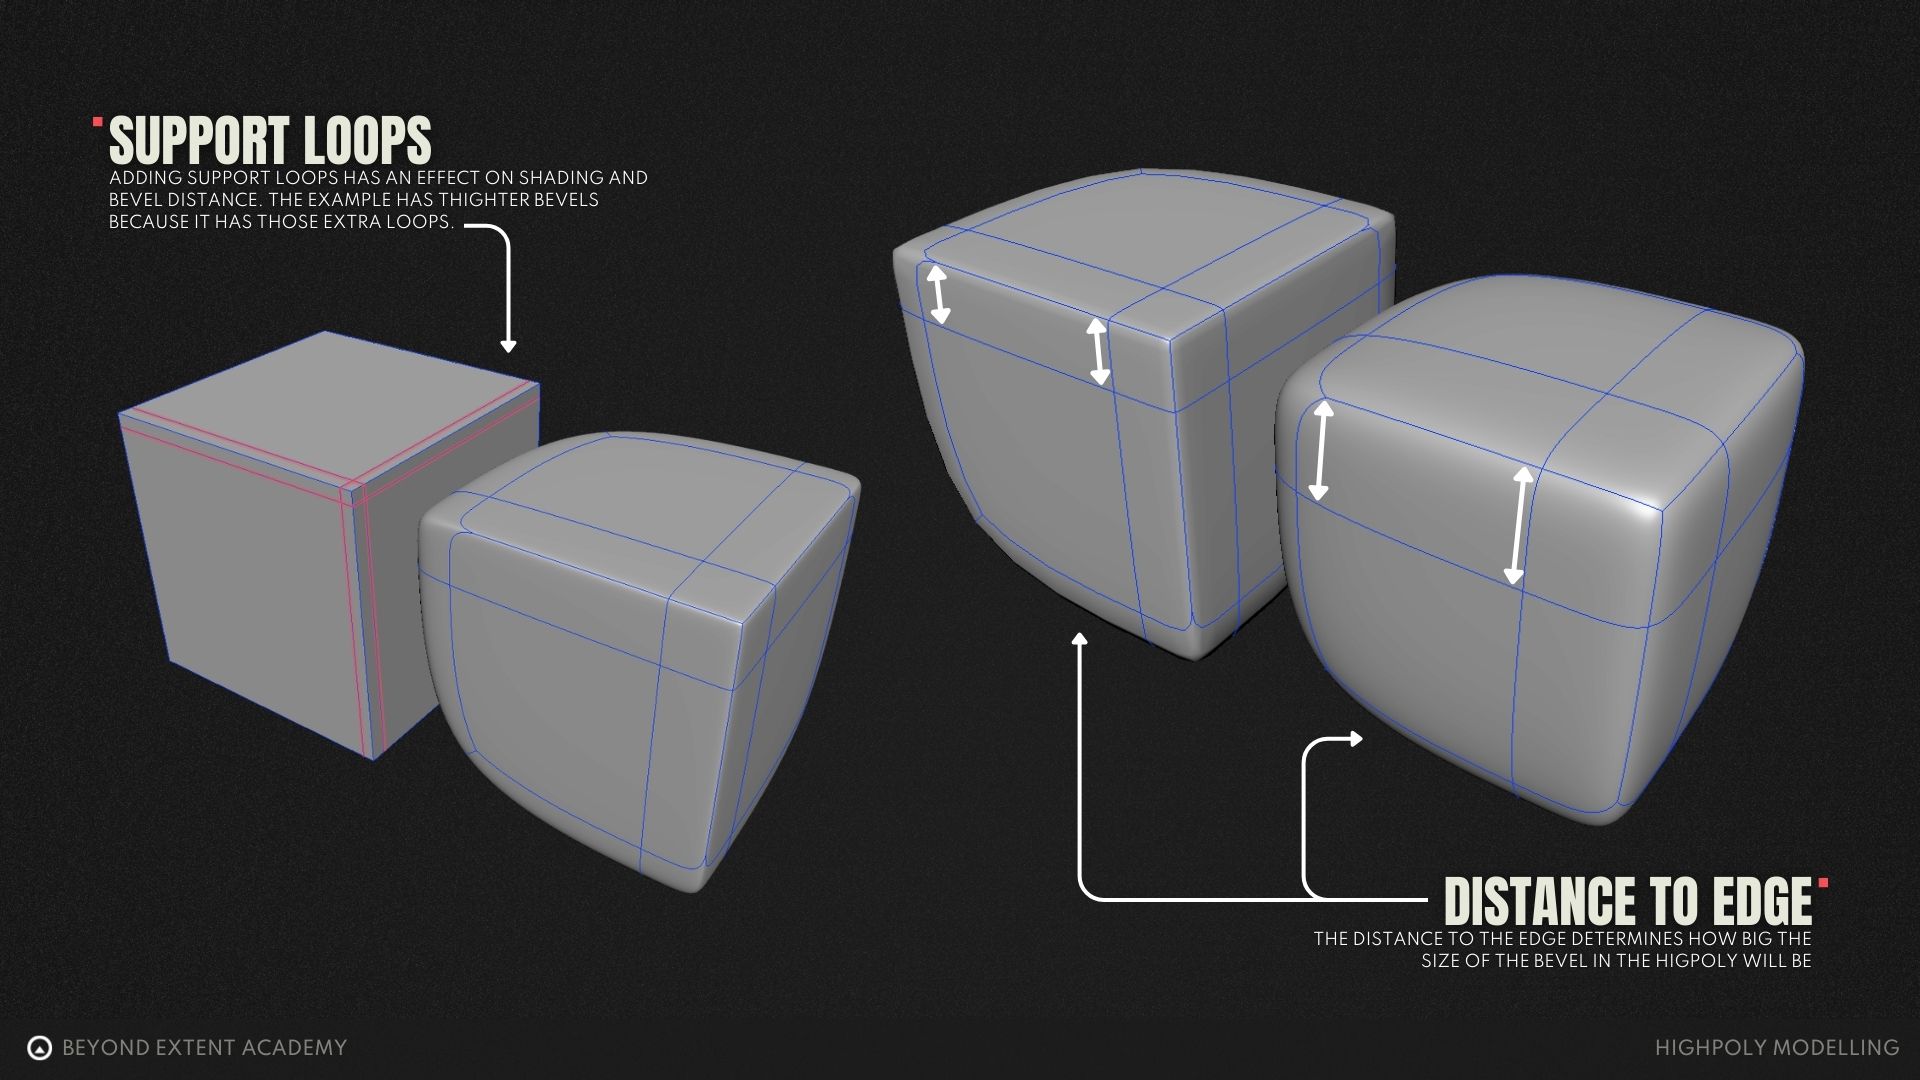
Edges and Support Loops
One of the most common use for subdivision is for the purpose of rounding, or beveling, edges. You can control how wide or sharp these bevels are by adding extra geometry close by. This is commonly referred to as adding support loops, or support edges.
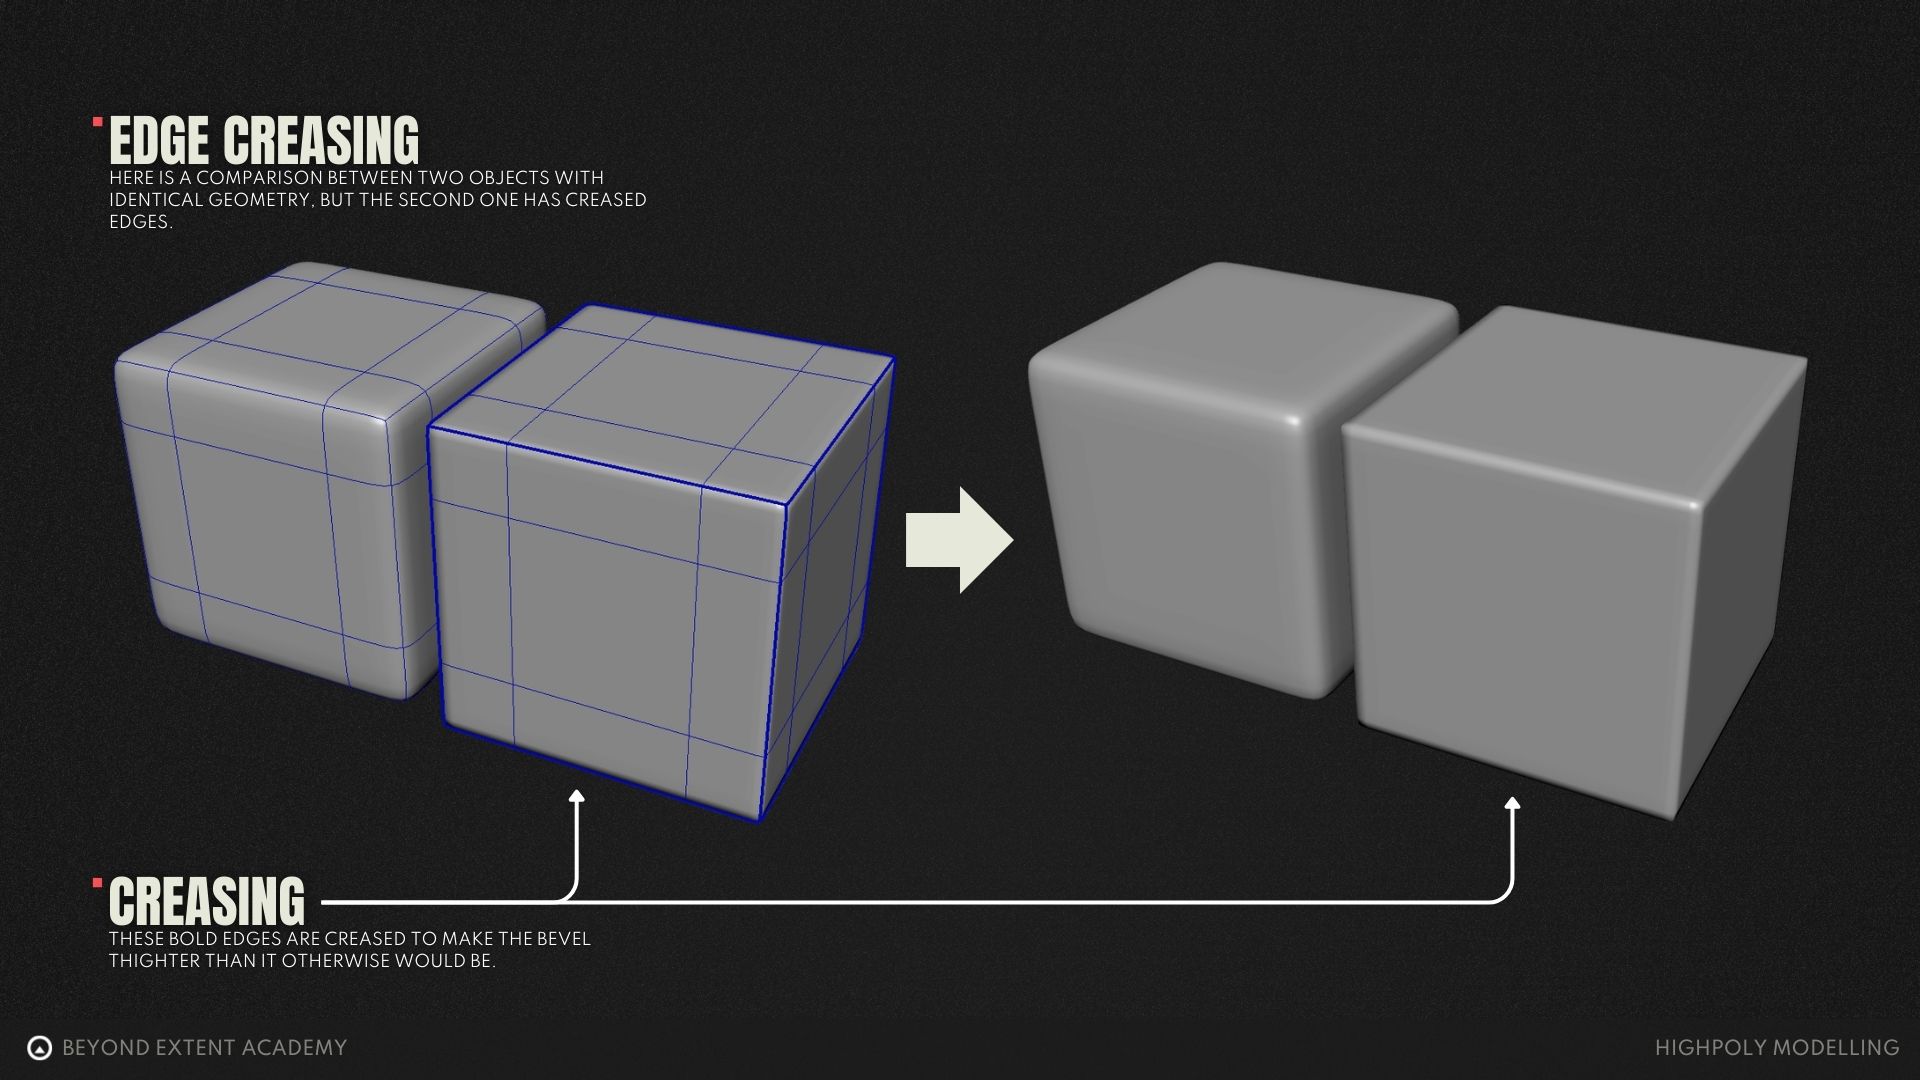
Creasing
Creasing tools can offer some fine adjustment to increasing the sharpness of an edge. But this isn’t strictly necessary.
Quads, Tris, and N-Gons
Subdivision typically works best with a clean mesh with even quads. But a lot of shapes make keeping only quads difficult or impossible. So it’s good to know how other types of geometry react. In some cases they can even be beneficial.
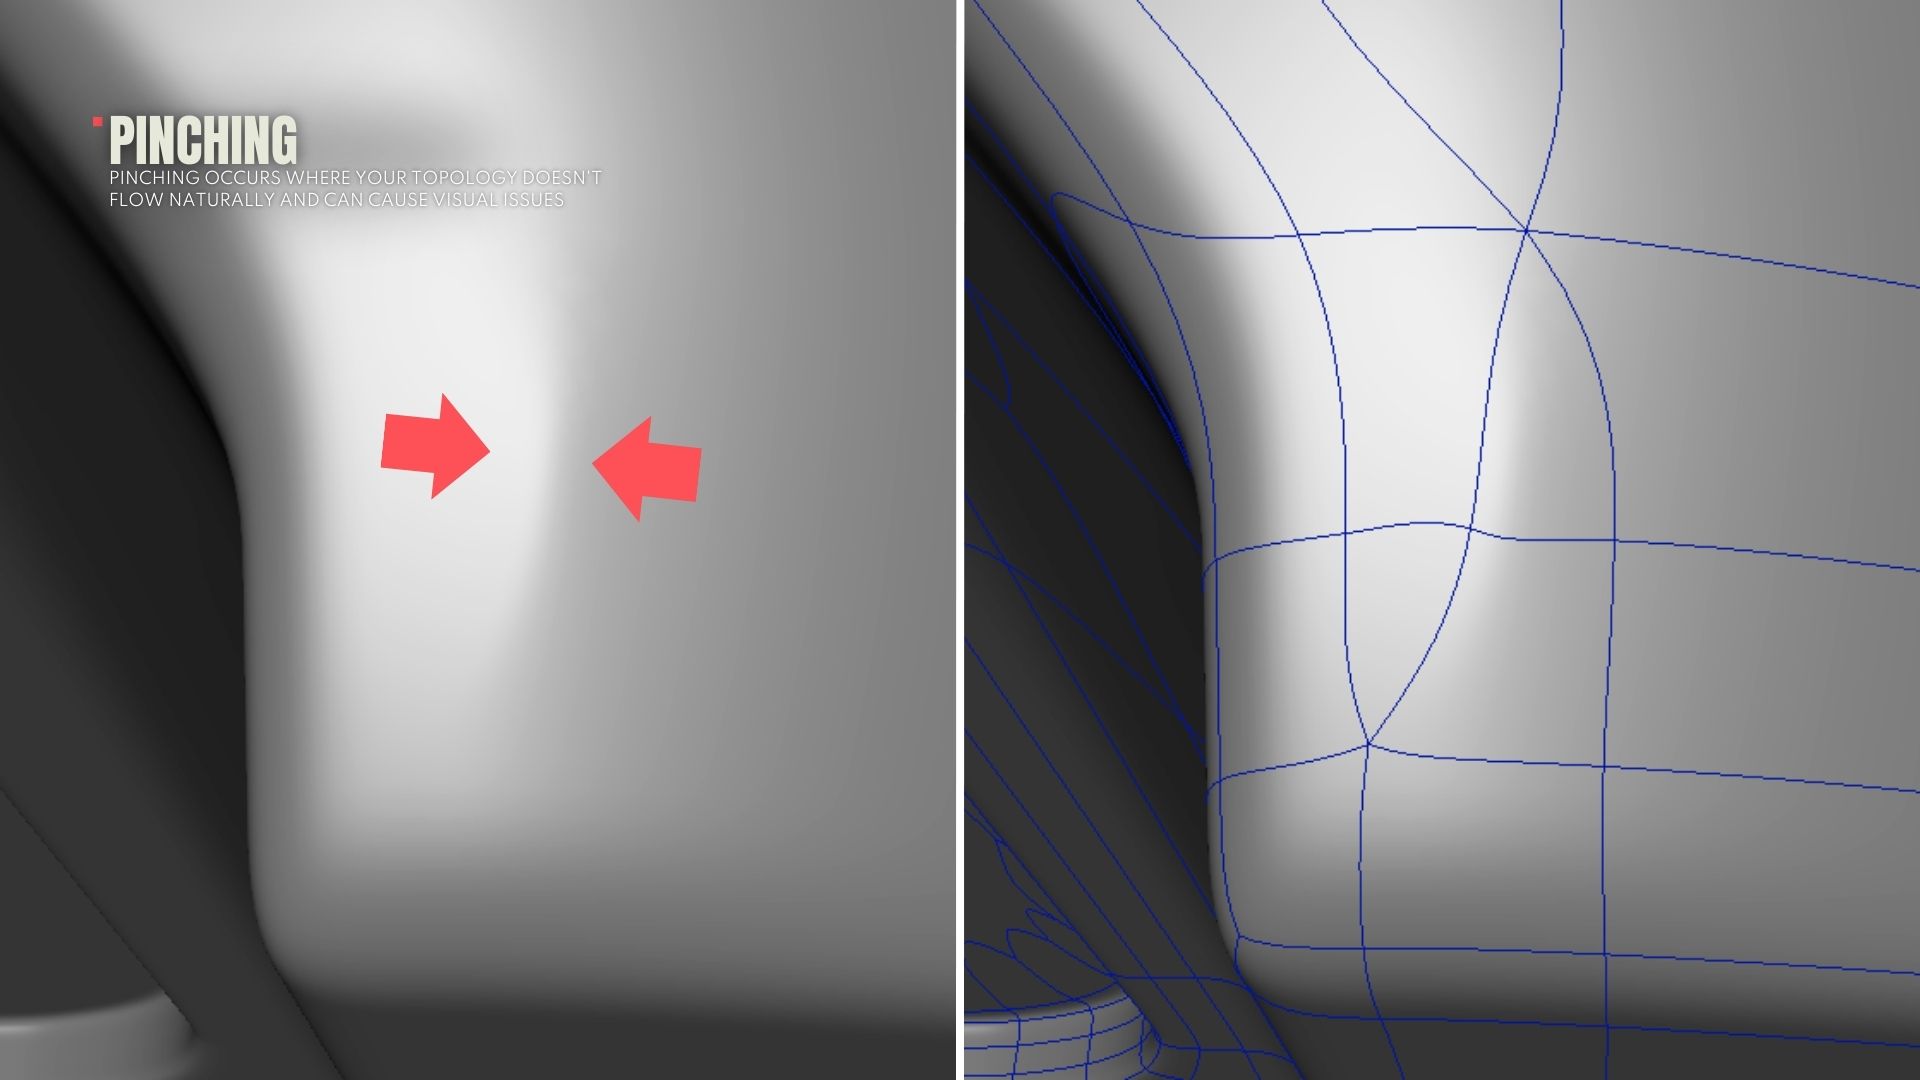
It can be helpful to think of subdivision smoothing as a group of people pulling on a bed sheet. Four people pulling on all the corners can create a nice, taught, smooth surface, like a quad. If you have three people pulling, two on the corners and in the middle of the opposite side you’ll probably end up with pinching and wrinkles like a triangle. If you have five or more people pulling it might be smooth, or it might create wrinkles depending on where they are pulling from and what direction they are pulling to.
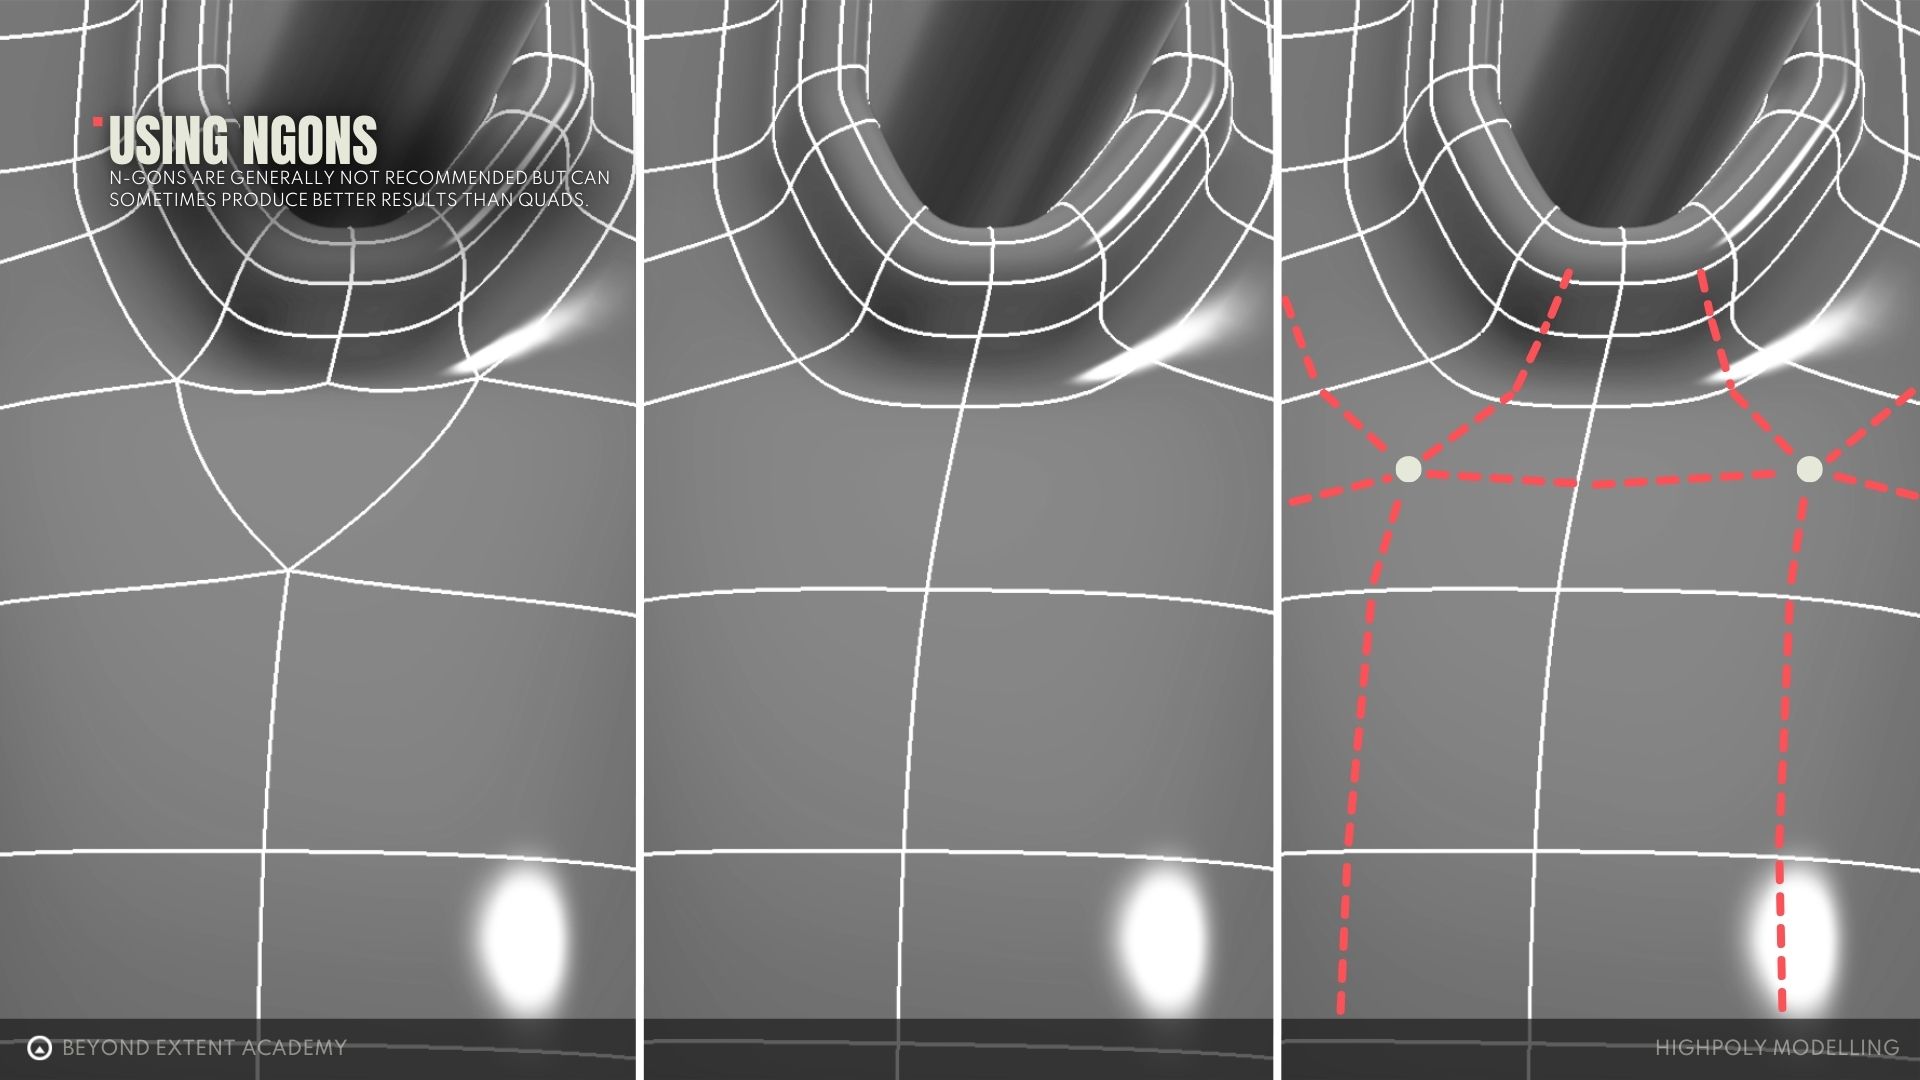
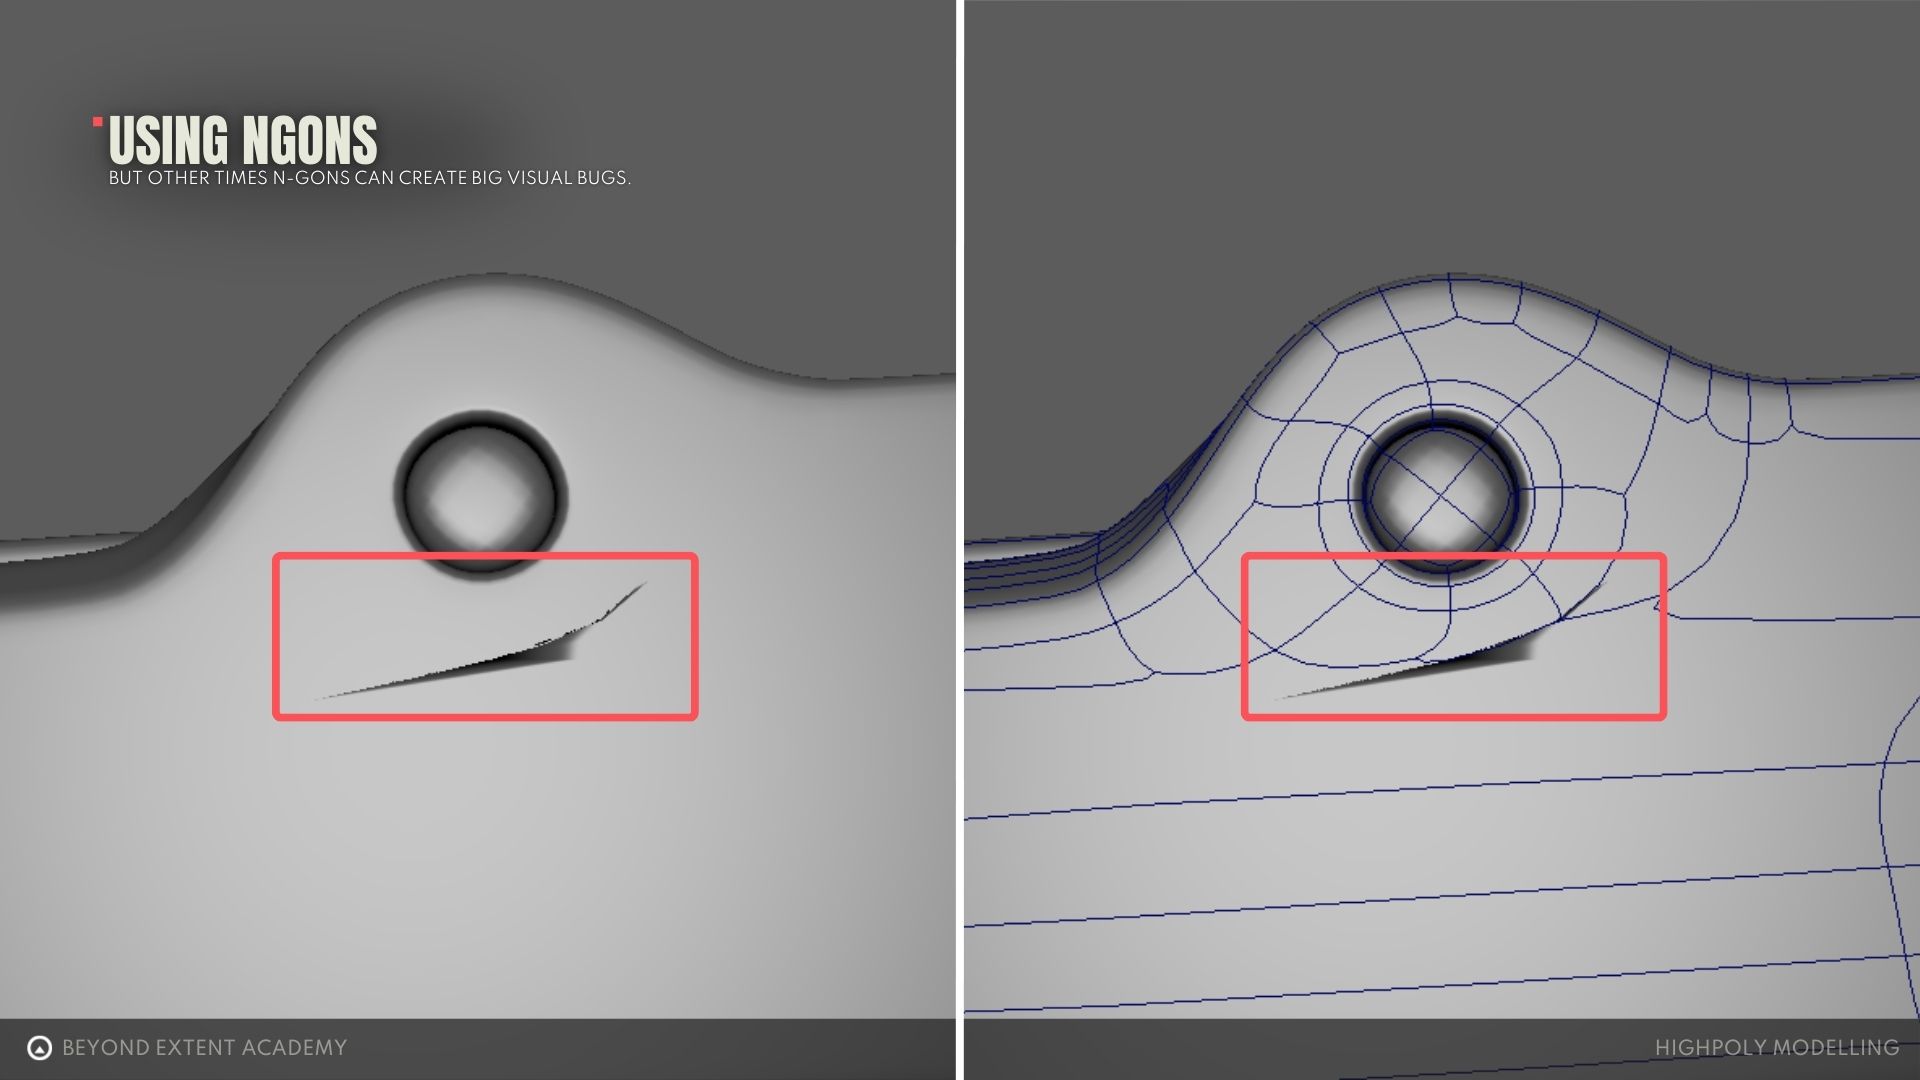
In the end the key take away should be that no form of geometry is inherently bad as long as your end result looks good. So feel free to try things out.
Topology Flow
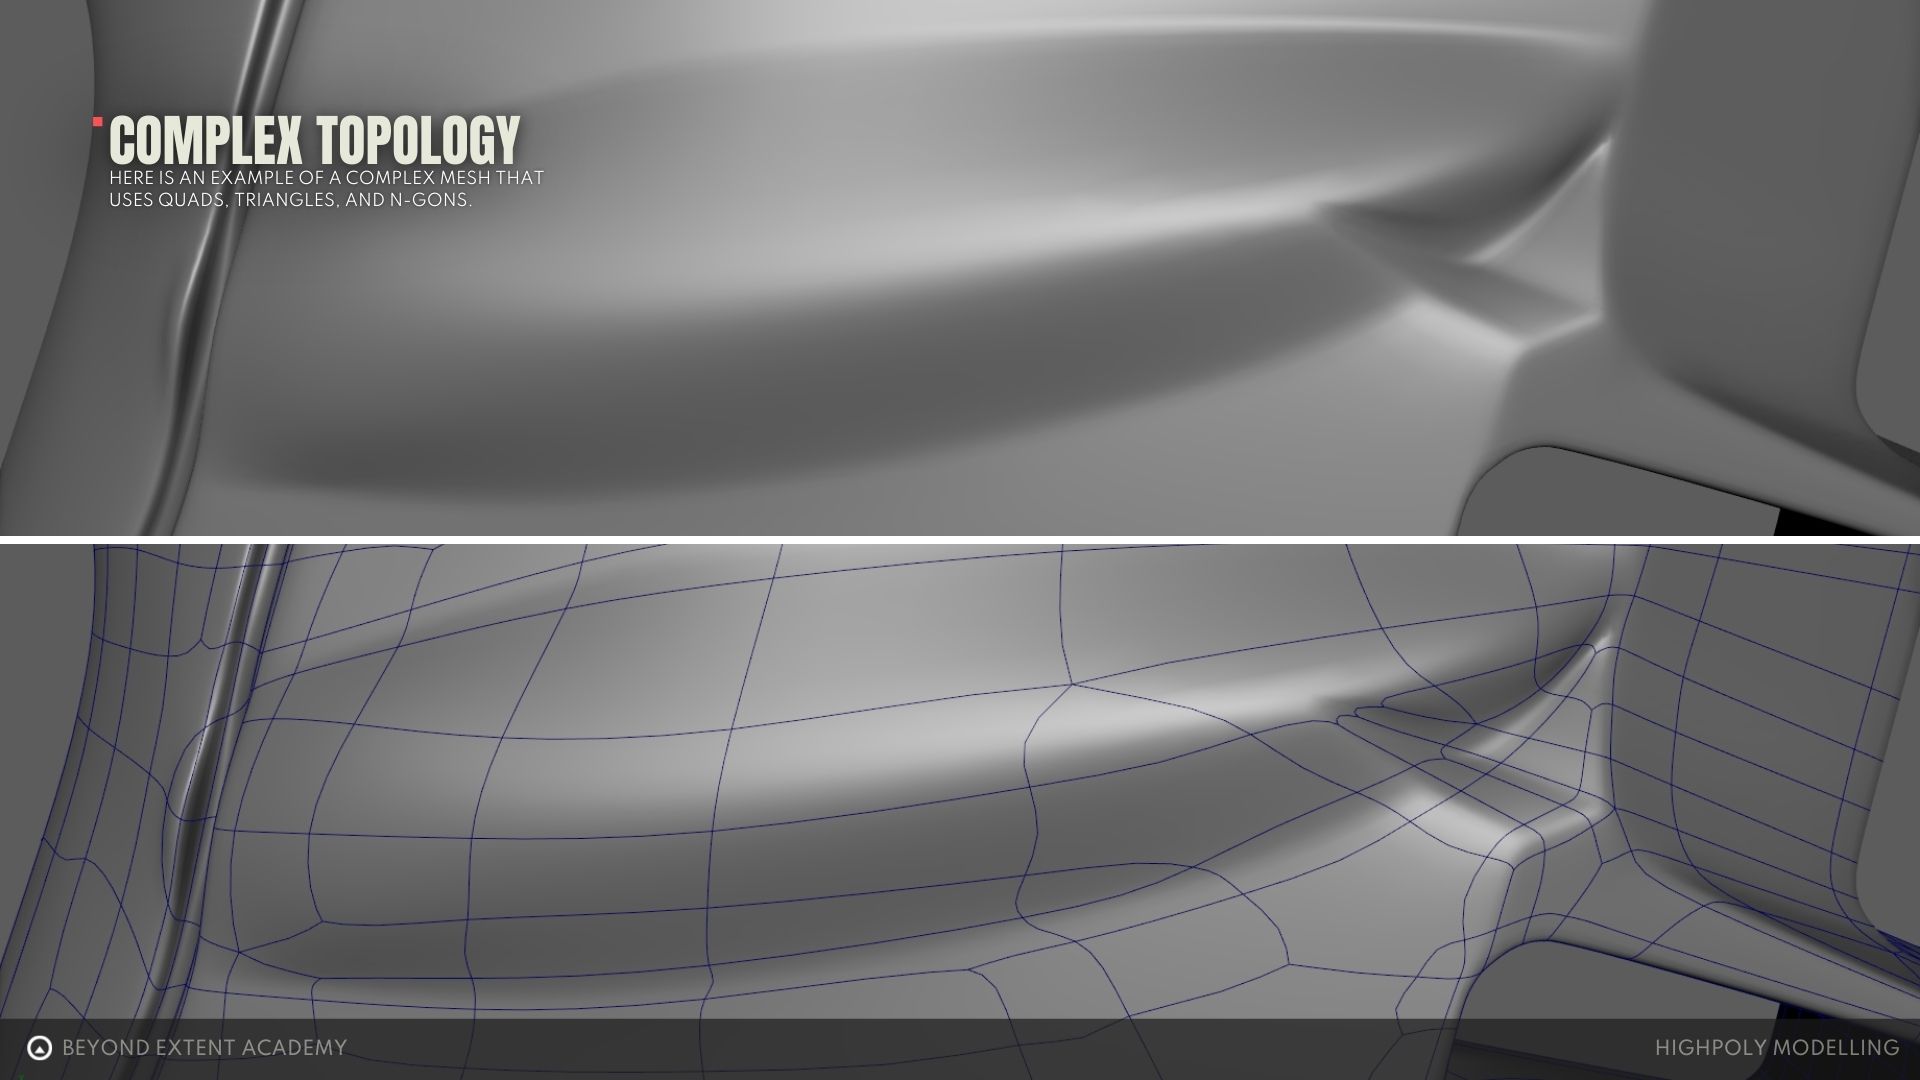
Adding a lot of support loops can quickly create a situation where your model becomes difficult to work with. Especially with complex meshes. Loops can wrap around your model to places where they aren’t doing anything but getting in the way. If you’re working on something organic it is crucial that you create a good flow of topology so that your edges don’t build up and get in your way or cause pinching.
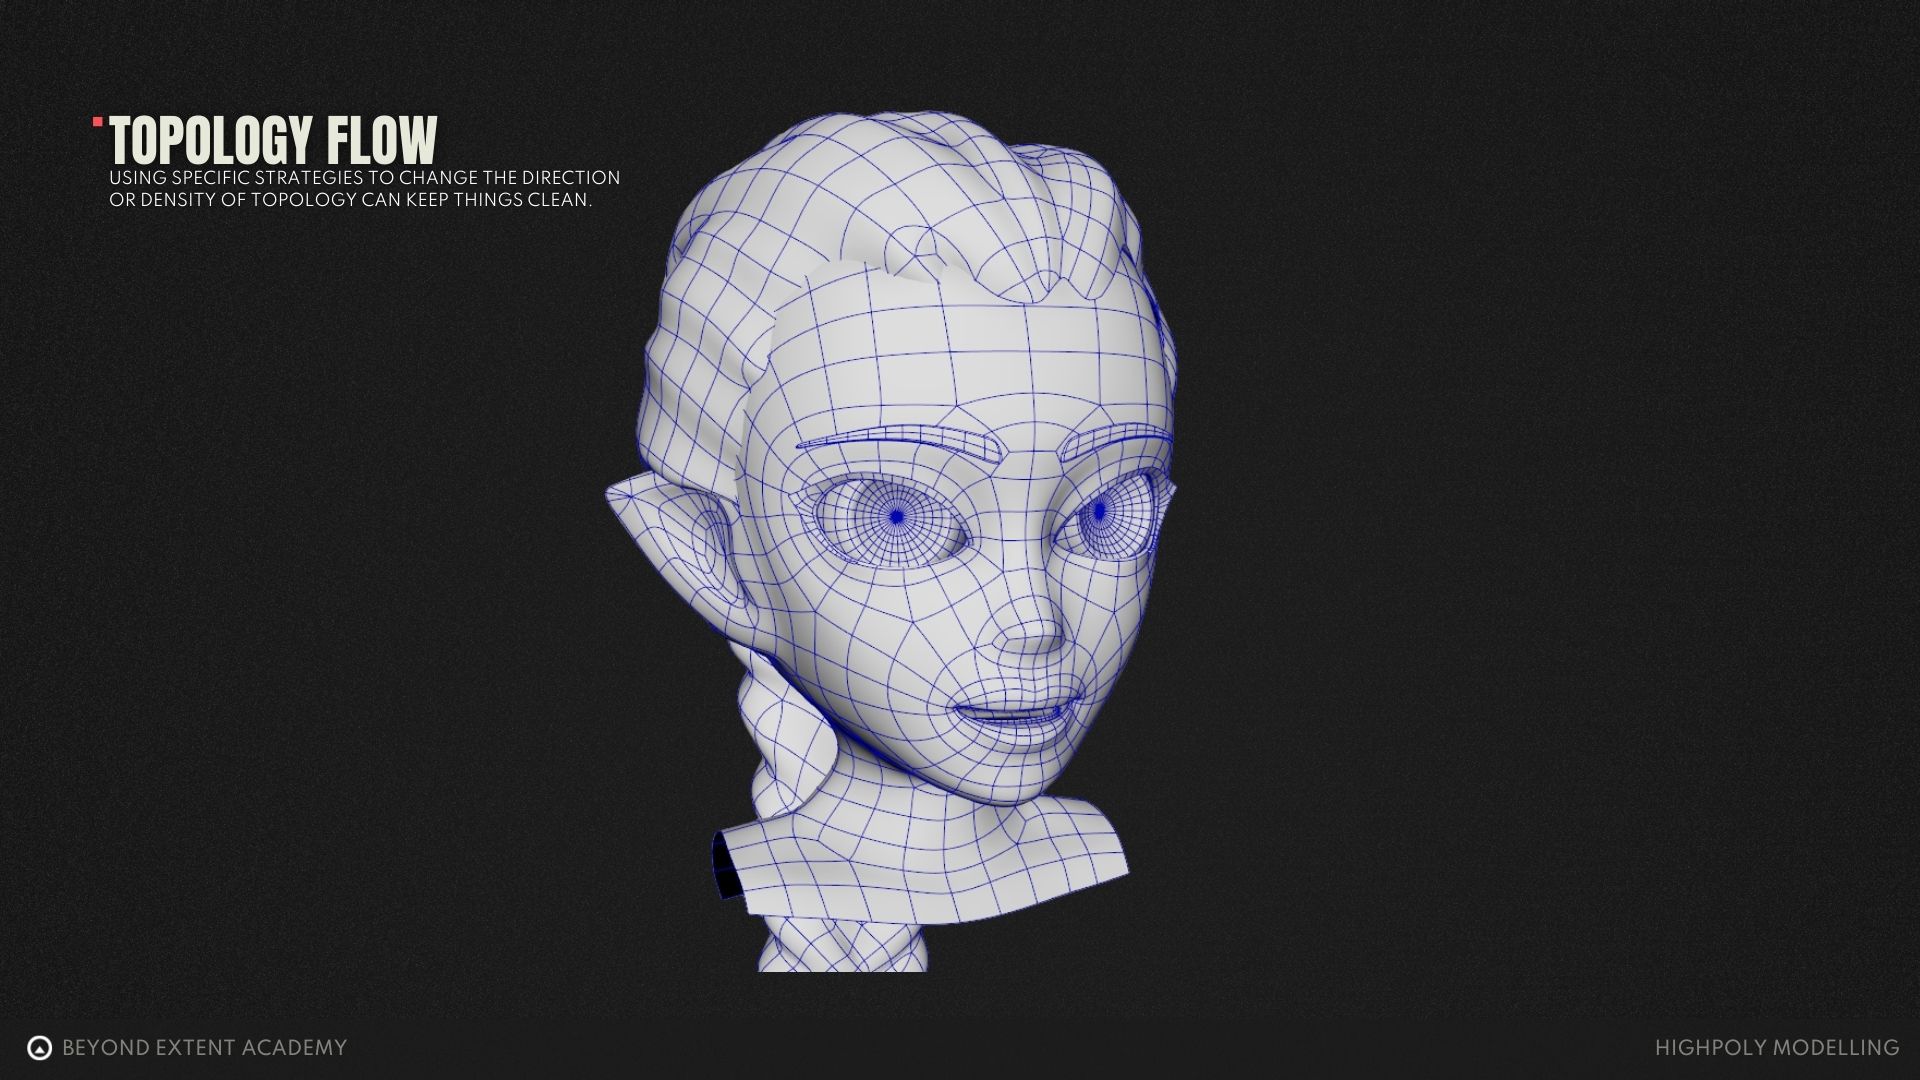
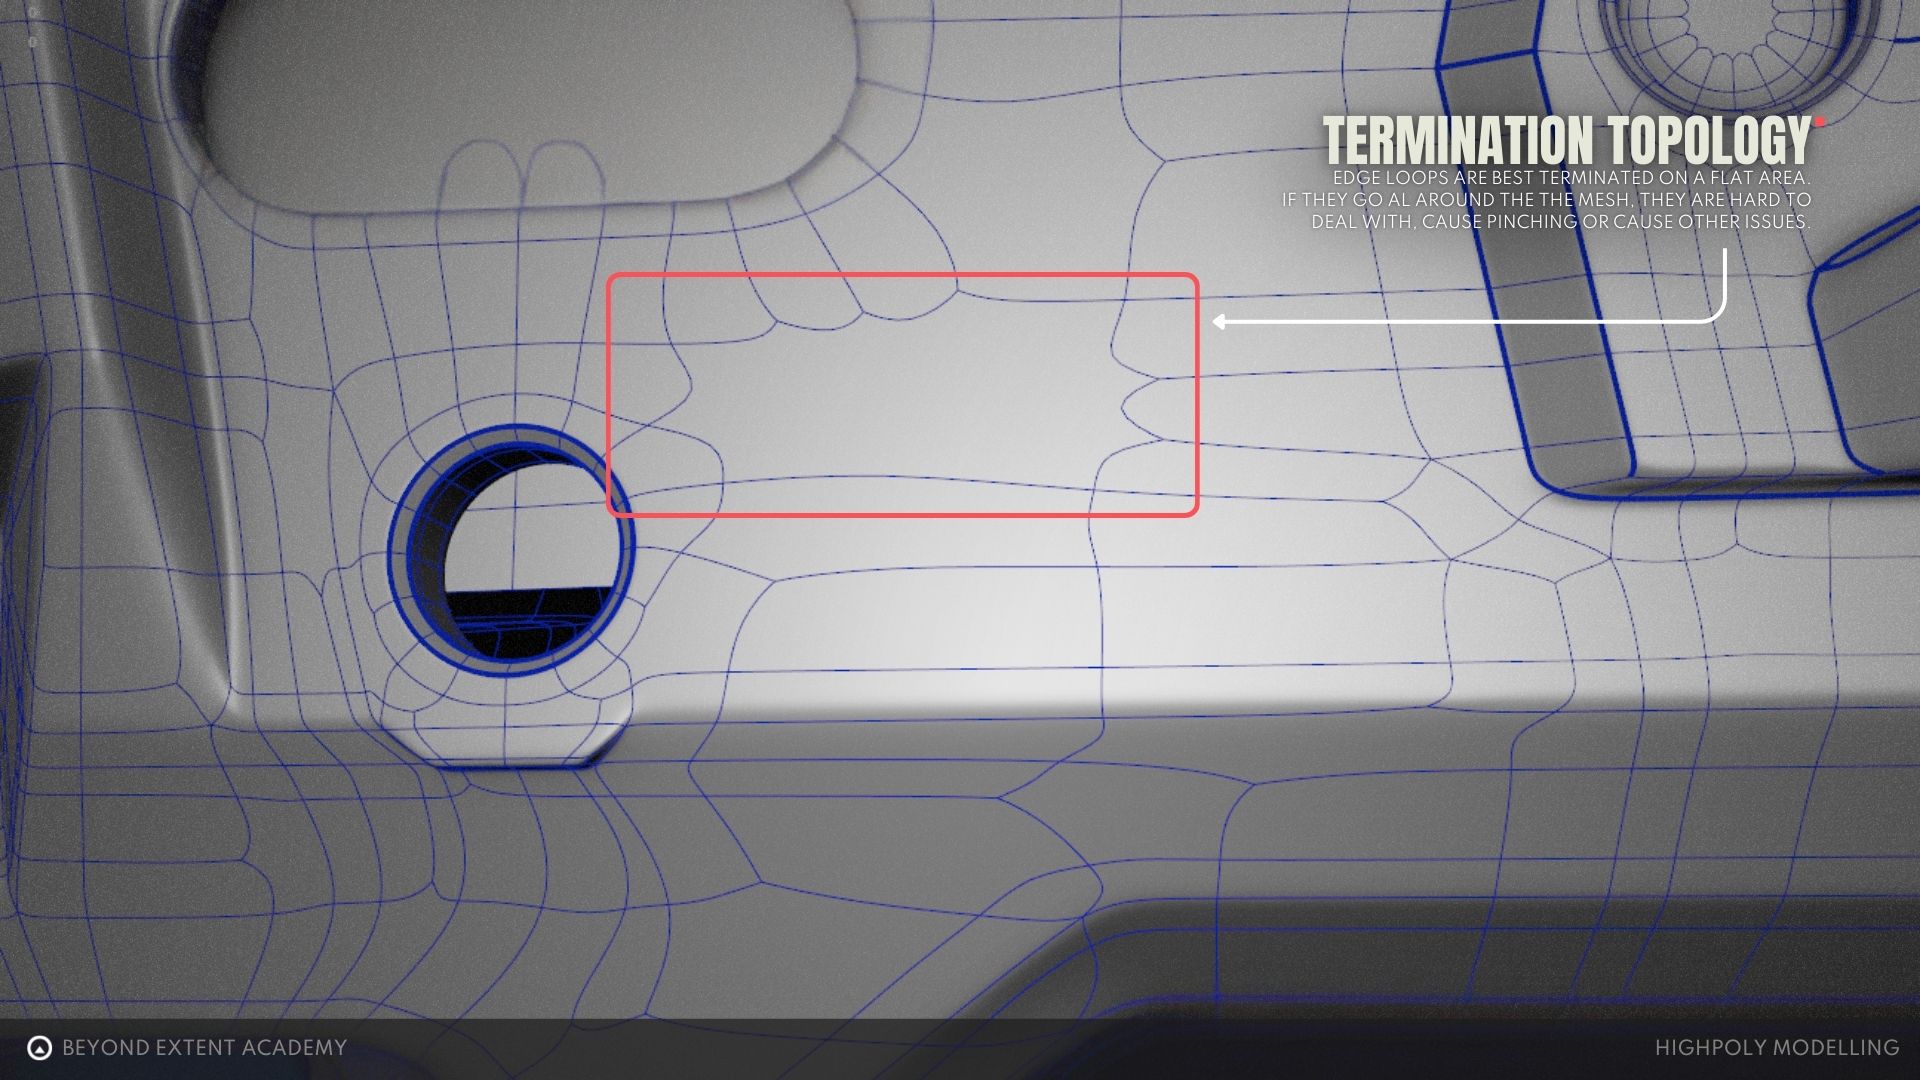
If you’re working on something hard surface it can be beneficial to terminate loops on a flat spot. This creates n-gons but shouldn’t cause any wrinkling if the area is flat.
Here you can see many examples of edge loops being terminated on a flat area. If they kept going all the way around they might cause pinching or adversely influence the sharpness of a different edge.
Non-Destructive Smoothing
Adding extra loops to your model changes it. This is often called destructive because you can’t easily just turn it off or on. An alternate method in programs with modifiers like 3ds Max or Blender is to use these modifiers, that can be turned on or off, to round edges in a way you can still make changes to the base model. This would be working non-destructively.
For example, in Blender we can add a Bevel modifier and adjust Segments to our liking.
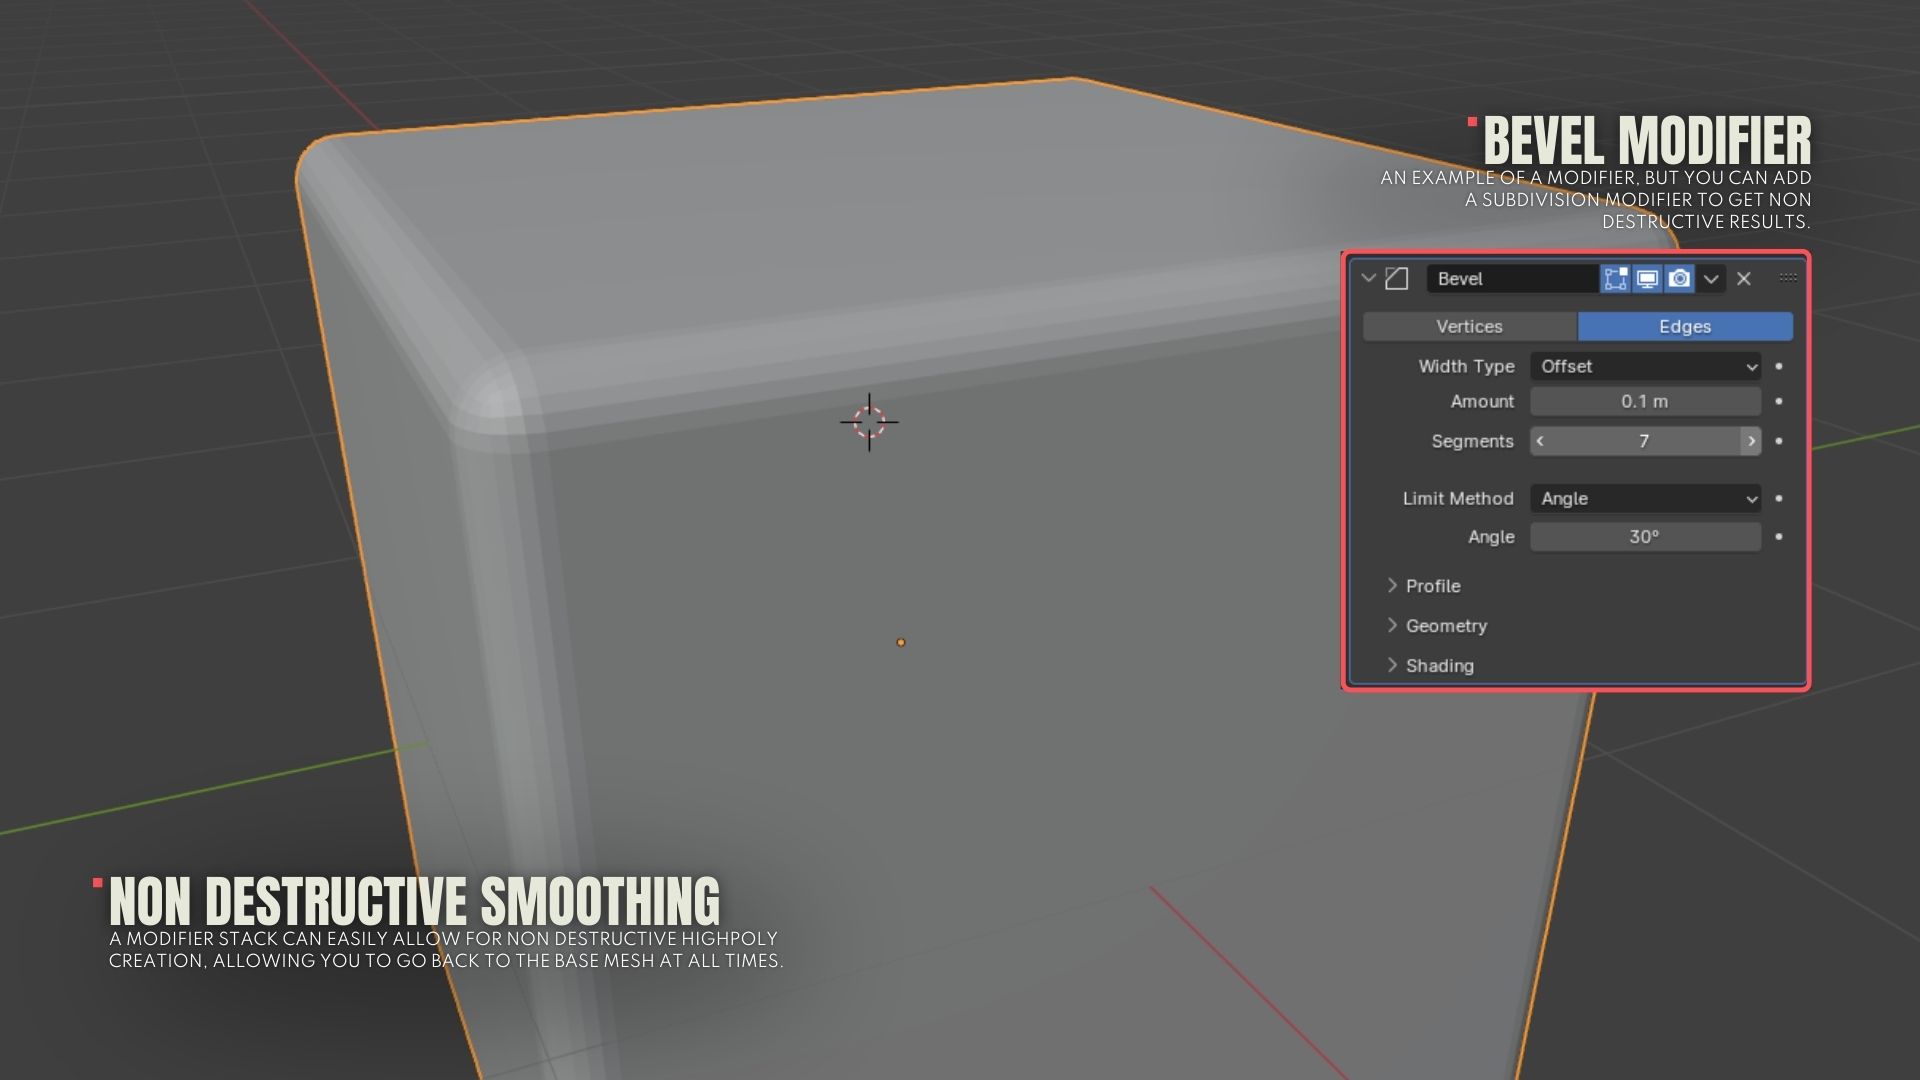
You can even use this in conjunction with the subdivision workflow just by adding that modifier as well.
Floating geometry
An easy way of adding smaller details to your highpoly is to create floating geometry. These are pieces that hover above the surface of the base model. When you bake this down the edges will be invisible.
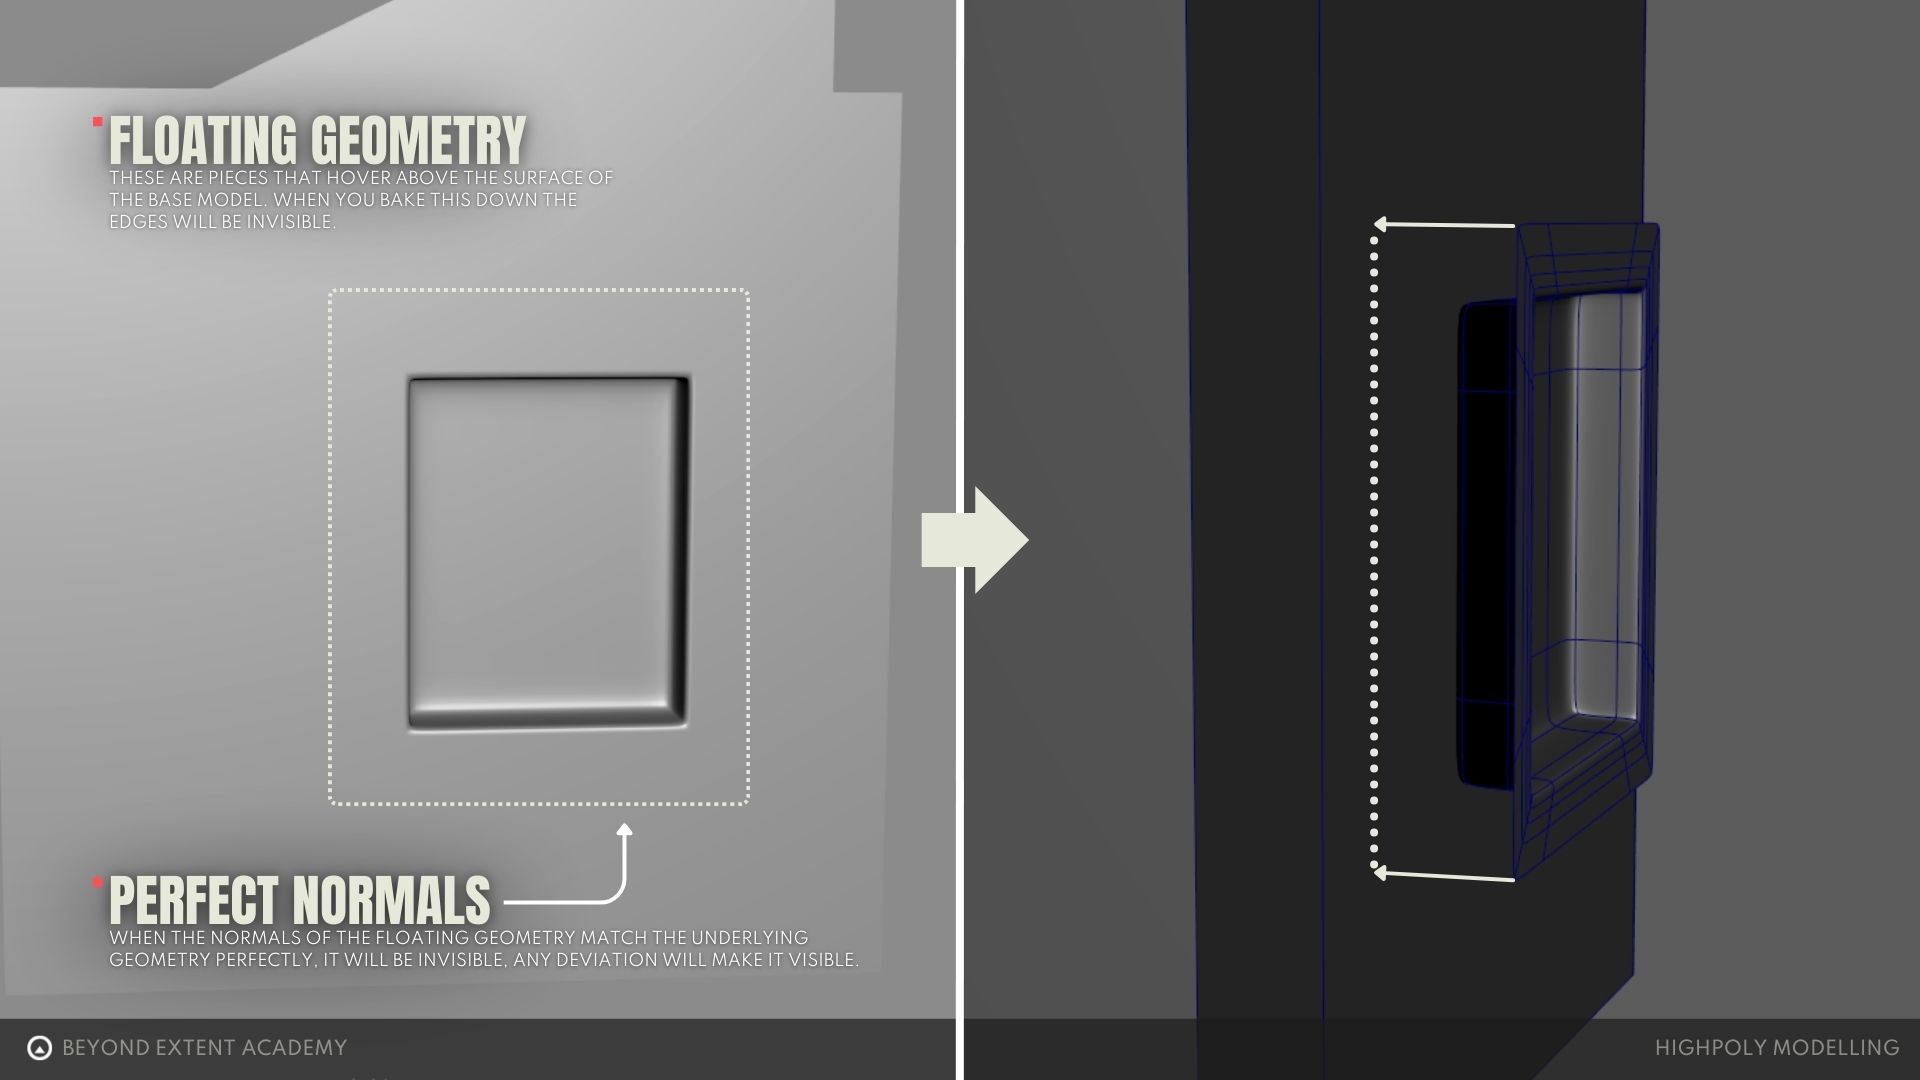
Since the edges of the floating piece need to match the exact angle of the underlying base model it’s usually best to use floating geometry on flat parts of a model, though a well made one can be created for curved surfaces.
Polishing your highpoly in Zbrush
There are alternatives to SubD that aim at saving time. One of those is polishing in a program like Zbrush. You can take a model into Zbrush, generate a new subdivided mesh, and have it procedurally soften the model to give nice rounded edges and corners. It’s a great method for hard surface assets. While you’re in there you can also do some sculpting to refine the model or create extra detail like damage. The downsides can be that it isn’t always easy to setup a model to be subdivided and polished, and the mesh that Zbrush generates can be very dense and have messy topology that causes issues.
Before you bring your model into Zbrush make sure that any curved surfaces have plenty of divisions to capture the curvature. Otherwise you’ll have faceting which is hard to get rid of in this workflow.
Faceting is when you can see obvious, sharp, divisions in a part of a mesh that should be curved and smooth.
The example mesh here was made in Plasticity, which is a 3D CAD software. On export, the model was intentionally over-subdivided. You can see how dense the mesh is here — that is to make sure that no faceting occurs.

Next, DynaMesh is used to remesh the model. This will make the geometry even, which will allow for the effective use of polish functions. A really high number like 2048 will make the mesh extremely dense. If you were actually sculpting you wouldn’t typically want a mesh this dense, but since we are just using Zbrush to polish and round the edges, it’s ok.
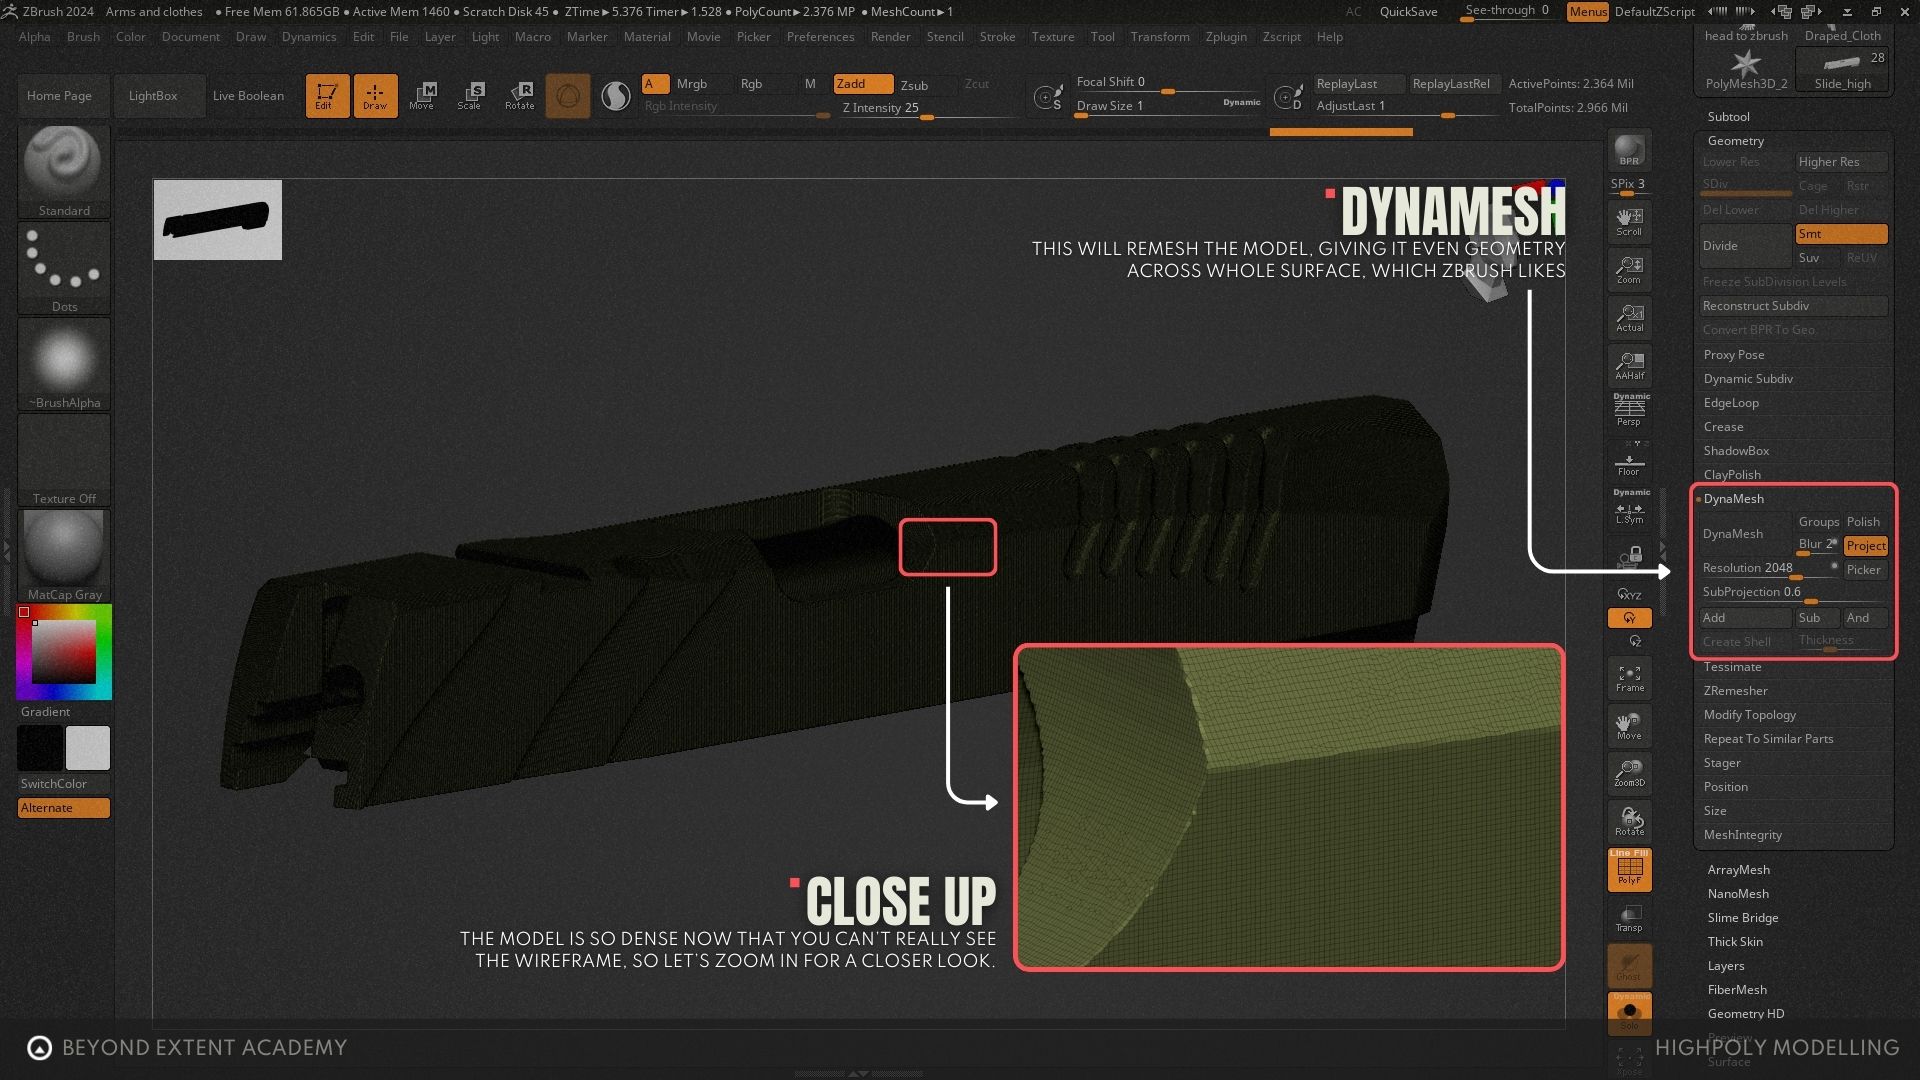
The model is so dense now that you can’t really see the wireframe, so let’s zoom in for a closer look.
The topology looks a little uneven and jagged, but that’s mostly because we are so zoomed in. However, this won’t effect the final result.
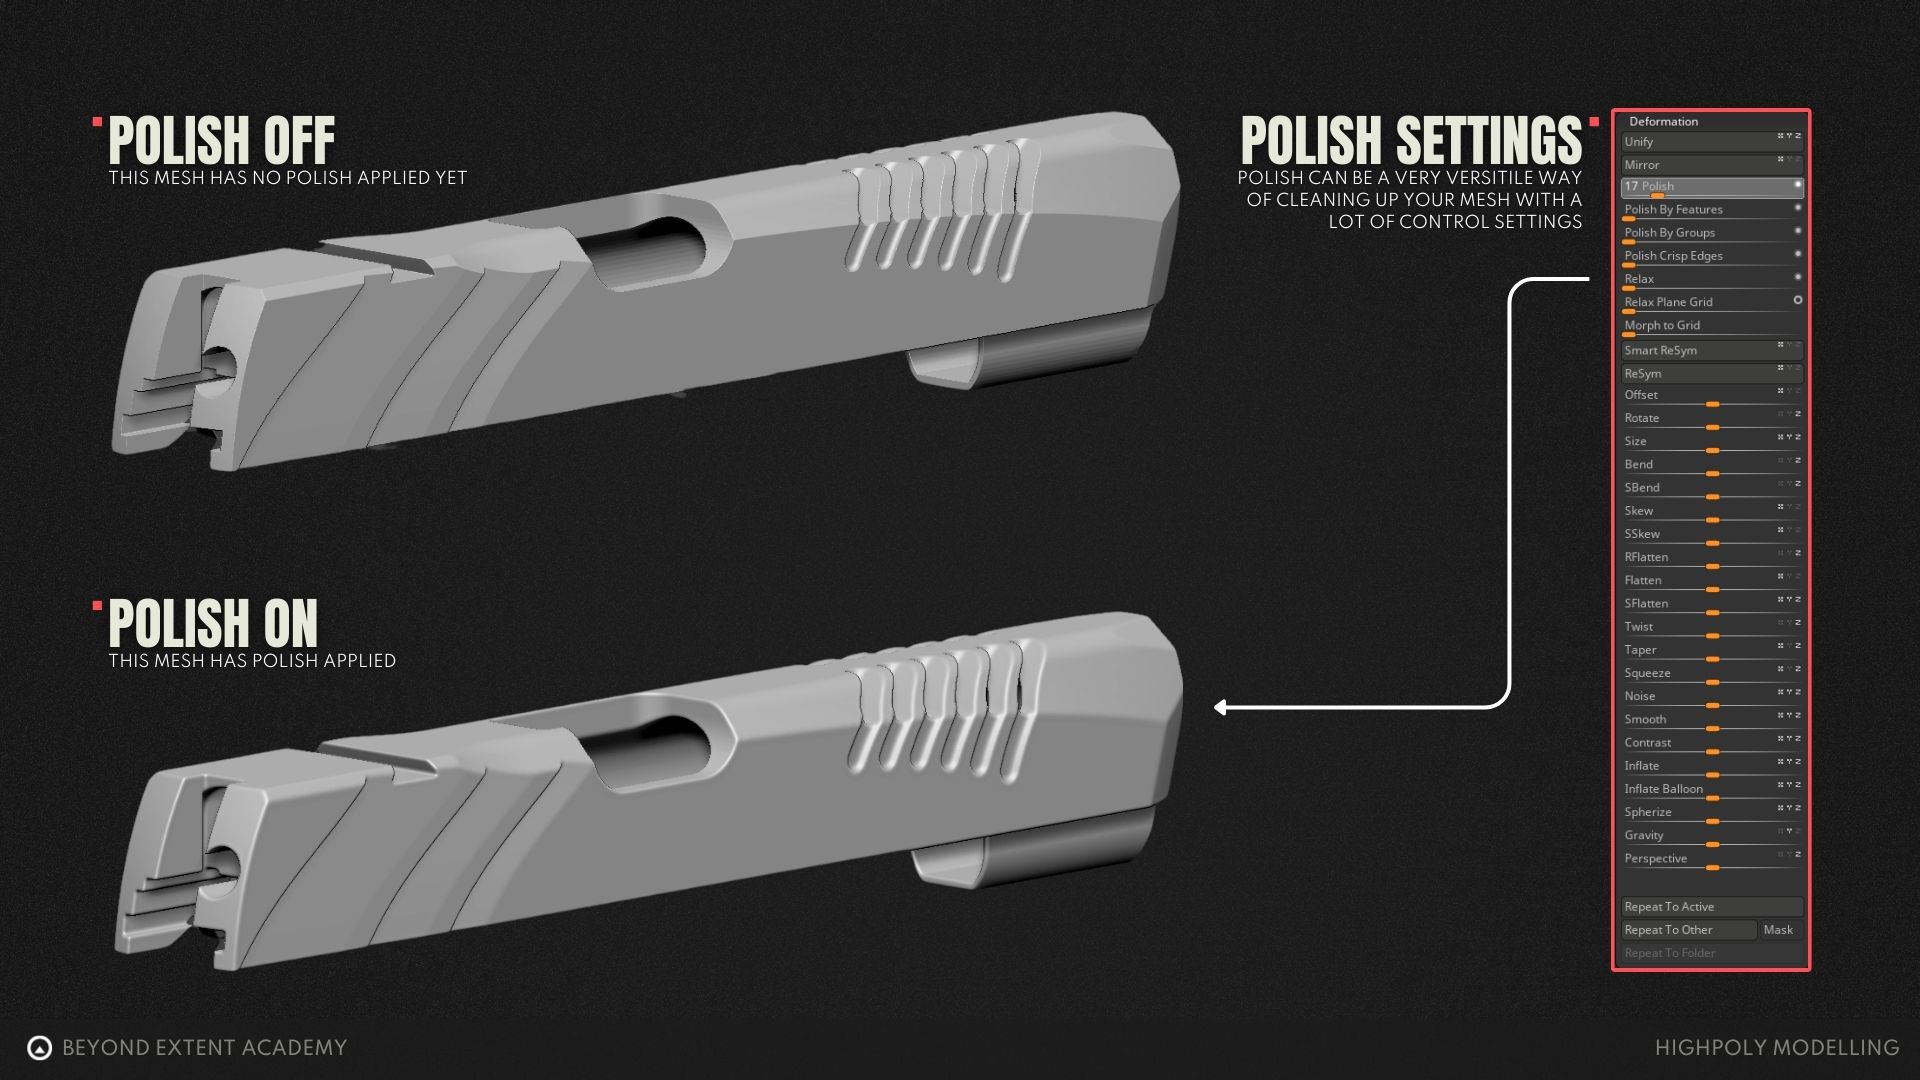
After using DynaMesh we can use the Polish tools in the Deformation window to round and smooth our edges and corners. Fiddling around with the different sliders, numbers, and options will help find the result that looks good, since things like mesh density or curvature can affect how it gets polished. For this example, the value of Polish was upped to 25. Here’s a before and after.
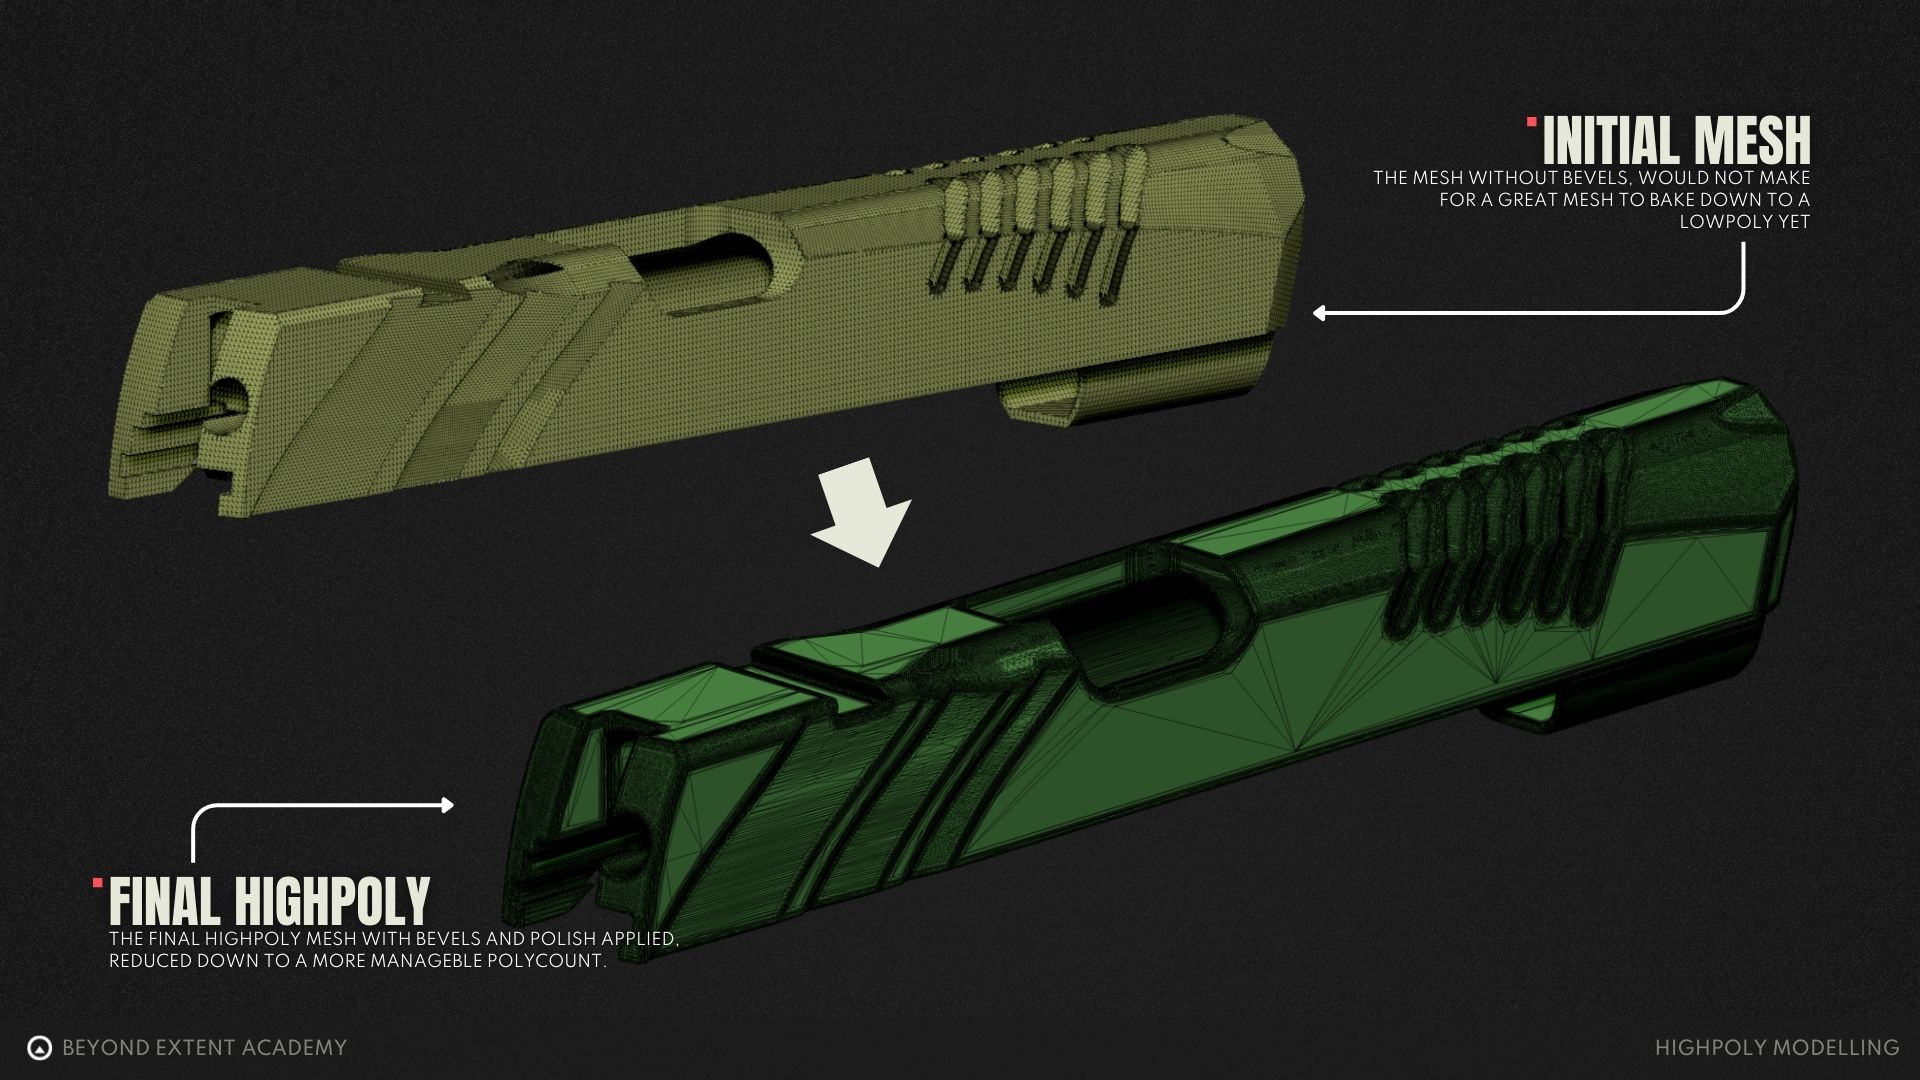
The edges now look nicely rounded. But the mesh is super dense: it’s 2.3 million points. Zbrush handles this pretty well, but most other programs would be overwhelmed by a mesh of this polycount. So, we can use the Decimation Master tool to reduce the polycount for use in other programs.
How to Decimate in Zbrush
When you sculpt in ZBrush, models can reach millions of polygons, which can make them heavy to export, render, or use in other programs. To make the mesh easier to work with outside of ZBrush, you can use the Decimation Master tool to reduce the polycount. It analyzes the surface of the model and removes polygons in areas where they aren’t needed, concentrating polygons only where they are needed to preserve detail. The result is a much lighter mesh that still looks almost the same.
To decimate a mesh, you must first Pre-Process it. You can find the Pre-process Current function under Zplugin.
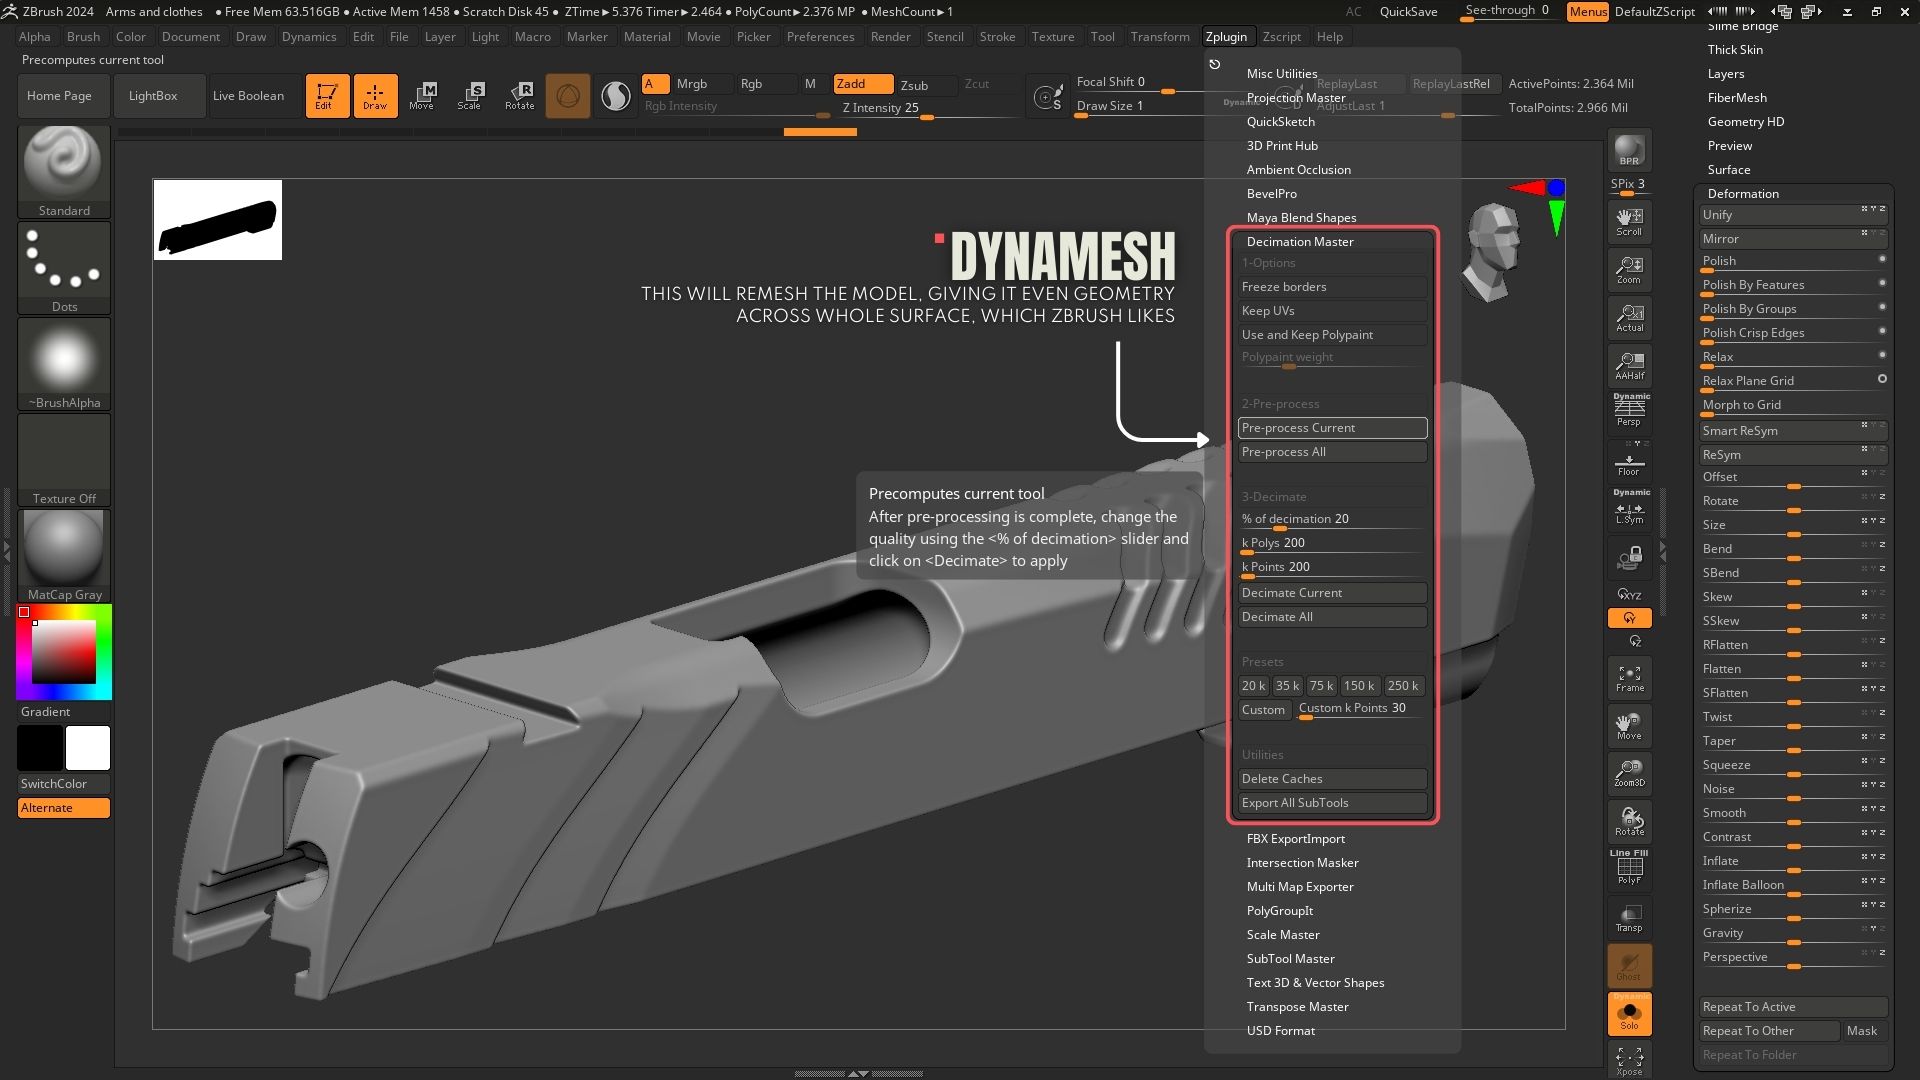
Then, select the percentage of decimation to apply. The default value of 20% usually preserves the important detail while reducing the mesh significantly. After that, click Decimate Current, and ZBrush will generate a lighter version of the mesh. The model will now be much easier to work with in other programs. From here, it can simply be exported and used to bake onto a low-poly mesh.
Bevel Shader in Marmoset Toolbag
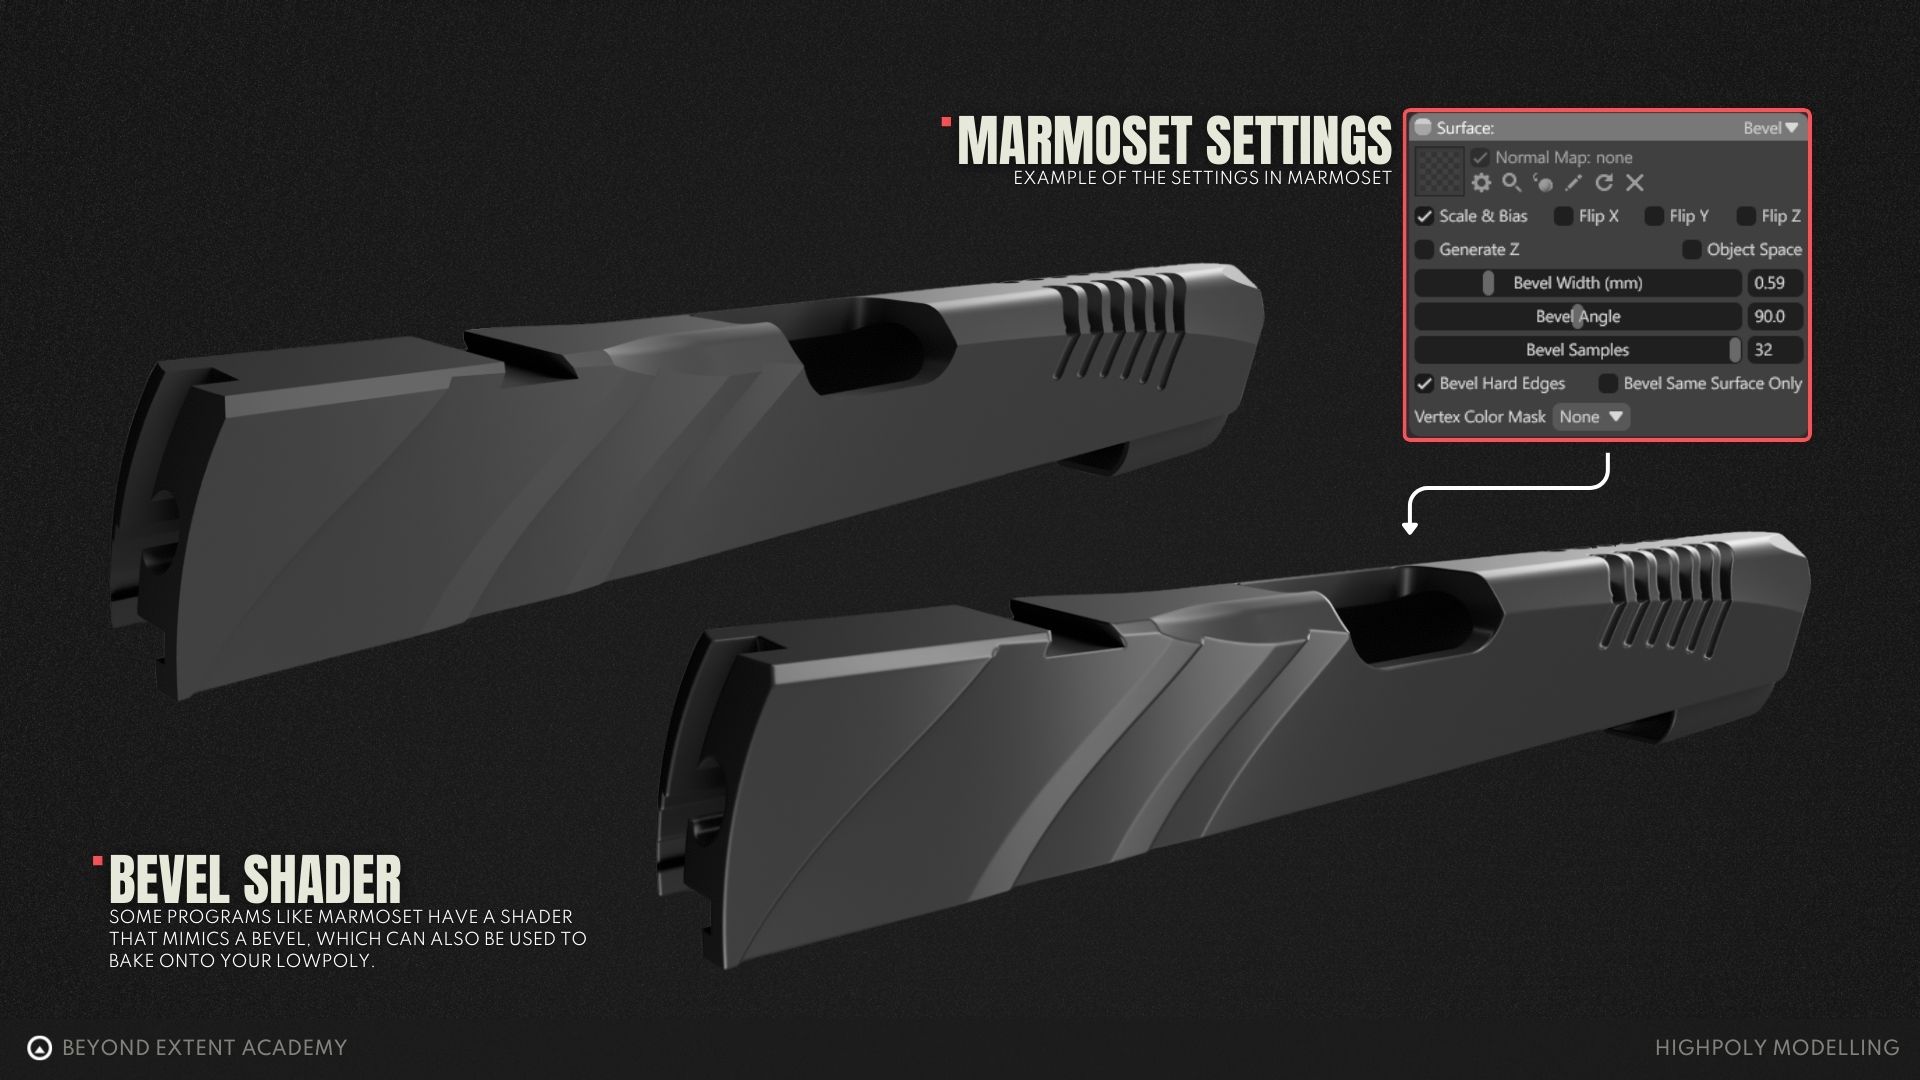
An even faster method is using the Bevel shader in Marmoset Toolbag. It procedurally simulates how rounded edges should appear on a model. That result can then be baked down onto the low-poly mesh. This is quickly becoming a common technique for hard-surface assets. It offers less control than traditional high-poly workflows, but the speed is hard to beat, since it allows you to skip most of the process of creating the highpoly.
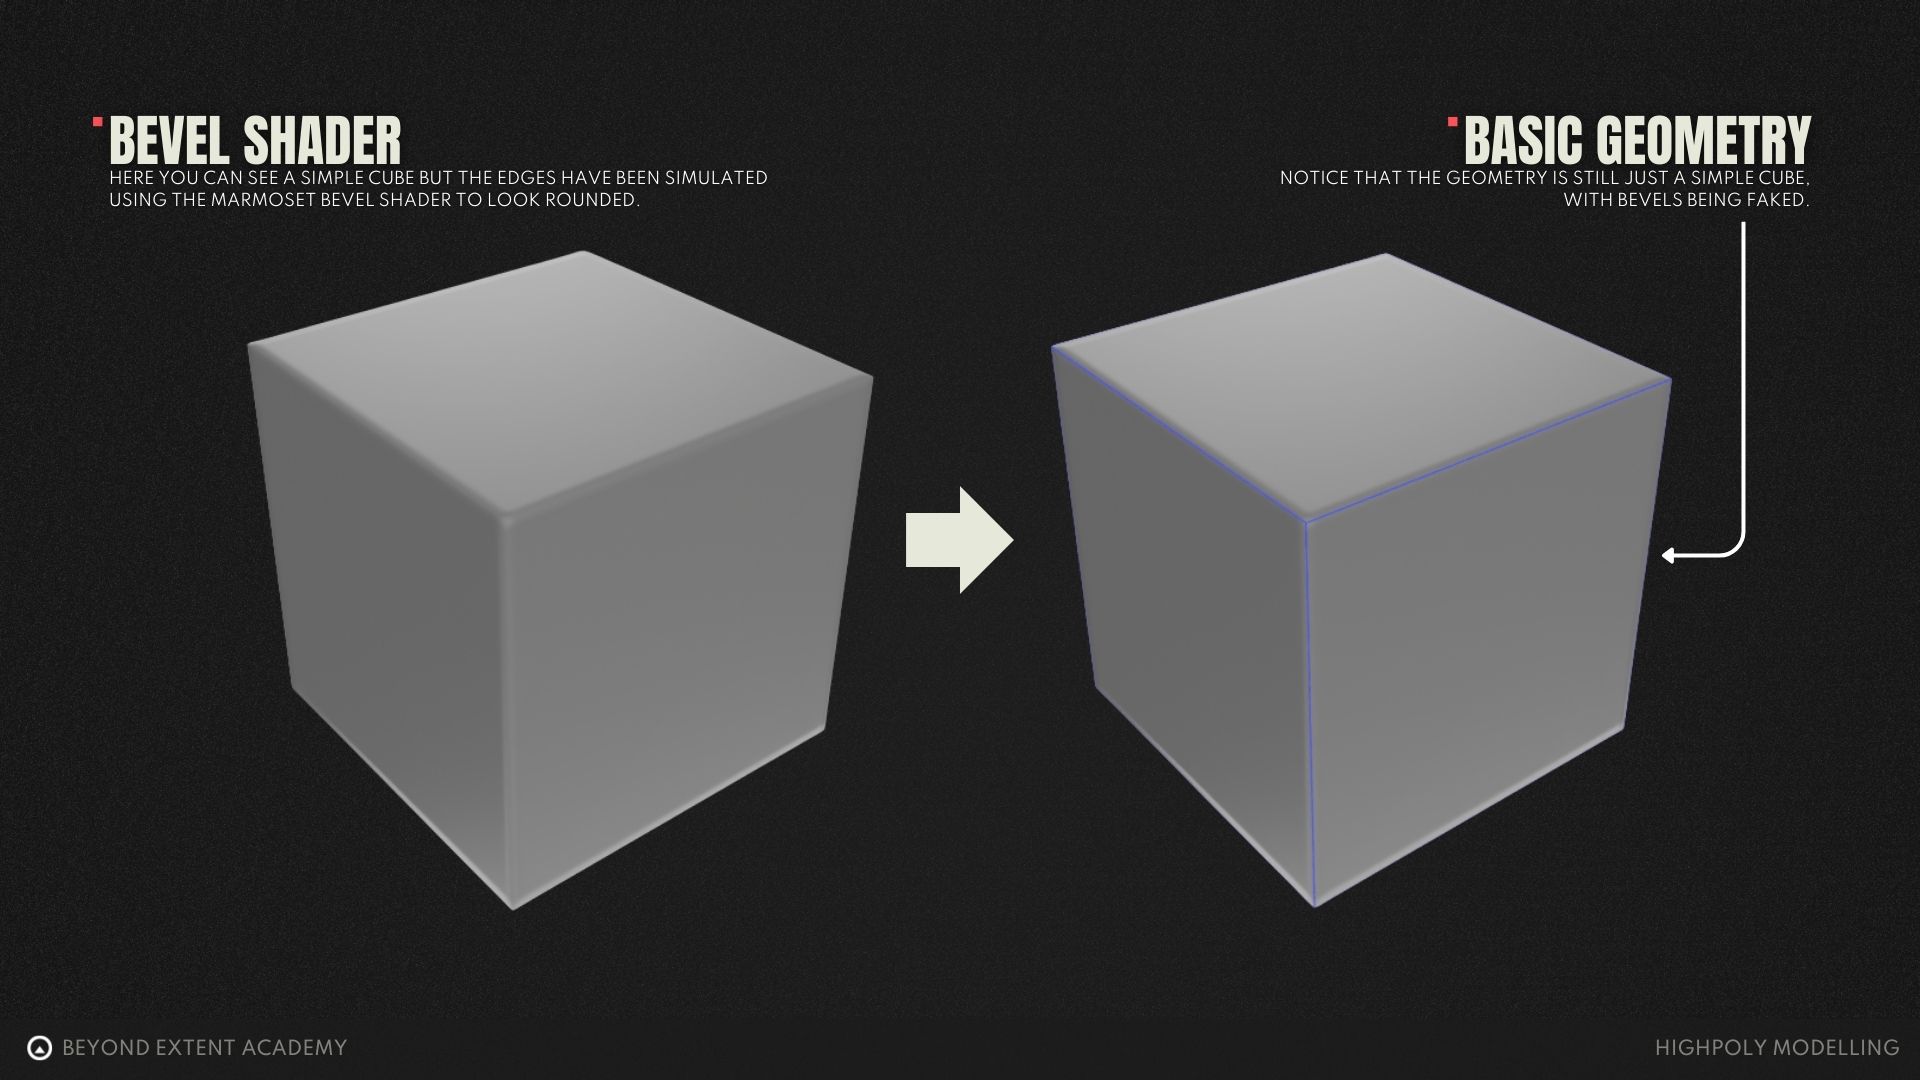
After that, create a new material and set the Surface to Bevel. Then, turn up the Bevel Samples and adjust Bevel Width to what looks good, and you’re done! Once that’s set, the result can be used to bake onto the low-poly mesh in Marmoset Toolbag.
Sculpting your Highpoly
If you’re modeling something with organic shapes like rocks, plants, animals, or cloth, you will most likely use a sculpting method. In programs like ZBrush or Blender’s sculpting tools, it’s common to start the process directly in the sculpt or with only a simple blockout before sculpting. The low-poly version is then created afterward through a method called retopology, or retopo. This is a separate workflow, so it won’t be covered in this lesson.

Photogrammetry
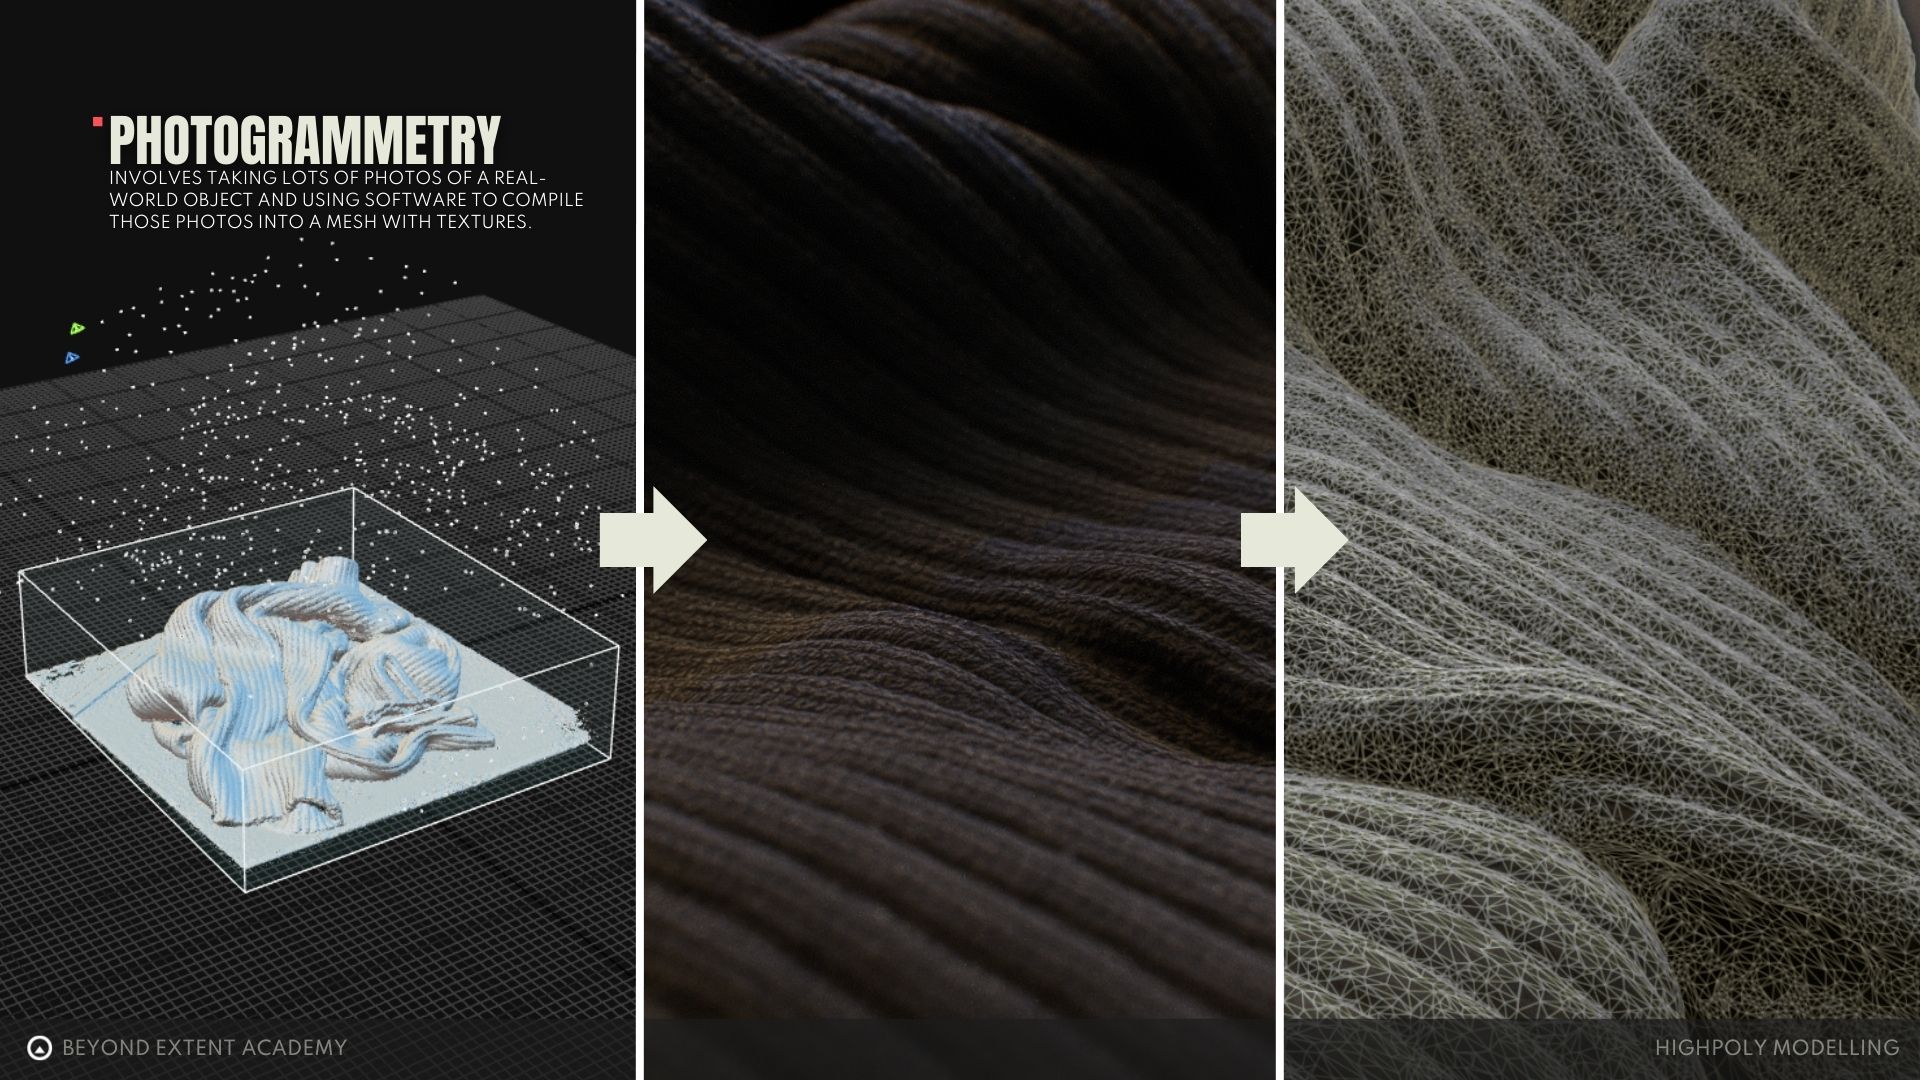
The last method we’ll cover briefly is Photogrammetry, a workflow that involves taking lots of photos of a real-world object and using software to compile those photos into a mesh with textures. When done properly, this creates a fantastically detailed and very dense model with realistic textures, but there is often noise and errors that will need to be cleaned up with sculpting. Then a low-poly mesh is created afterward through retopology, similar to the sculpting method. Because of the noise commonly seen with this method, it is best used for organic shapes, but not typically usable for hard-surface models. This is a very specialized workflow, and outside the scope of this lesson, so we’ll skip over it for now!
Choosing Your Method
In a professional environment, deciding which method to use could look like this:
Subdivision Modeling
- You’re working on a smooth, low-detail model like a classic 3D animation character or a simple object like a mug.
- You’re creating assets for an industry where SubD is required, like military or medical training simulations.
- You need very fine or hands-on control over soft and sharp edges in a high-detail model.
- The final output will be physical, like a 3D print.
Zbrush polish method
- You want to both polish edges and refine or enhance the model with sculpting.
- You want to save time and don’t have access to Marmoset Toolbag.
- The final output will be physical, like a 3D print, and includes some sculpted or organic elements.
marmoset toolbag bevel shader
- You’re making high volumes of hard-surface assets for fully digital environments, like games, and don’t need very fine control.
photogrammetry
- You have the physical object you want to recreate.
- You have specialized equipment to capture it effectively.
- This is very common for character work, like capturing the face and body of actors.
RESOURCES
⚠️
MISSING RESOURCES