


to do list (Admin only)
⚠️ lesson in EARLY ACCESS ⚠️
Please keep this in mind when viewing this lesson as we still need to do a final pass on it.
Feel free to share anything that is out of place in the feedback form at the bottom of the lesson to help us improve it.
Thanks and happy learning!
LESSON OVERVIEW
What makes a 3D object feel real? Textures! They are what give models their surface detail and material identity, helping the viewer understand whether something is made of metal, plastic, fabric, or wood. Textures can tell us if an asset is brand new or worn down from years of use, whether it’s been carefully maintained or roughly handled.
In this lesson, we’ll introduce the core fundamentals of the texturing process. You’ll learn how different texture maps work together, how materials are built, and how to start thinking about surface detail the way a 3D artist does.
By the end, you’ll have a solid understanding of how textures contribute to realism and visual clarity, and how to approach texturing in a way that supports both artistic intent and technical requirements.
⚠️
Missing LESSON OVERVIEW
Reference Gathering
Like every other step in the pipeline, we first need to gather references before diving into texturing. There are a few questions we need to keep in mind while searching for reference images, so we don’t end up aimlessly browsing the internet.
Be sure to refresh your memory of general Reference Gathering here!
Unique asset or set dressing?
The first question we need to answer is whether a model is a hero prop or used for set dressing. Depending on the usage, textures need to be approached differently. A hero asset can include many unique details to help it feel distinctive and memorable. However, such details are not preferable for set dressing props, which will be placed more than one time in a scene, and whose textures need to look generic so that level and environment artists can reuse them in an environment without players noticing repetition.

What is the prop made of?
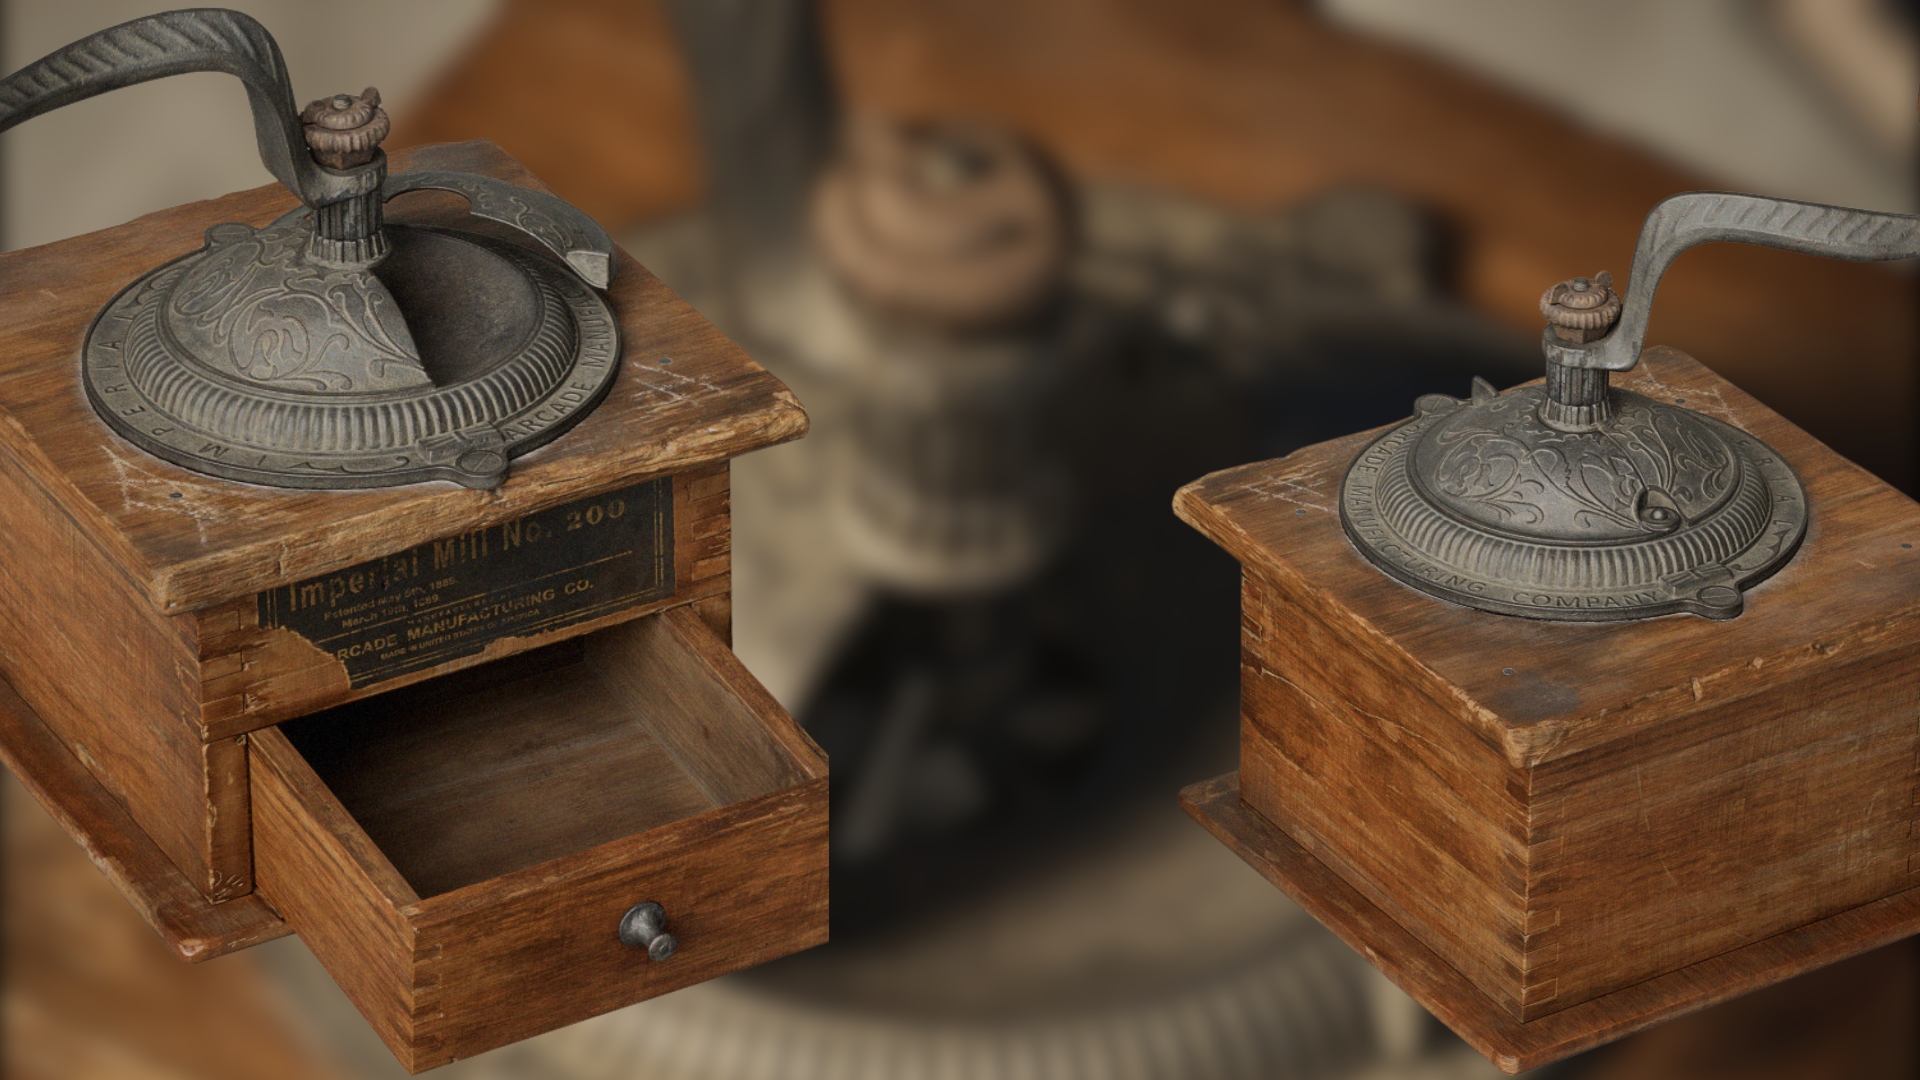
The second question we need to consider is what materials an asset is made of and how those materials or props are produced. These questions are worth taking time to research, as the answers will help you understand what kinds of imperfections, details or damages (such as scratches or surface roughness) the textures can show.
For example, let’s take a look at this railing and try to answer the questions mentioned above: What material is the object made of? It is made of painted metal. How is the material or asset produced? The metal is welded together, and a layer of paint is applied on top.
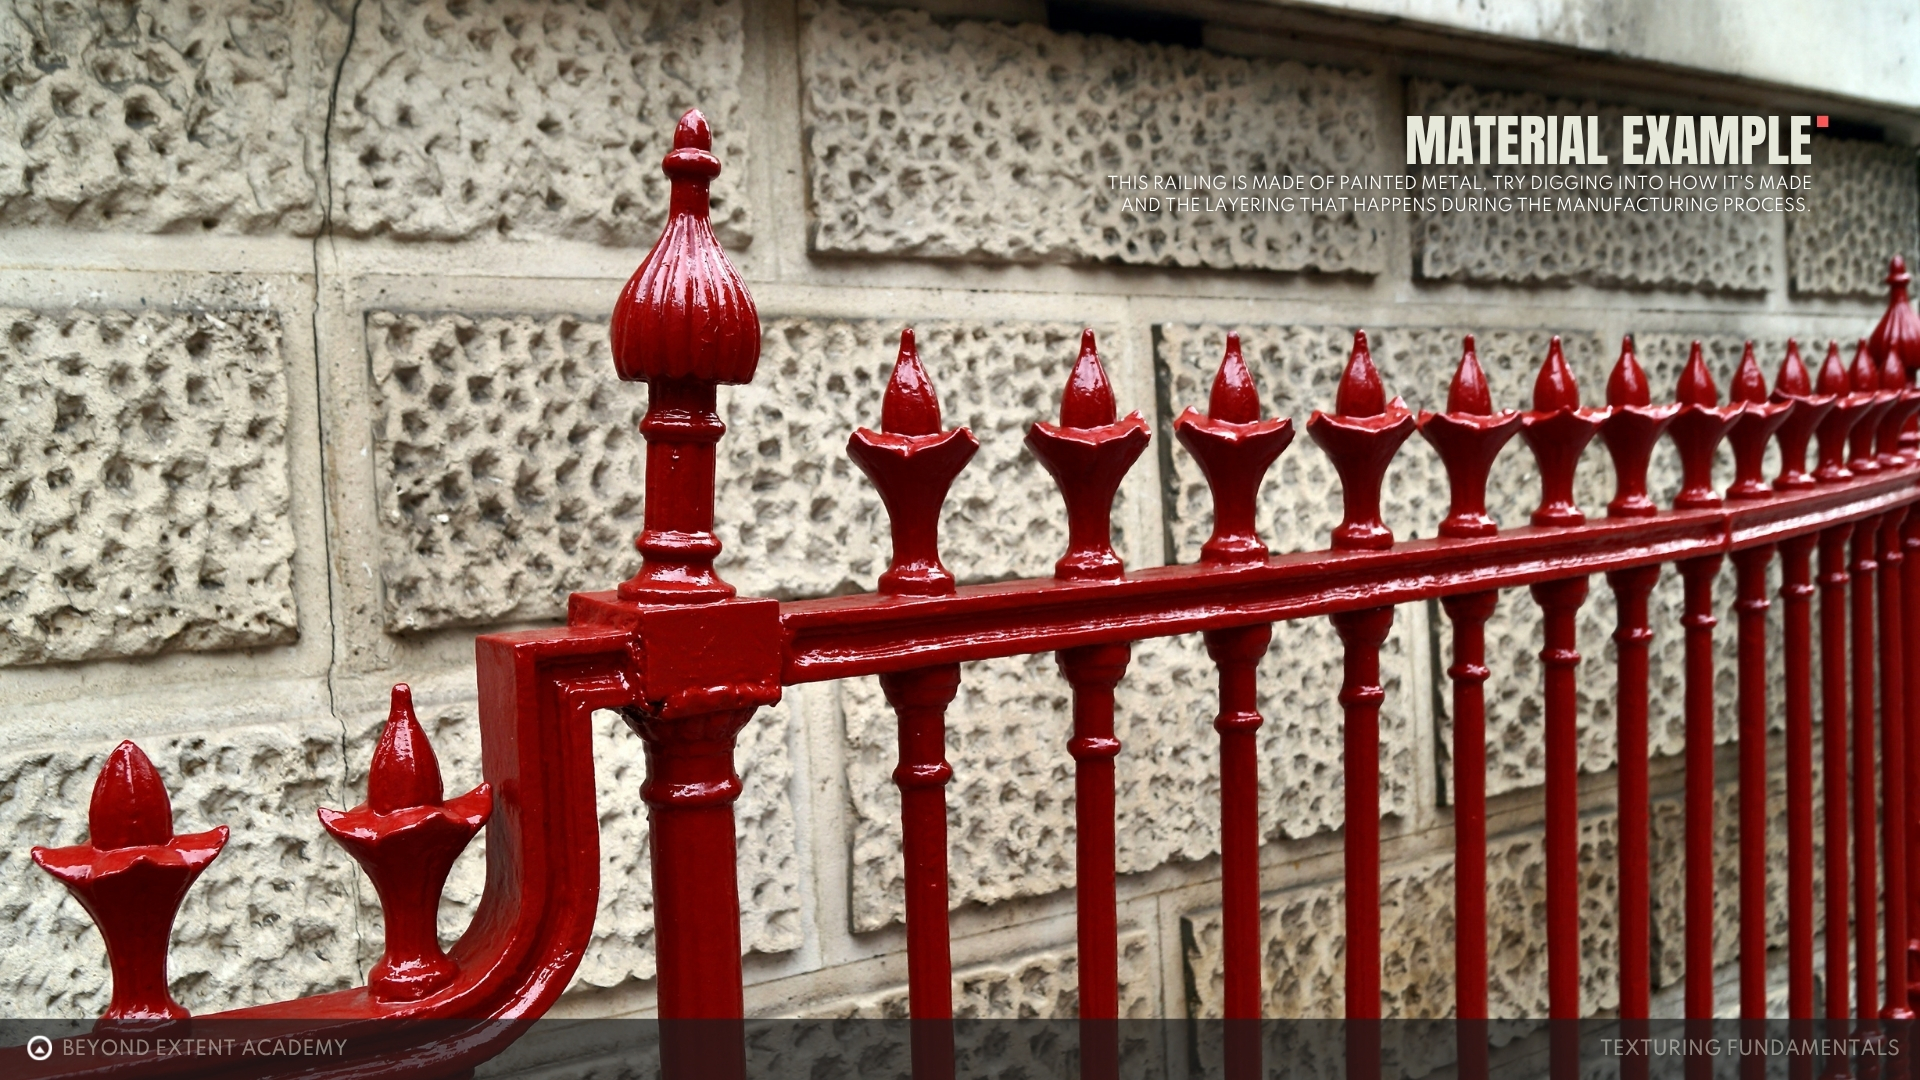
With this information, we can form a general idea of the kinds of imperfections the material may show:
- Depending on how the paint is applied (sprayed or brushed), the surface will have different types of surface variation
- The paint layer may be scratched away, revealing the metal underneath
- After prolonged exposure to outdoor environments, the exposed metal may rust
- Some scratches may not be deep enough to reach the metal and will only affect the paint layer
- If the welding is sloppy, we may see weld splatter around certain areas
How long has it been used? Where is the prop being placed?
These two questions go hand in hand. Depending on the surroundings and the amount of time an object has been exposed to its environment, textures can show various kinds of aging effects and grime. These characteristics tell the history of an object.
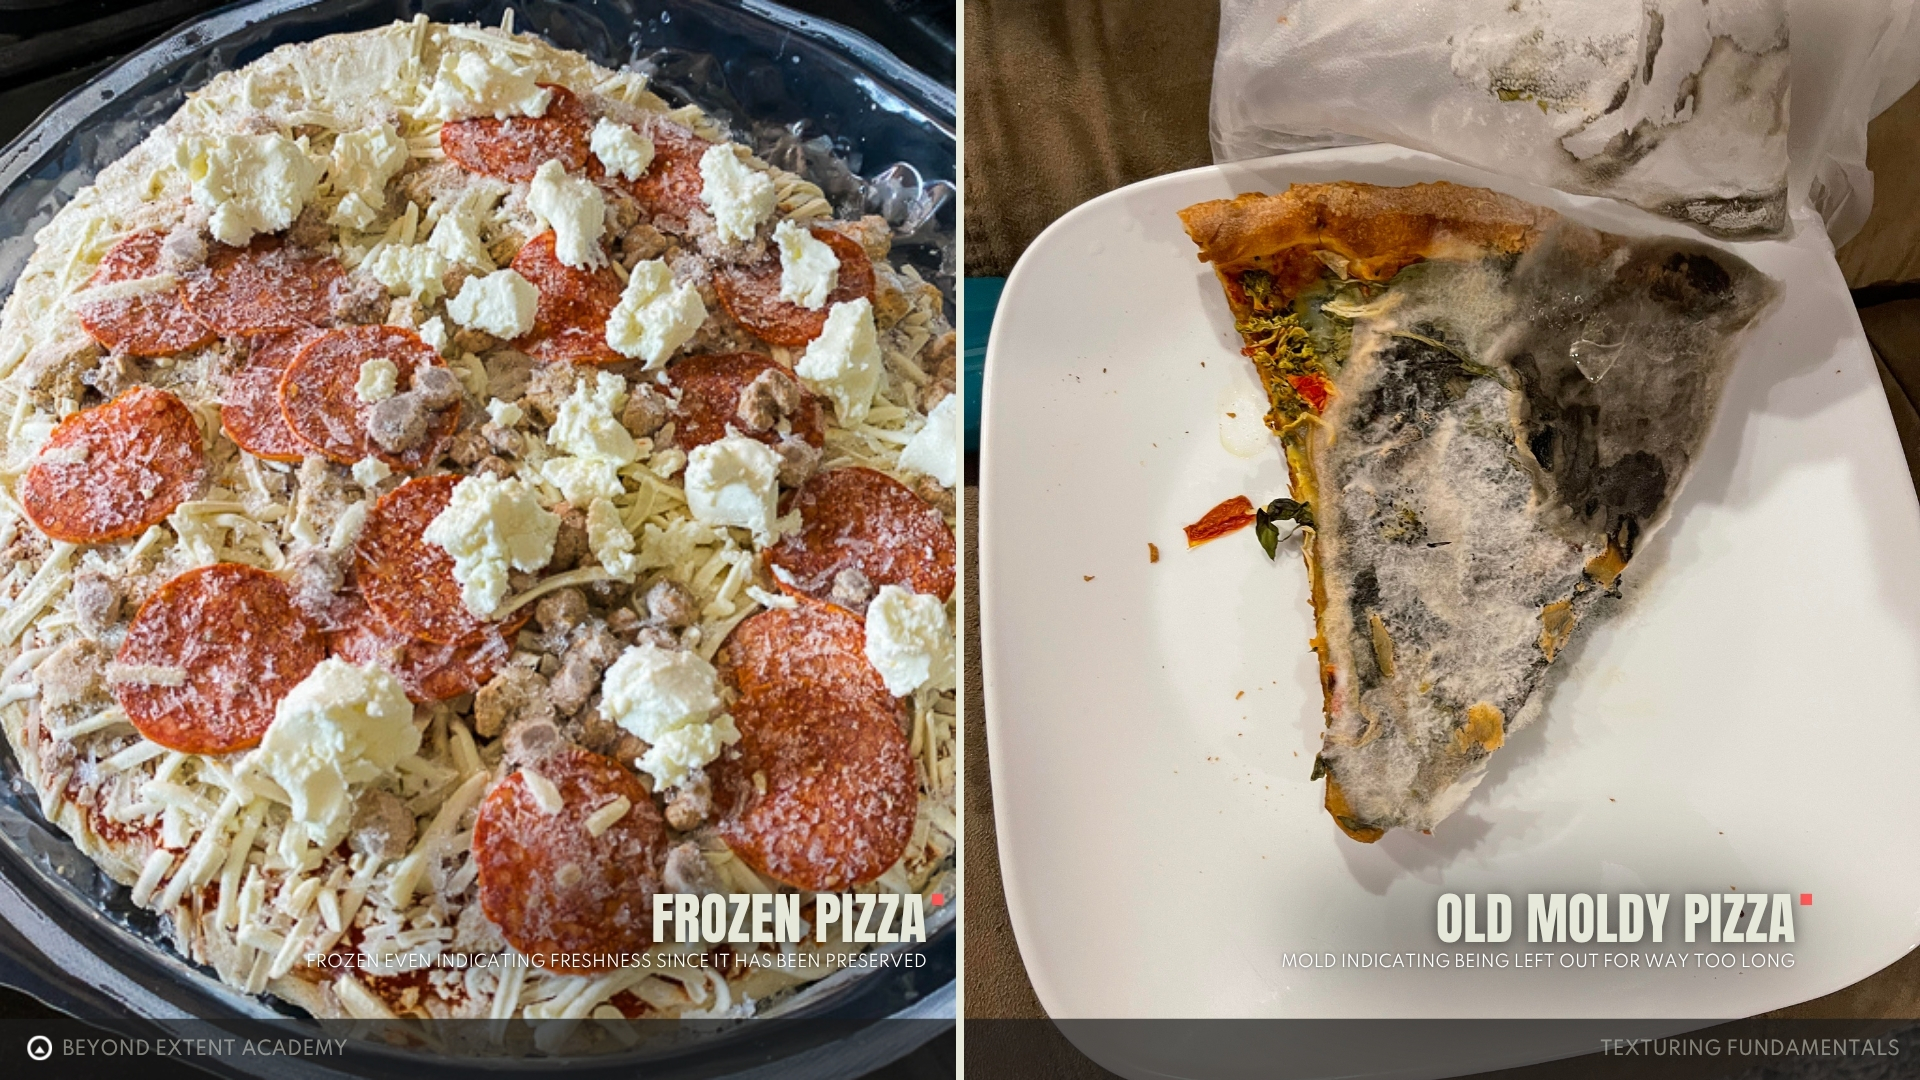
A pizza that has been placed in the freezer for some time will look frosty. If it is left outside for too long after being cooked, mold will start to grow on it.
On an outdoor metal pole, a gradient of dirt can form toward the bottom. Rain exposure can also lead to streaks, stains, and rust forming over time.

Now let’s take a closer look at another example: a plastic chair. This is an object that we commonly see both indoors and outdoors.
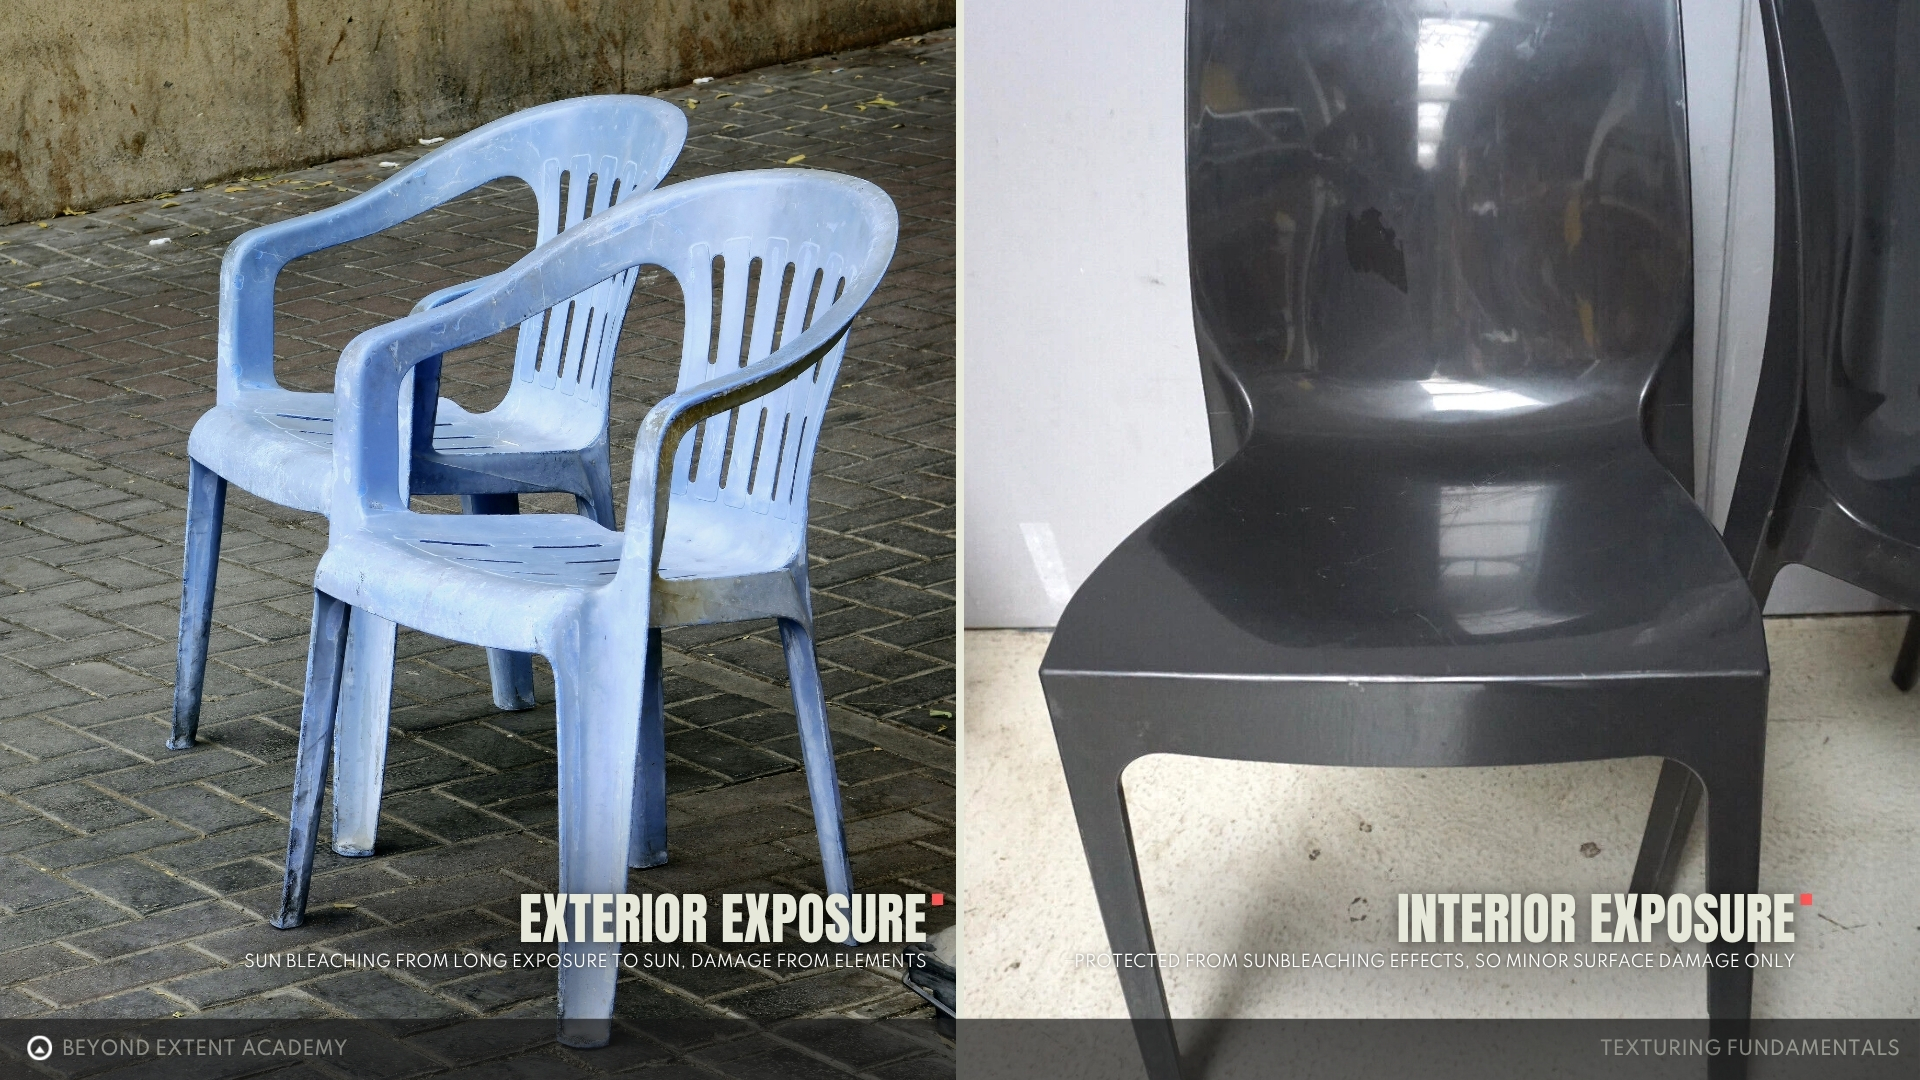
In the first scenario, the chair is constantly exposed to sunlight. Plastic is a material that loses its color over time due to heat and UV radiation, resulting in a bleaching effect. Because the object is outdoors, we can also observe some imperfections caused by the environment. For indoor chairs, discoloration can still occur, but at a much slower rate. As a result, they tend to look newer and shinier compared to their outdoor counterparts.
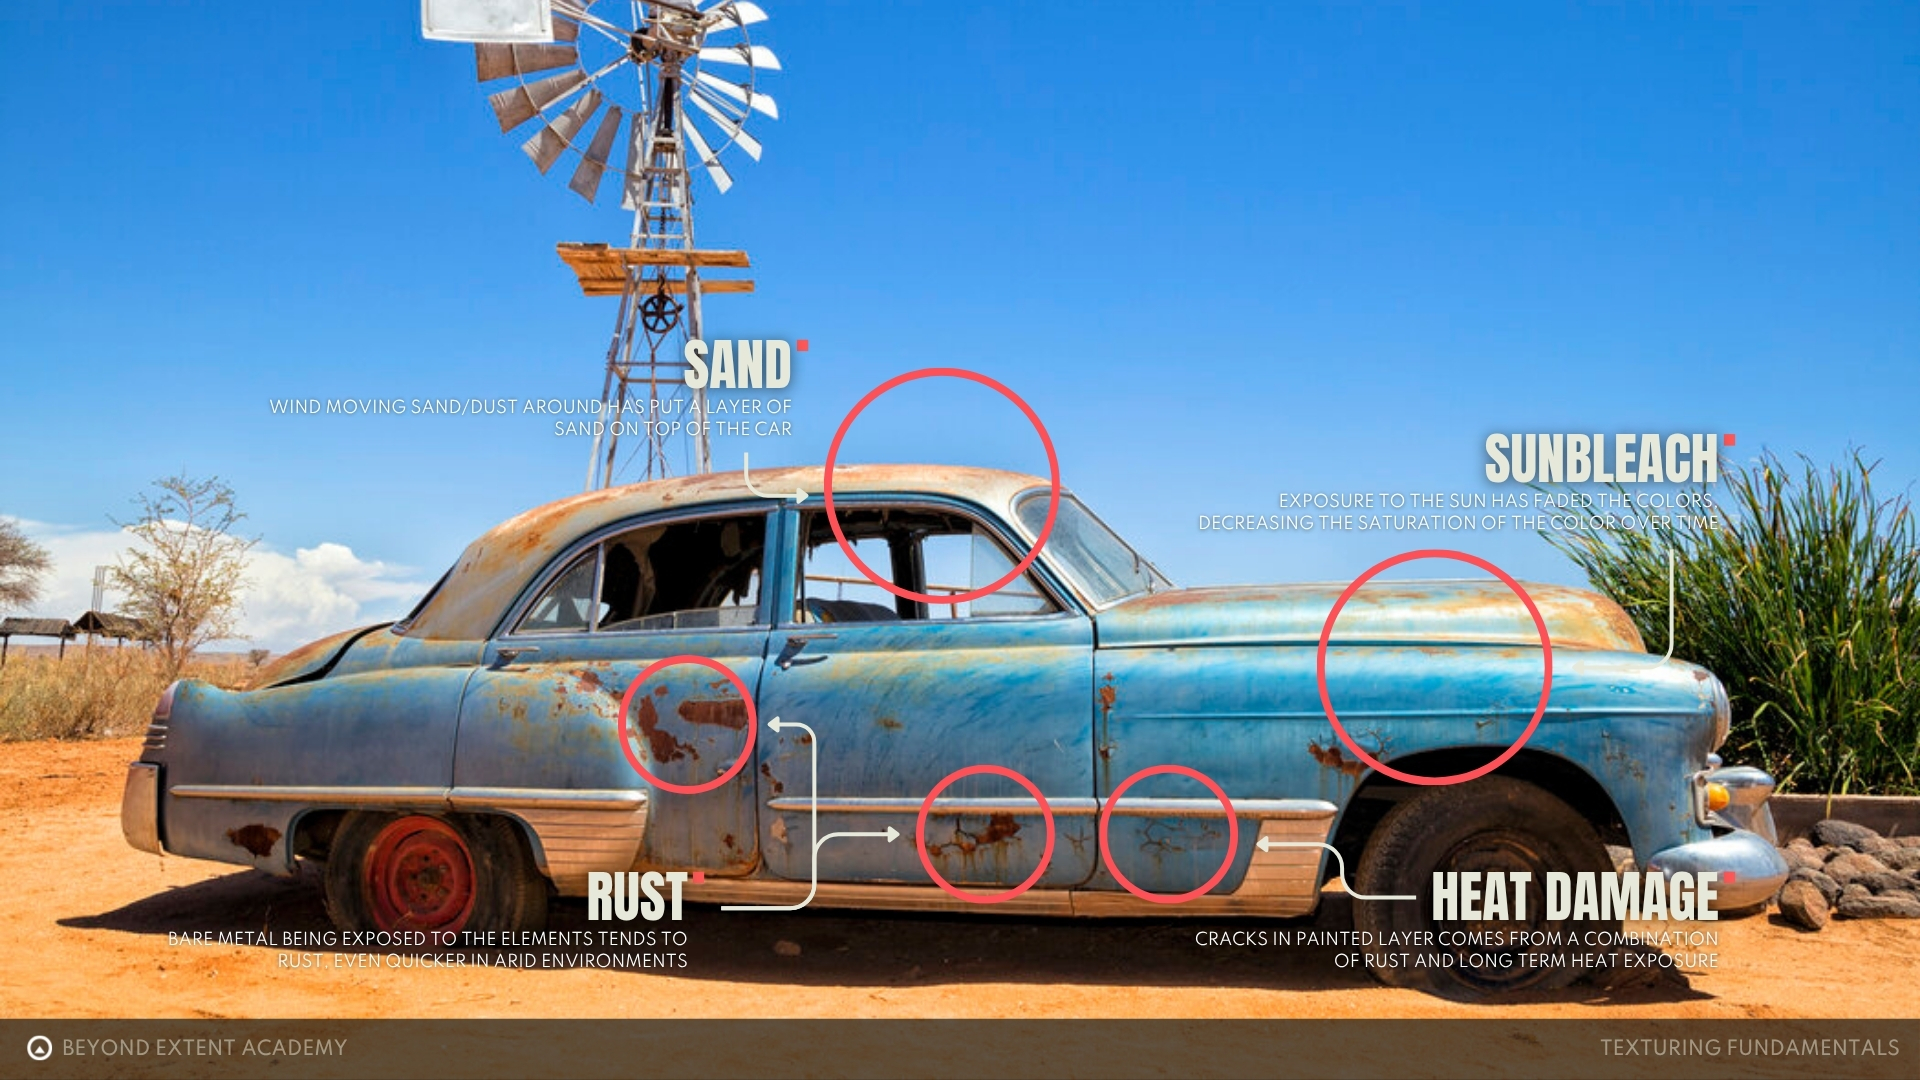
Let’s analyze another example: an abandoned car in the desert. As the car has been exposed to the elements over time, we can see sand building up on protruding edges, in nooks and crannies, and especially on the roof. Areas that are more exposed to the wind, such as the sides, show greater signs of wear. Rust has also formed in spots where the paint has worn off and the metal has been exposed for extended periods.
How is the object being used?
Thinking about how an object is used and adding those details will help sell its believability. An everyday example is your smartphone. How do we normally interact with it? We touch and swipe the screen, which is why smudges appear from the natural oils and sweat on our fingers. Sometimes a phone is accidentally dropped, leaving cracks or scratches. By incorporating these details into the textures, the object becomes far more believable than a perfectly clean, shiny screen.
What are the technical specifics of texturing?
Nowadays, the most common workflow in the game industry is the PBR workflow. You can read more about it in the Intro to PBR Metallic Workflow lesson. At its core, PBR is a rendering method that produces realistic and physically accurate visuals based on texture inputs. In other words, the goal of texturing is to create the textures that the game engine will use.
In most cases 3 texture maps will be exported:
- Base Color
- Normal Map
- ORM (a texture that stores Ambient Occlusion in the red channel, Roughness in the green channel, and Metallic in the blue channel)
In this chapter, we will mainly focus on Base Color and Roughness maps, as they form the basis for achieving realistic results.
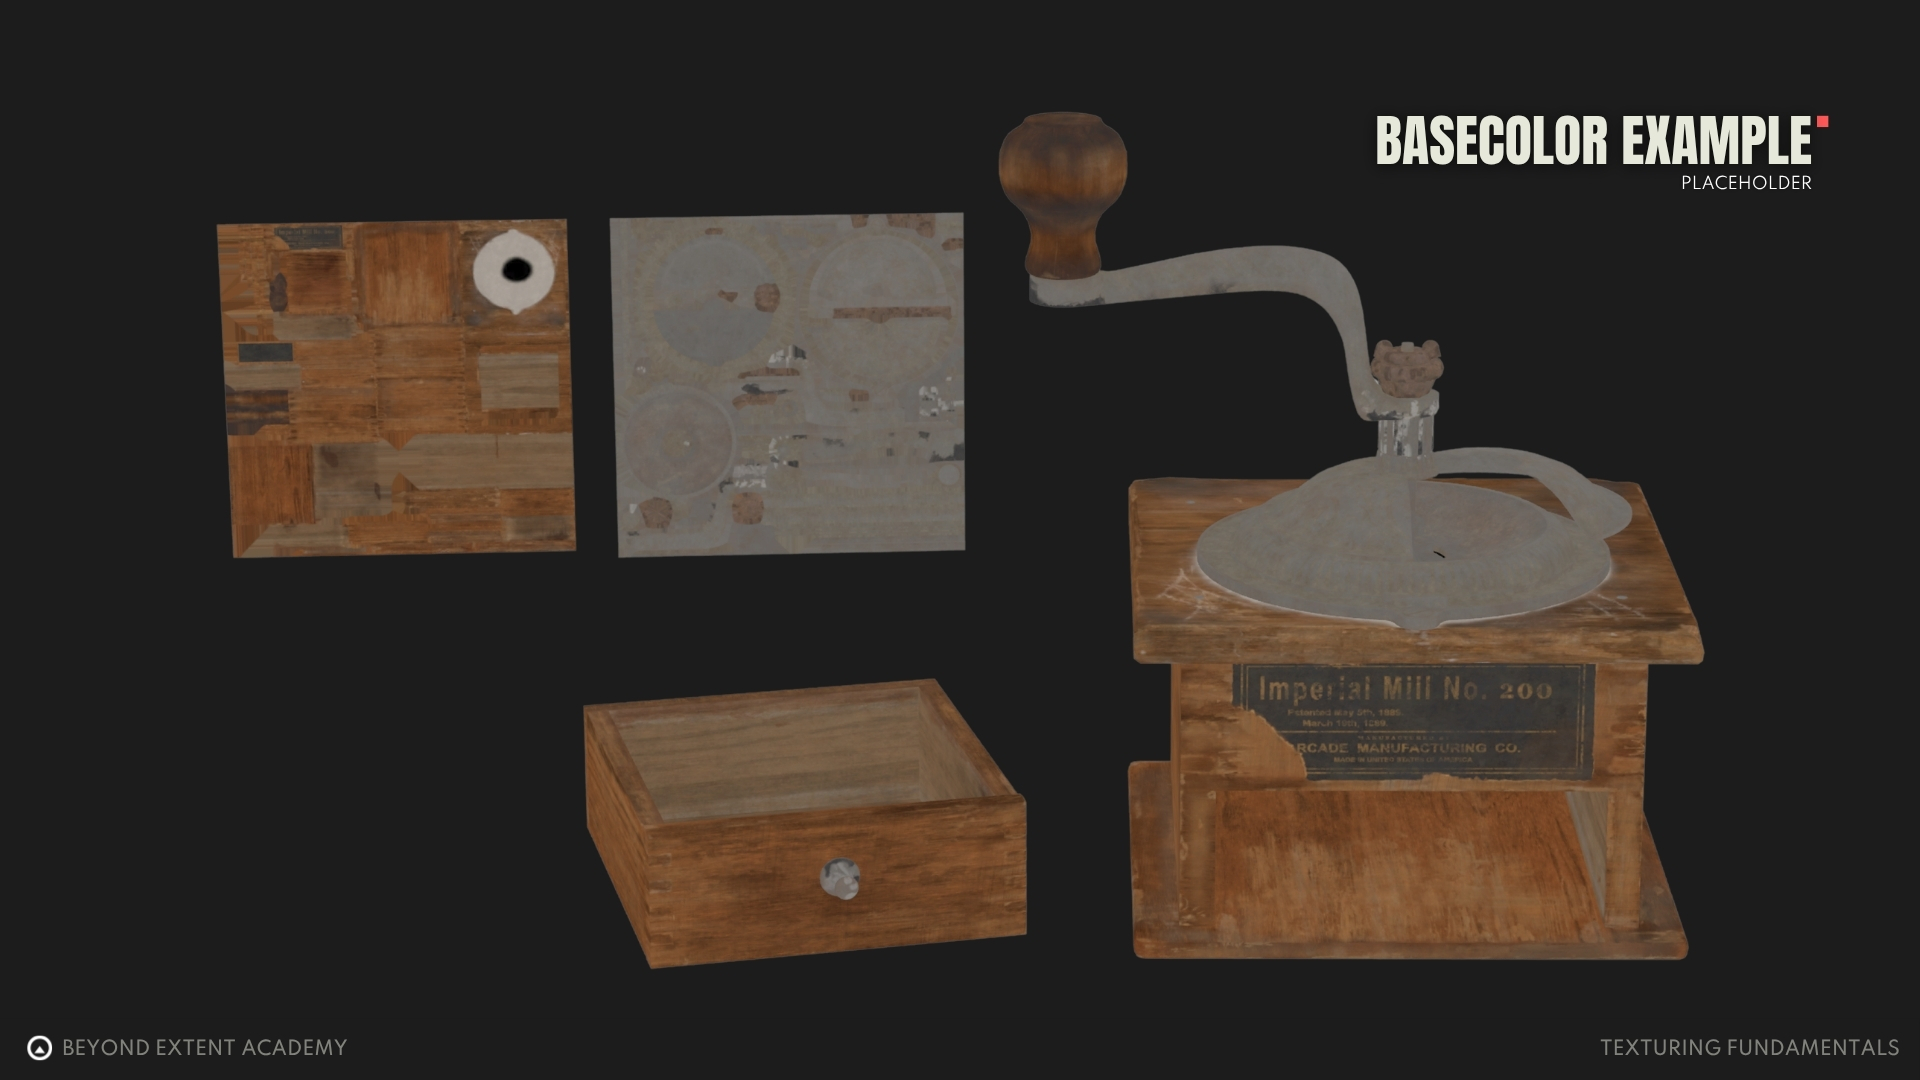
Base color
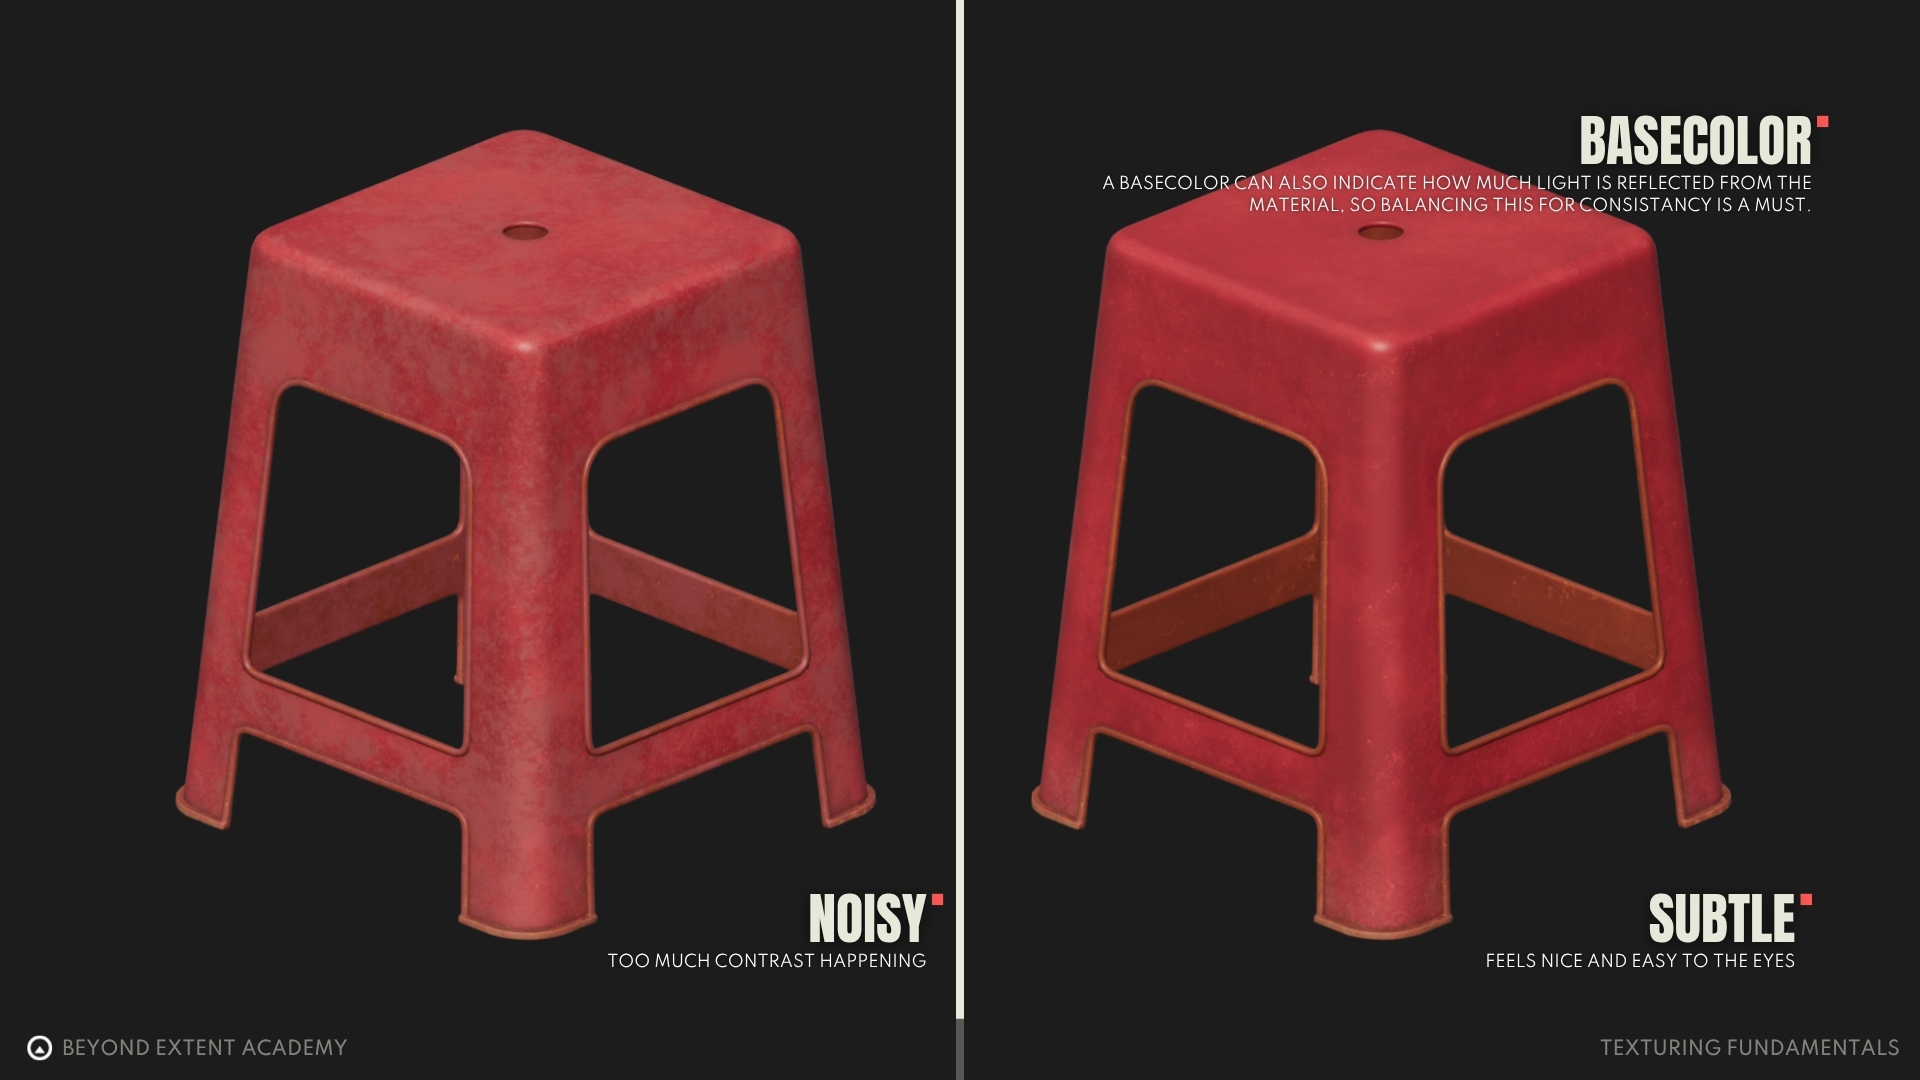
A Base Color texture defines the color of an object without any lighting information and is one of the key maps for achieving realism. When light shines on a surface, some wavelengths are absorbed while others are reflected. The reflected wavelengths determine the colors we perceive.
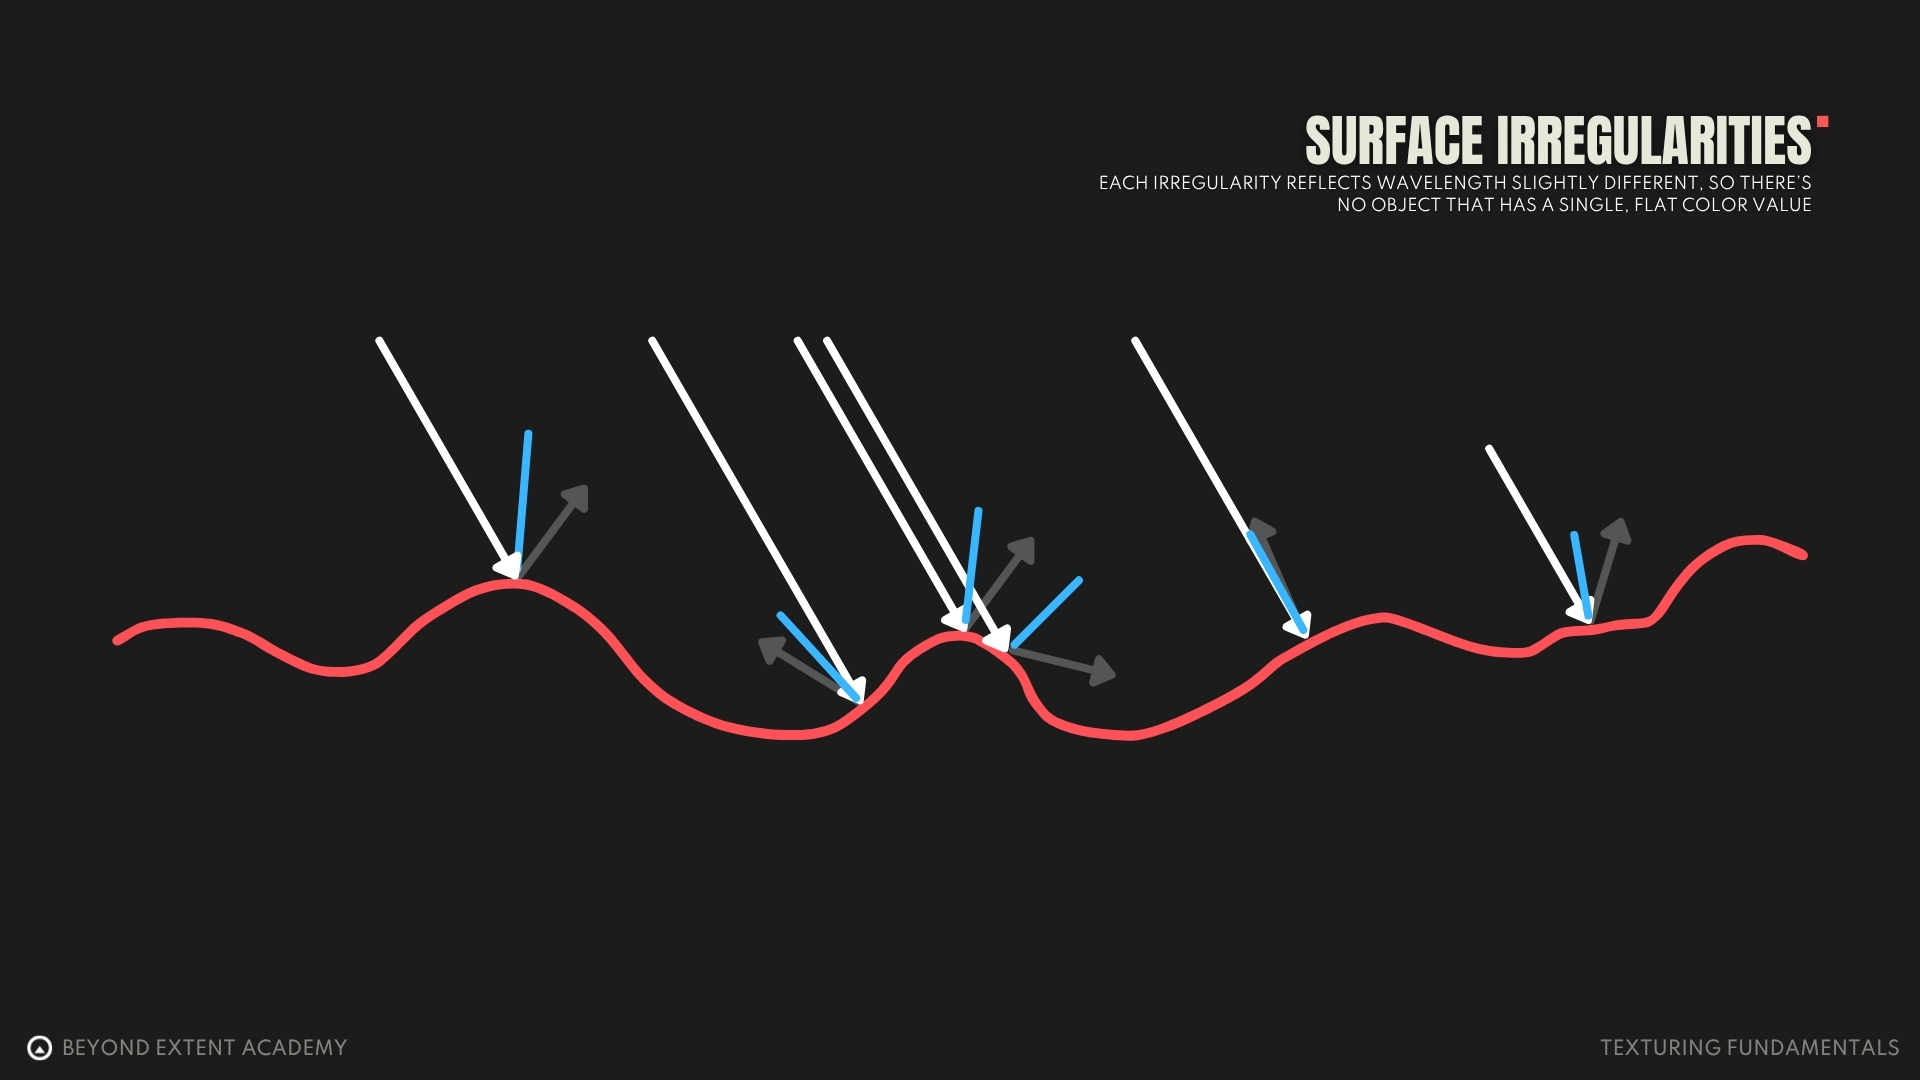
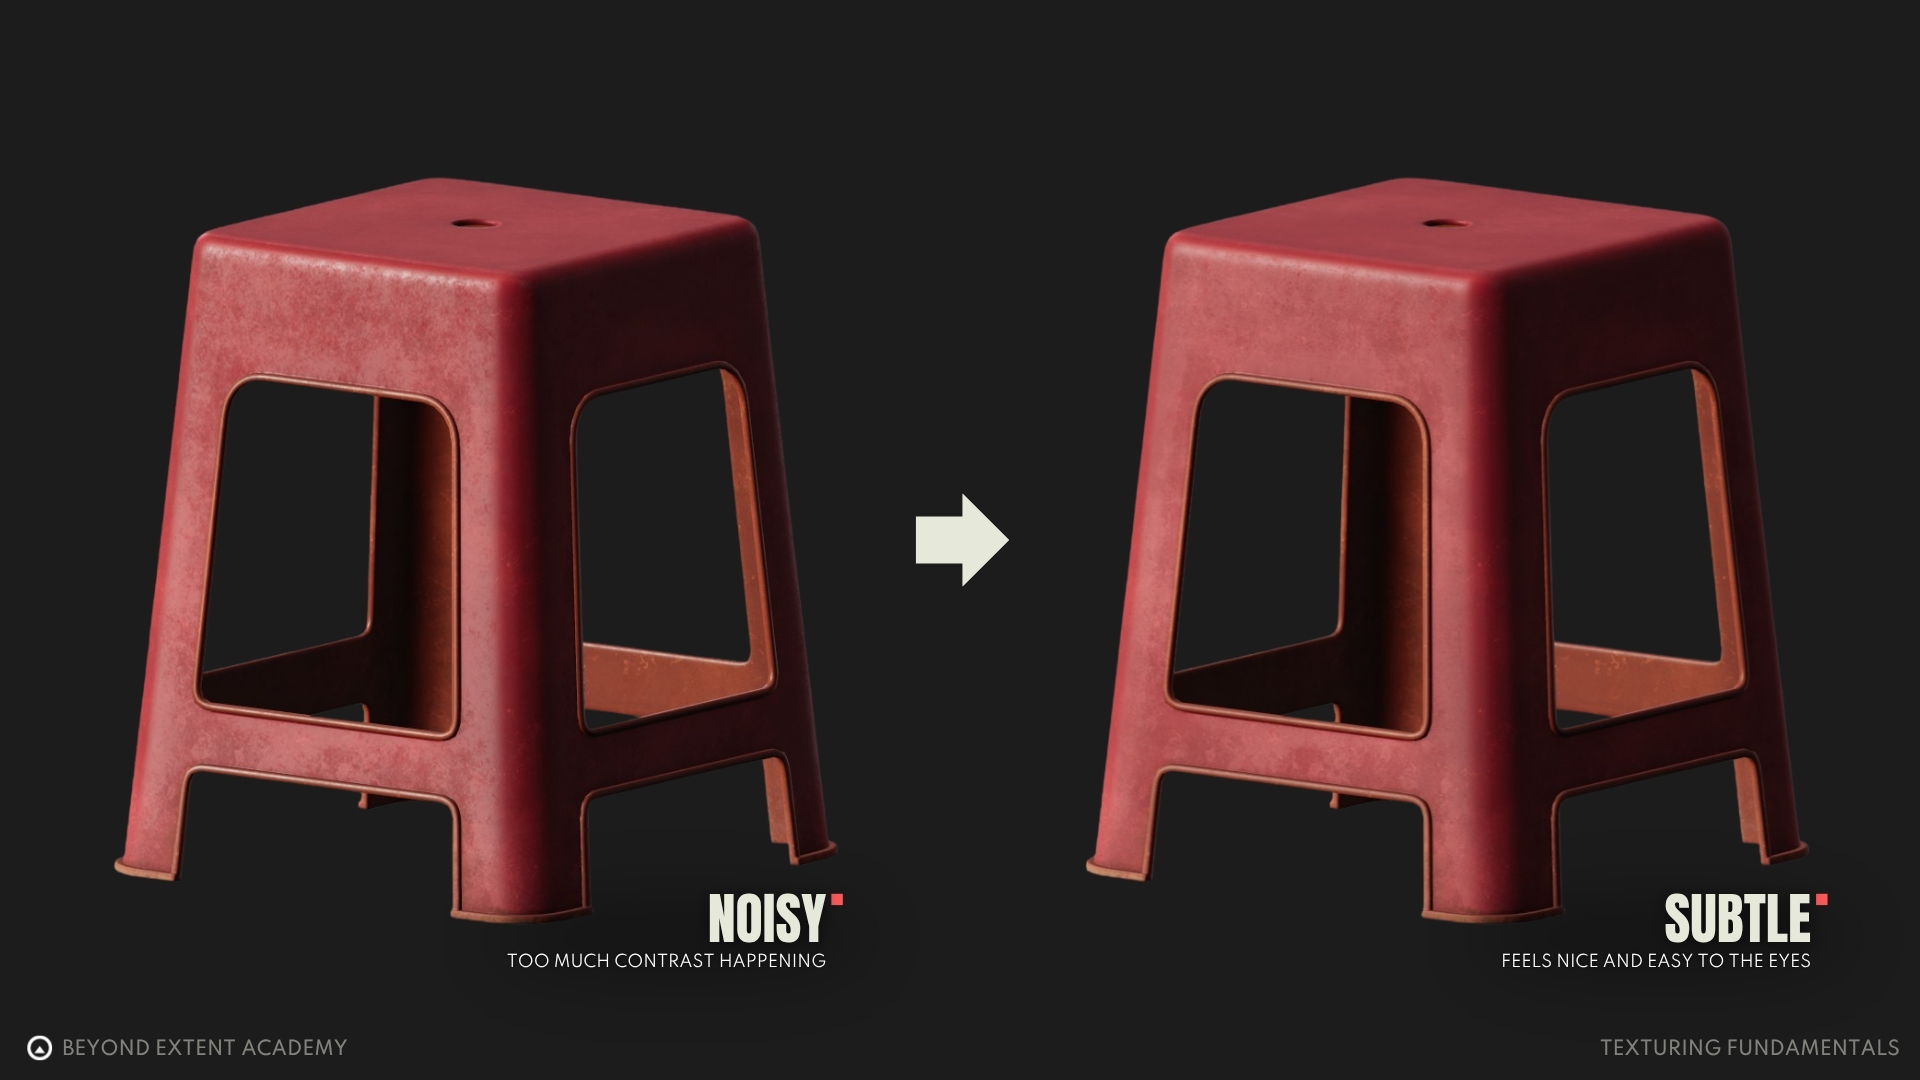
An important fact to keep in mind is that no surface is perfectly smooth. Every surface has irregularities. Each irregularity reflects wavelengths slightly differently, so there is no object with a single, flat color value. There are always subtle color variations. Introducing this kind of variation into our Base Color is an important step toward achieving realistic results. However, don’t overdo it, as it can quickly break realism and make the texture appear noisy.
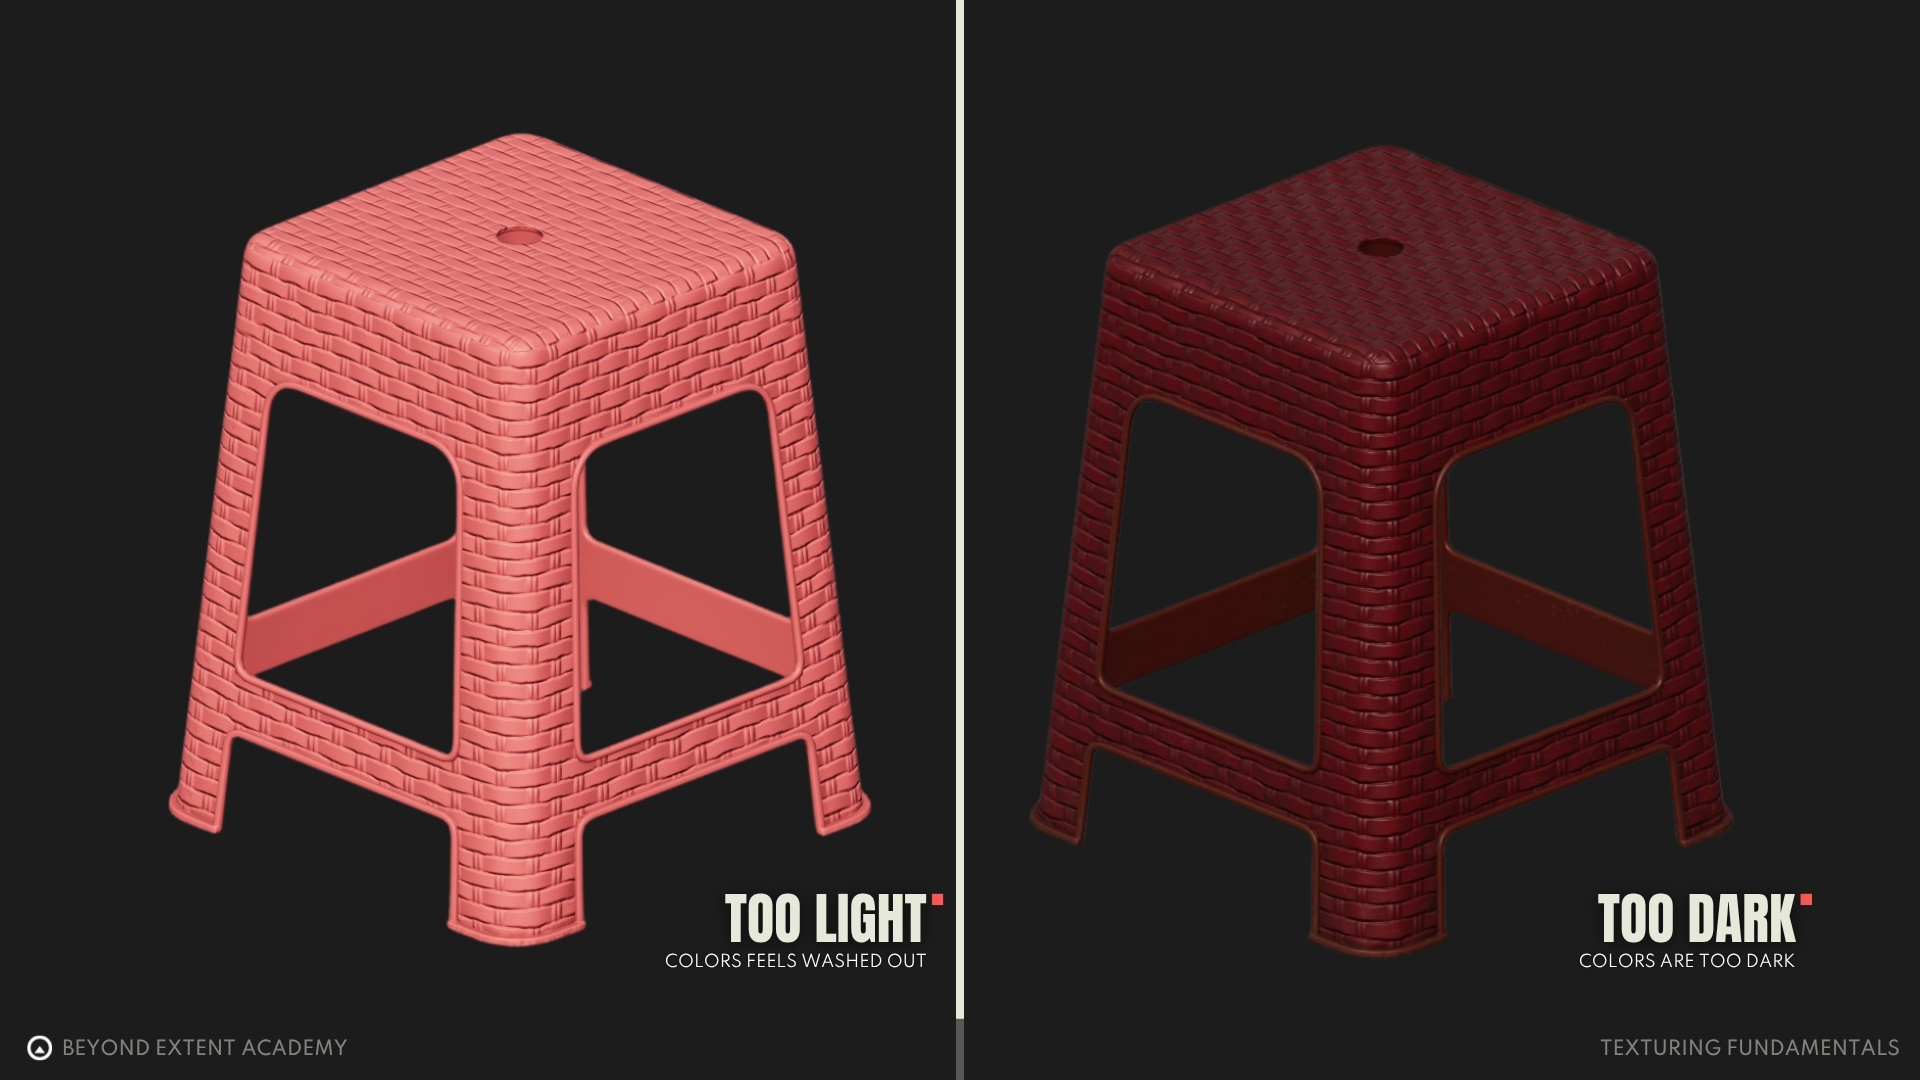
While working on the Base Color, pay close attention to it’s value. A common mistake that can happen is creating textures that are too dark or too bright. If a texture is too dark, it absorbs too much light. If it’s too bright, it will reflect too much light. Both cases are not accurate to reality, and therefore not PBR-correct. In the real world, very few materials behave in this extreme way. This can also cause issues further down the line for lighting artists, as global illumination cannot properly fill a scene with overly dark textures. Conversely, a scene may become too bright if textures reflect too much light.
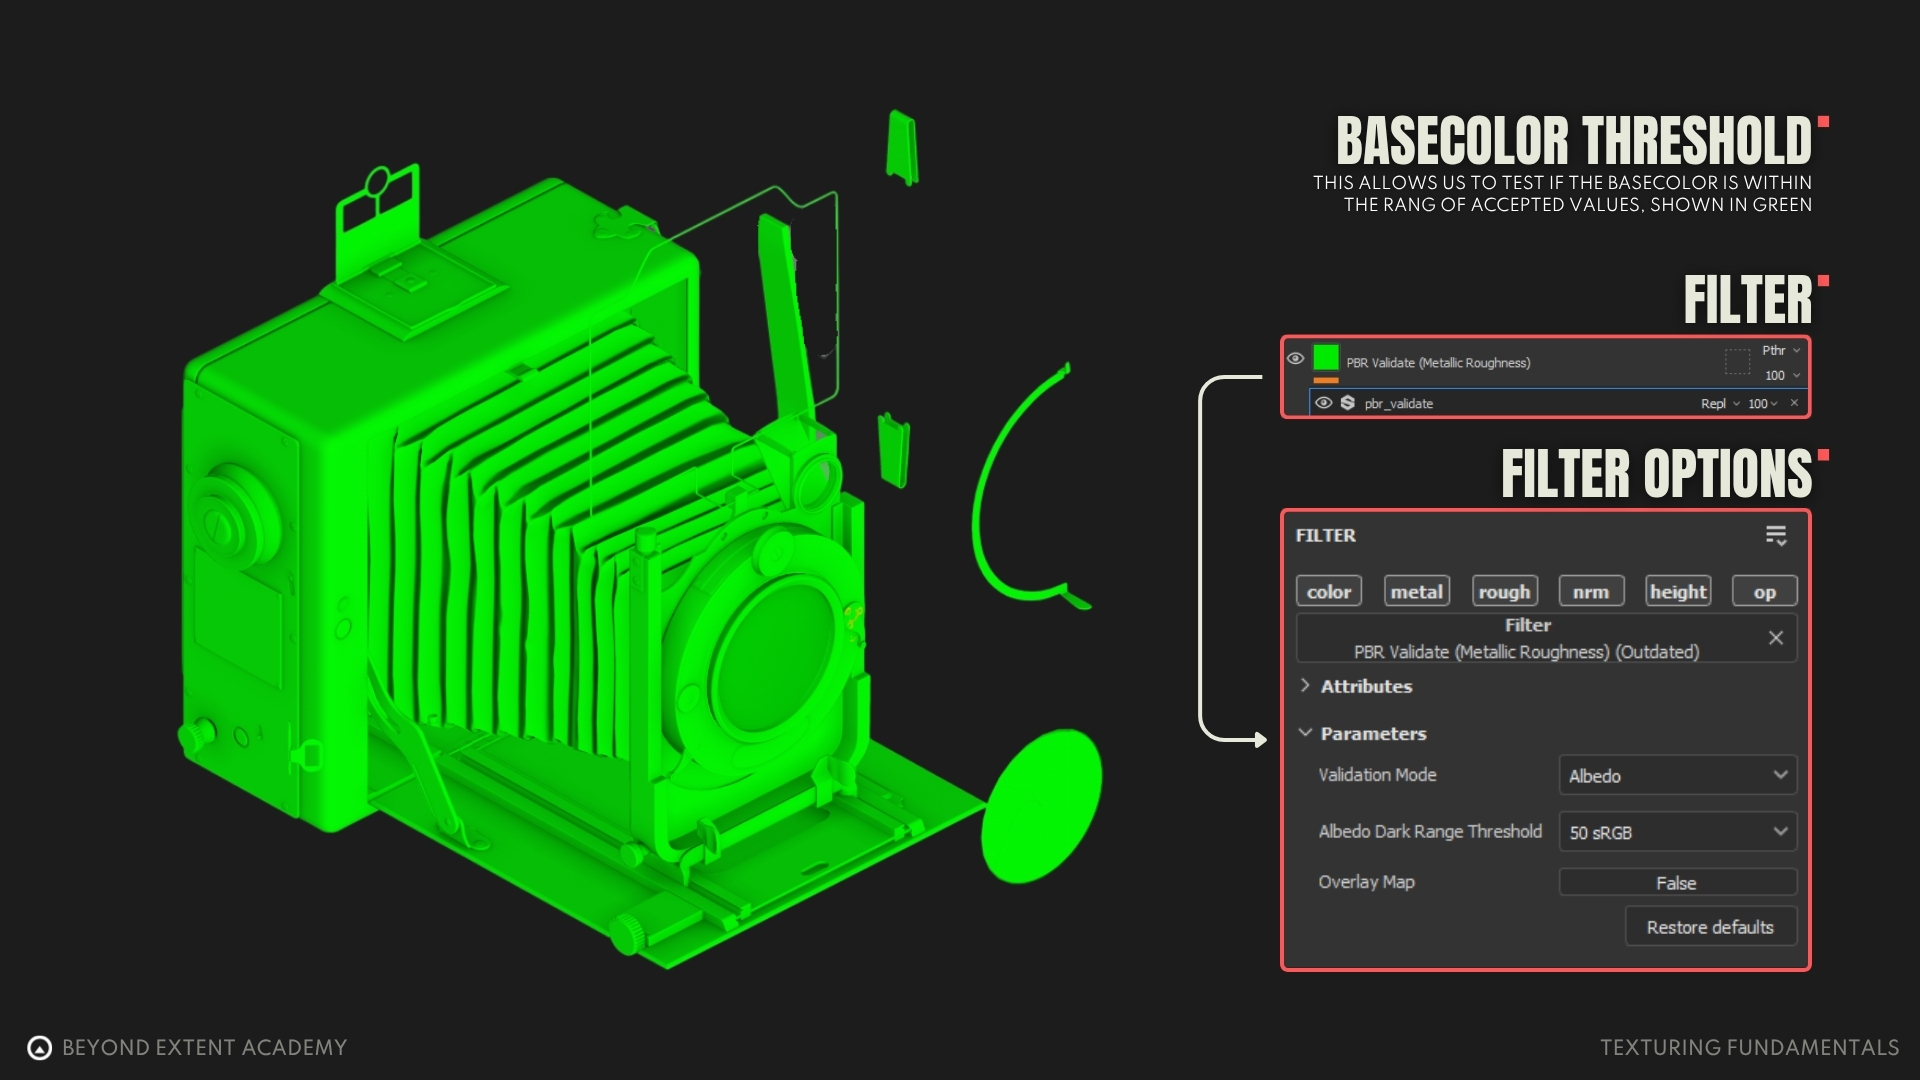
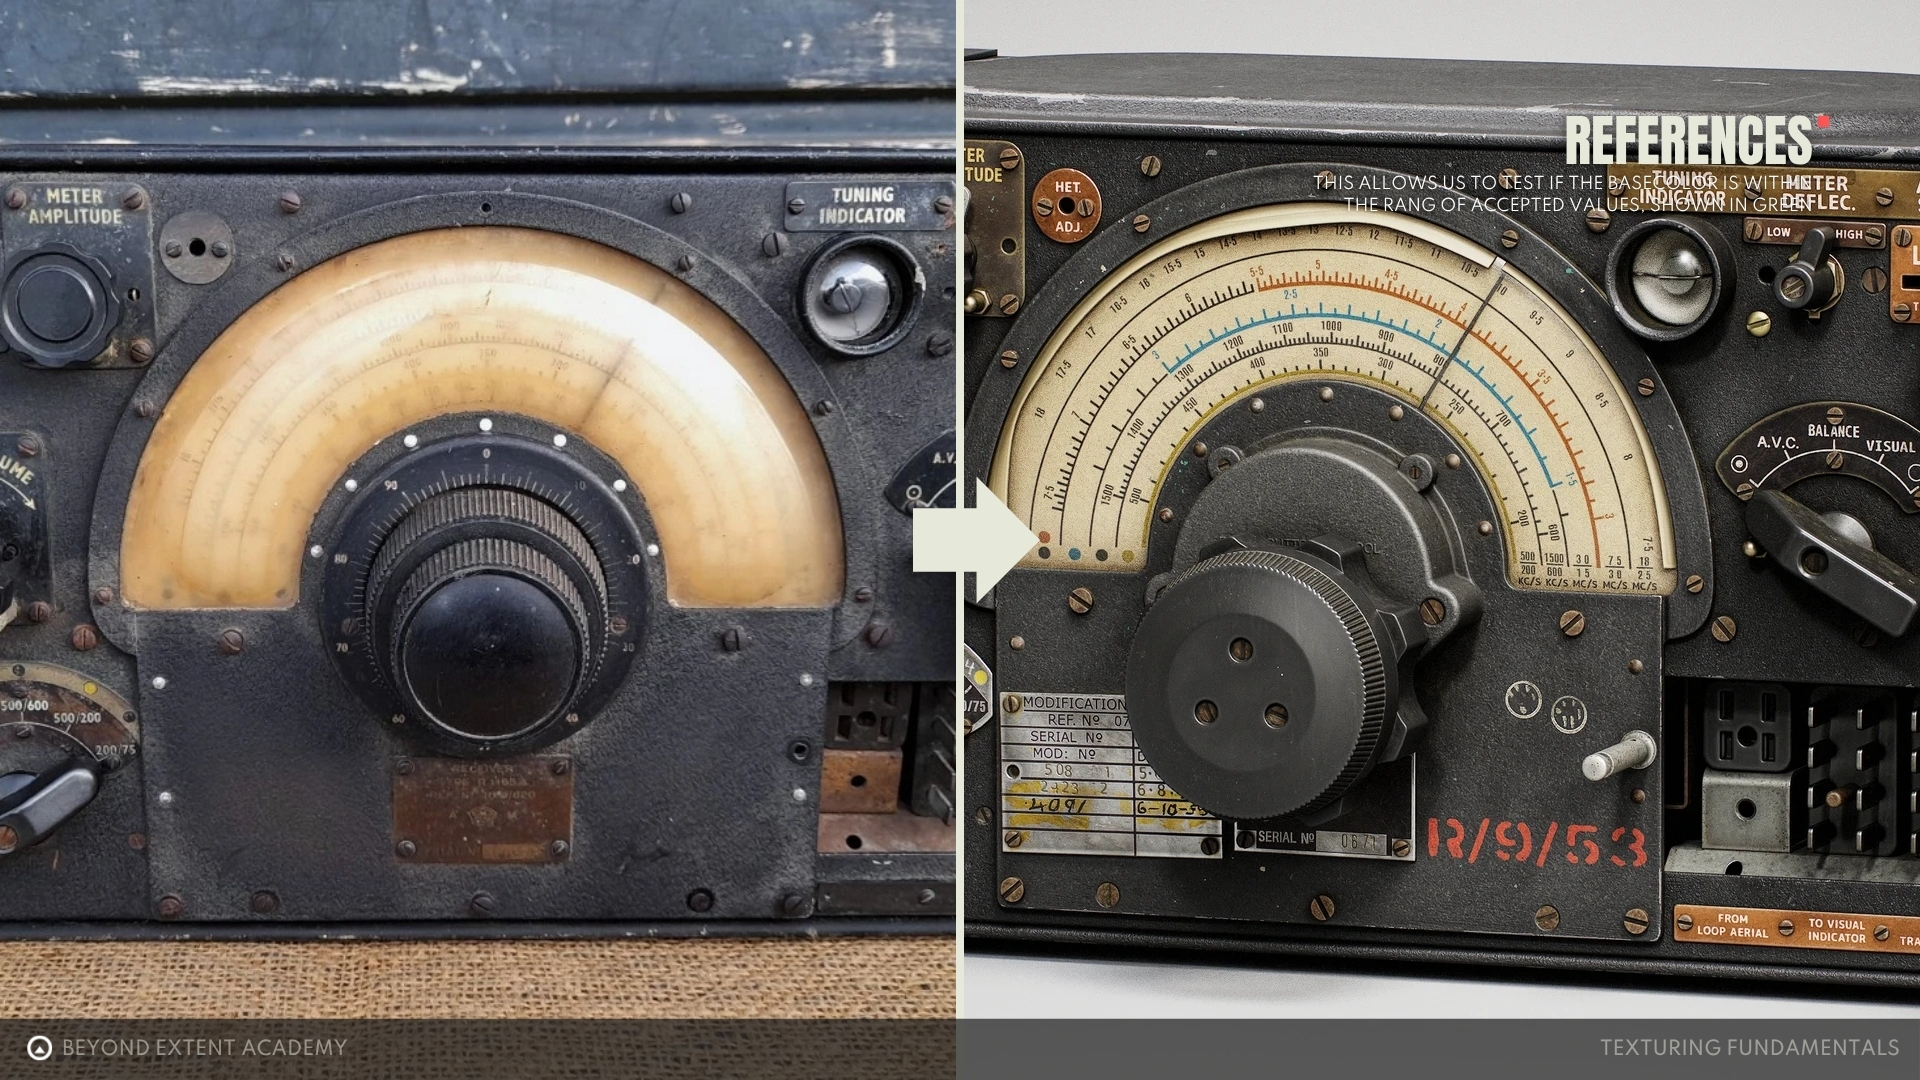
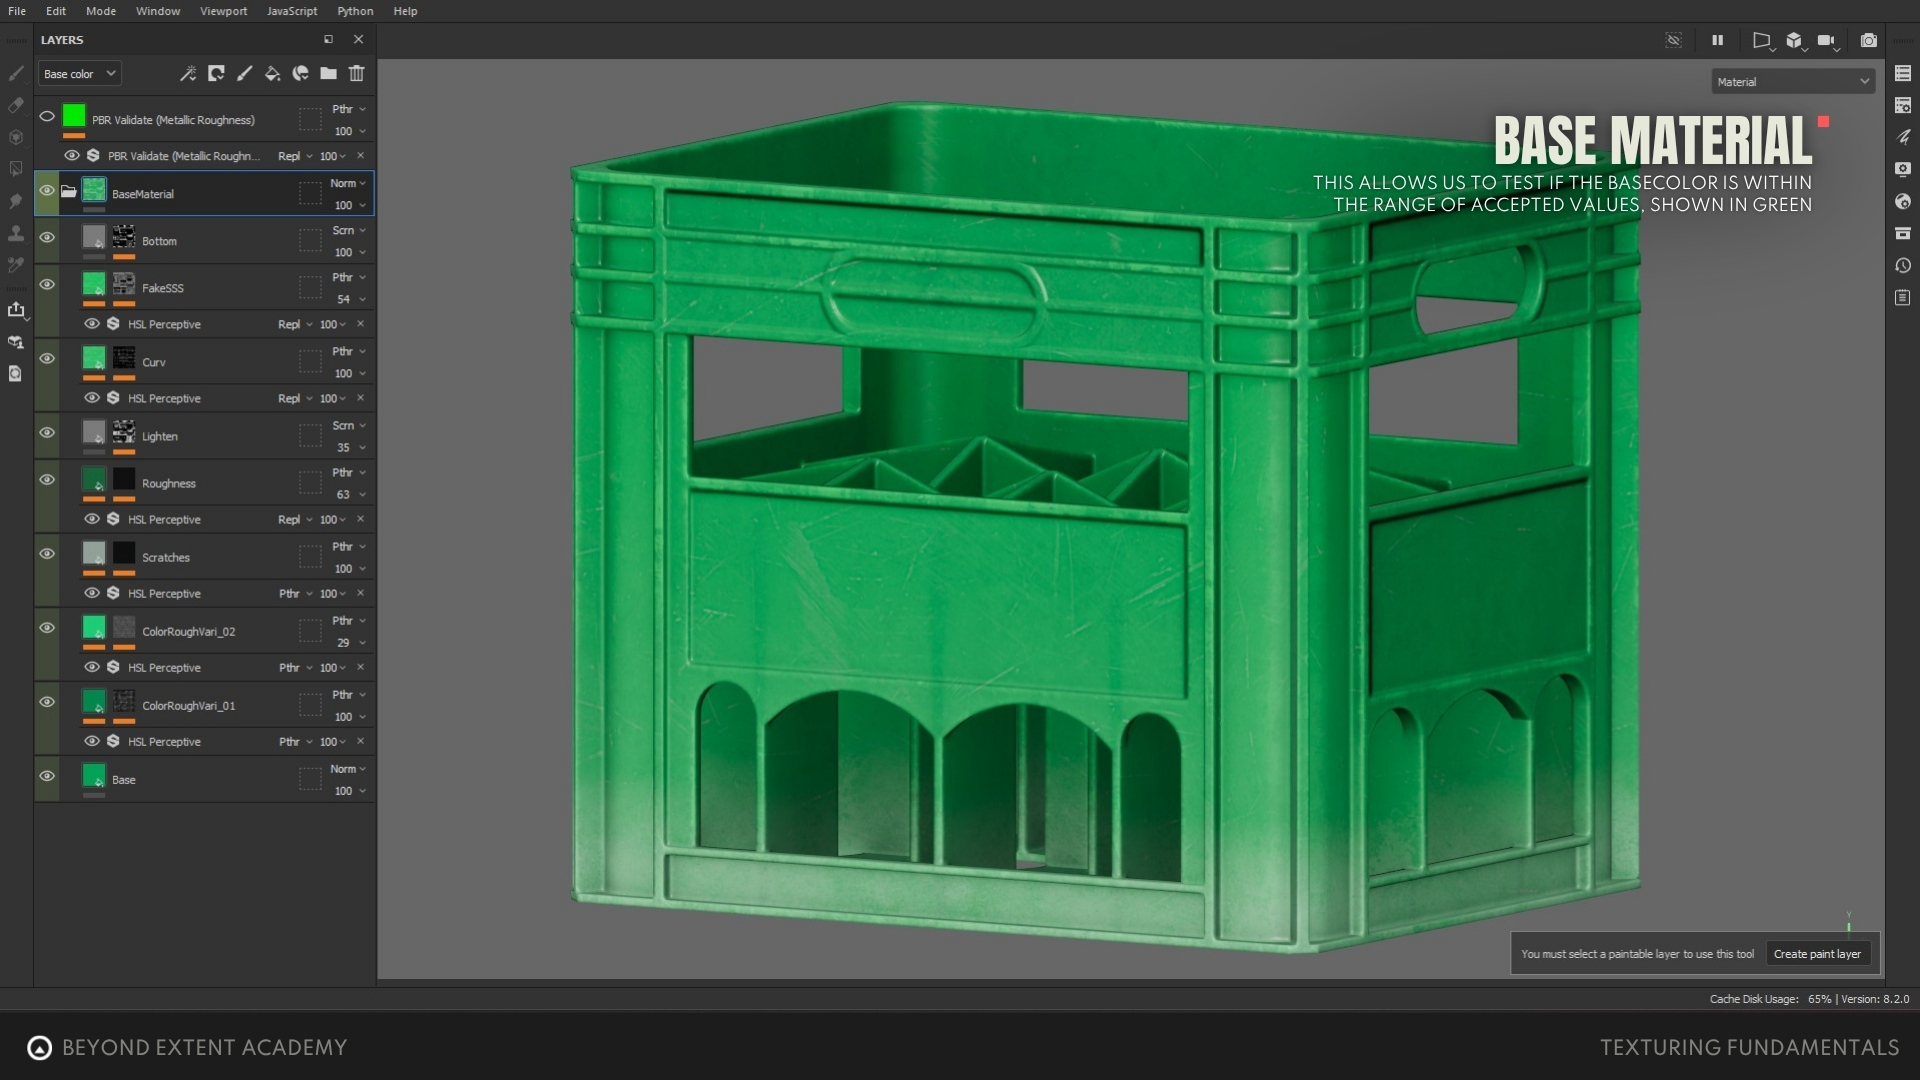
But how do we know if a value is PBR-correct? Texturing software often includes tools to help us determine this. For example, Substance Painter has an easy-to-use tool called the PBR Validate Filter. After applying this filter, it shows whether a texture’s values are within a safe range. Green means the values are PBR correct, while red inicates that something is either too bright or too dark and needs to be adjusted accordingly.
By default, the threshold of the filter is 30 sRGB, meaning the color shouldn’t be darker than 30 sRGB (the darkest value typically found in the physical world). However, it’s recommended to set the threshold to 50 sRGB, which is roughly the darkness of charcoal. Since very few real-world objects are darker than charcoal, this higher threshold helps make sure our textures remain realistic.
Roughness
Roughness textures play a huge role in achieving realism. They define how smooth or rough a surface is and influence how light interacts with it. A good roughness map should capture realistic highlights and reflections, adding realism to an asset.
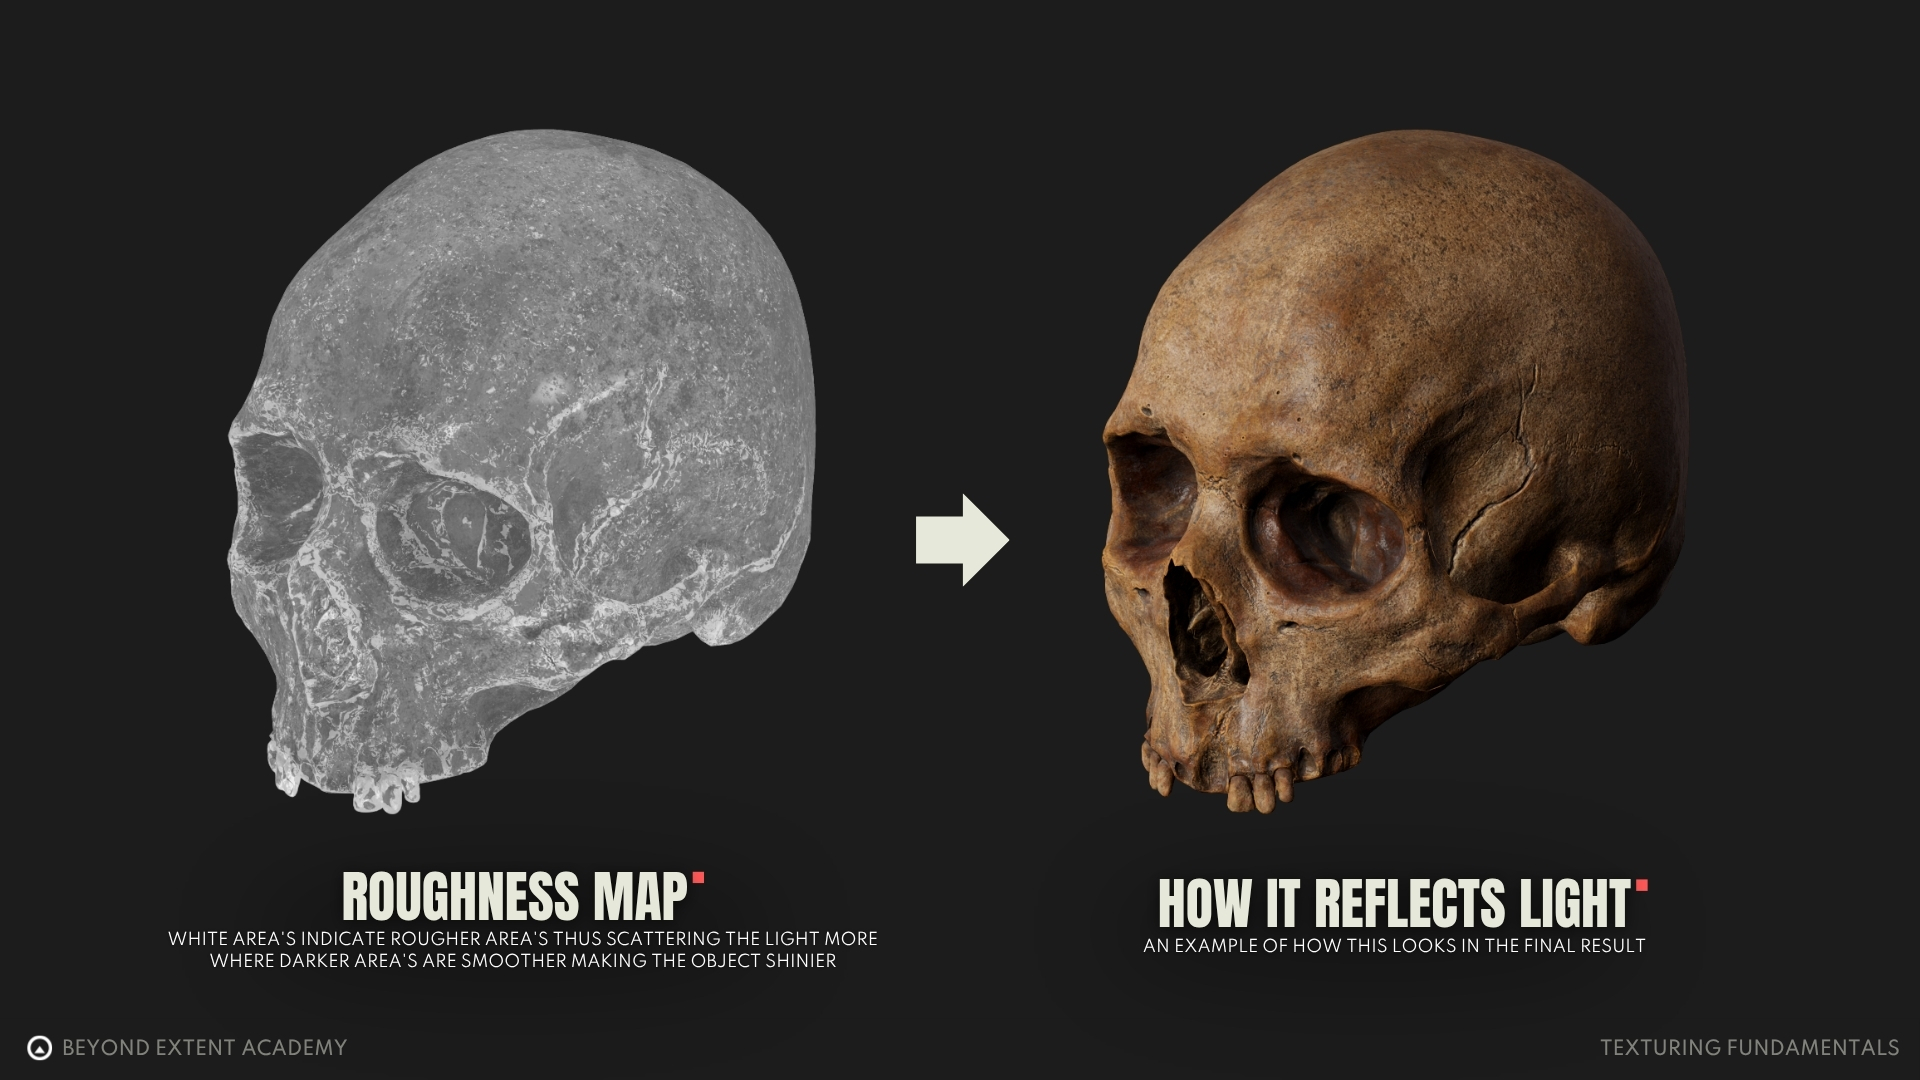
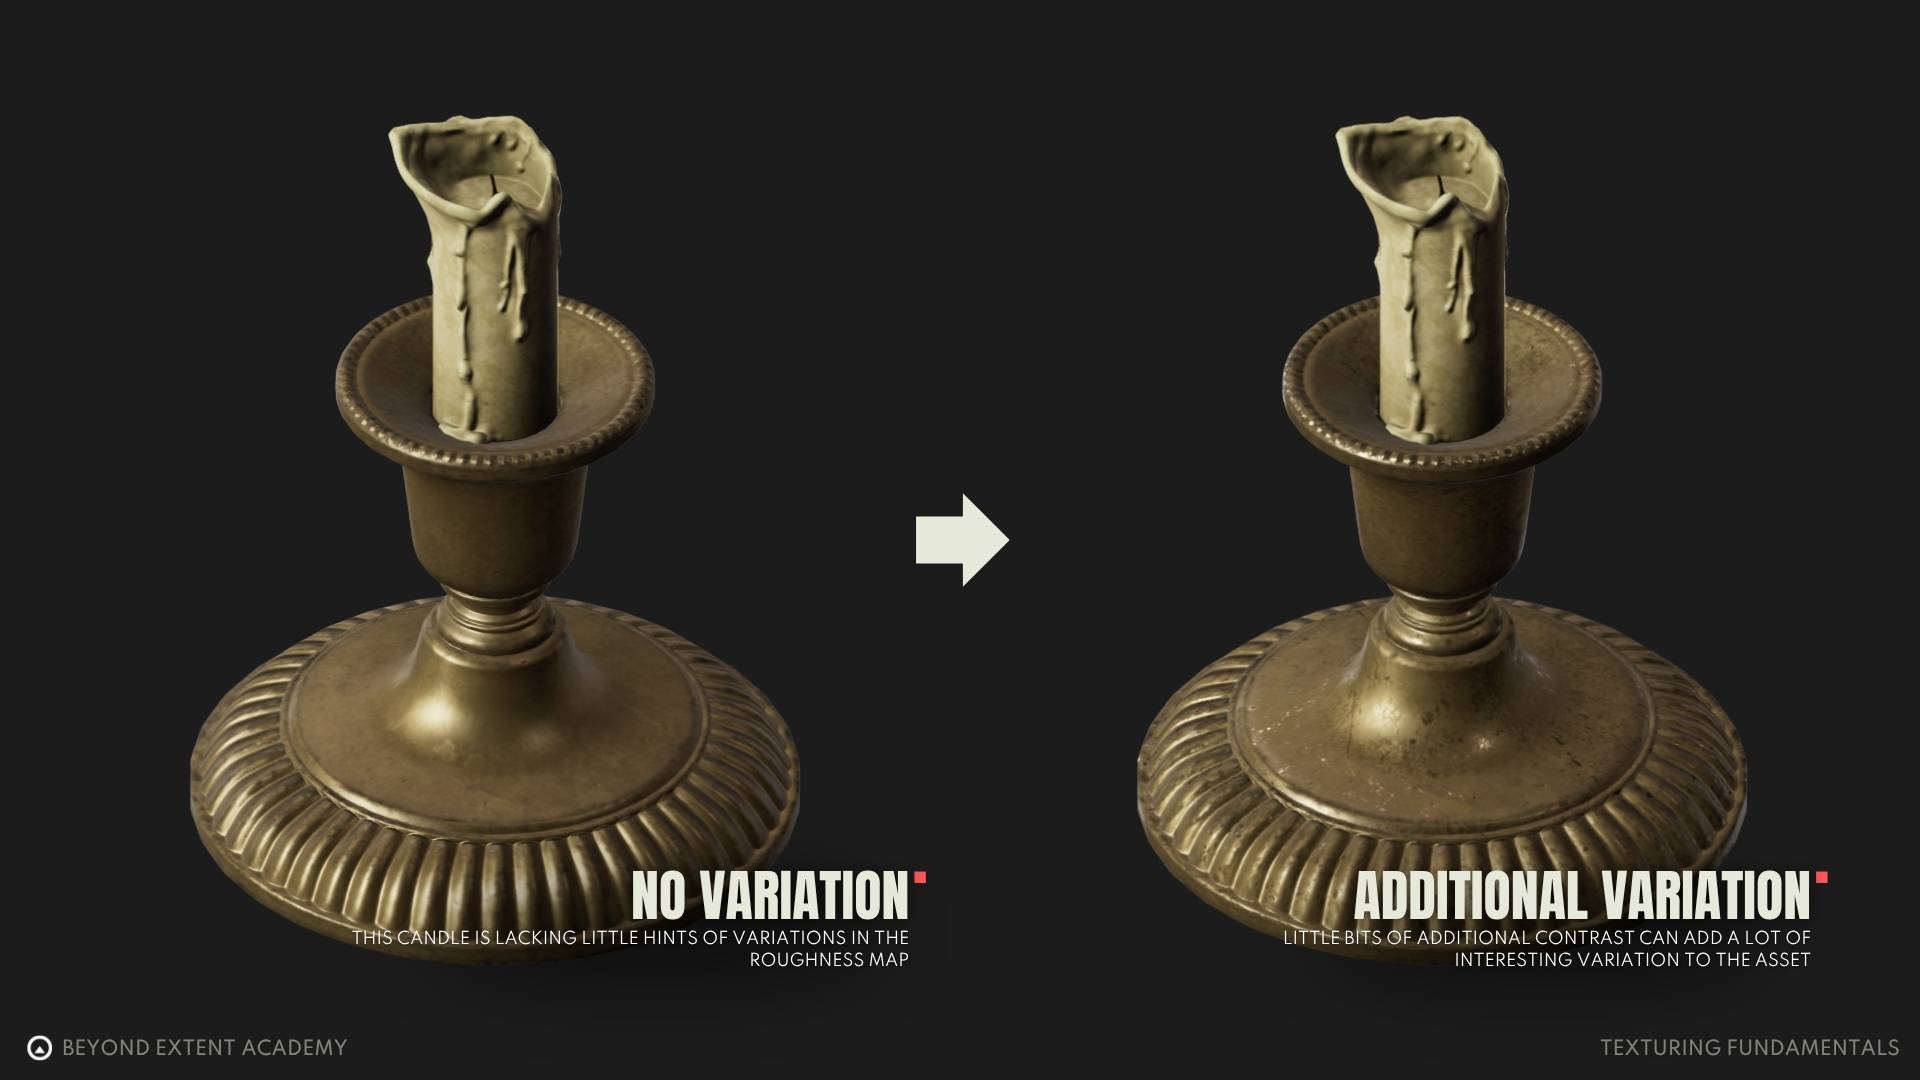
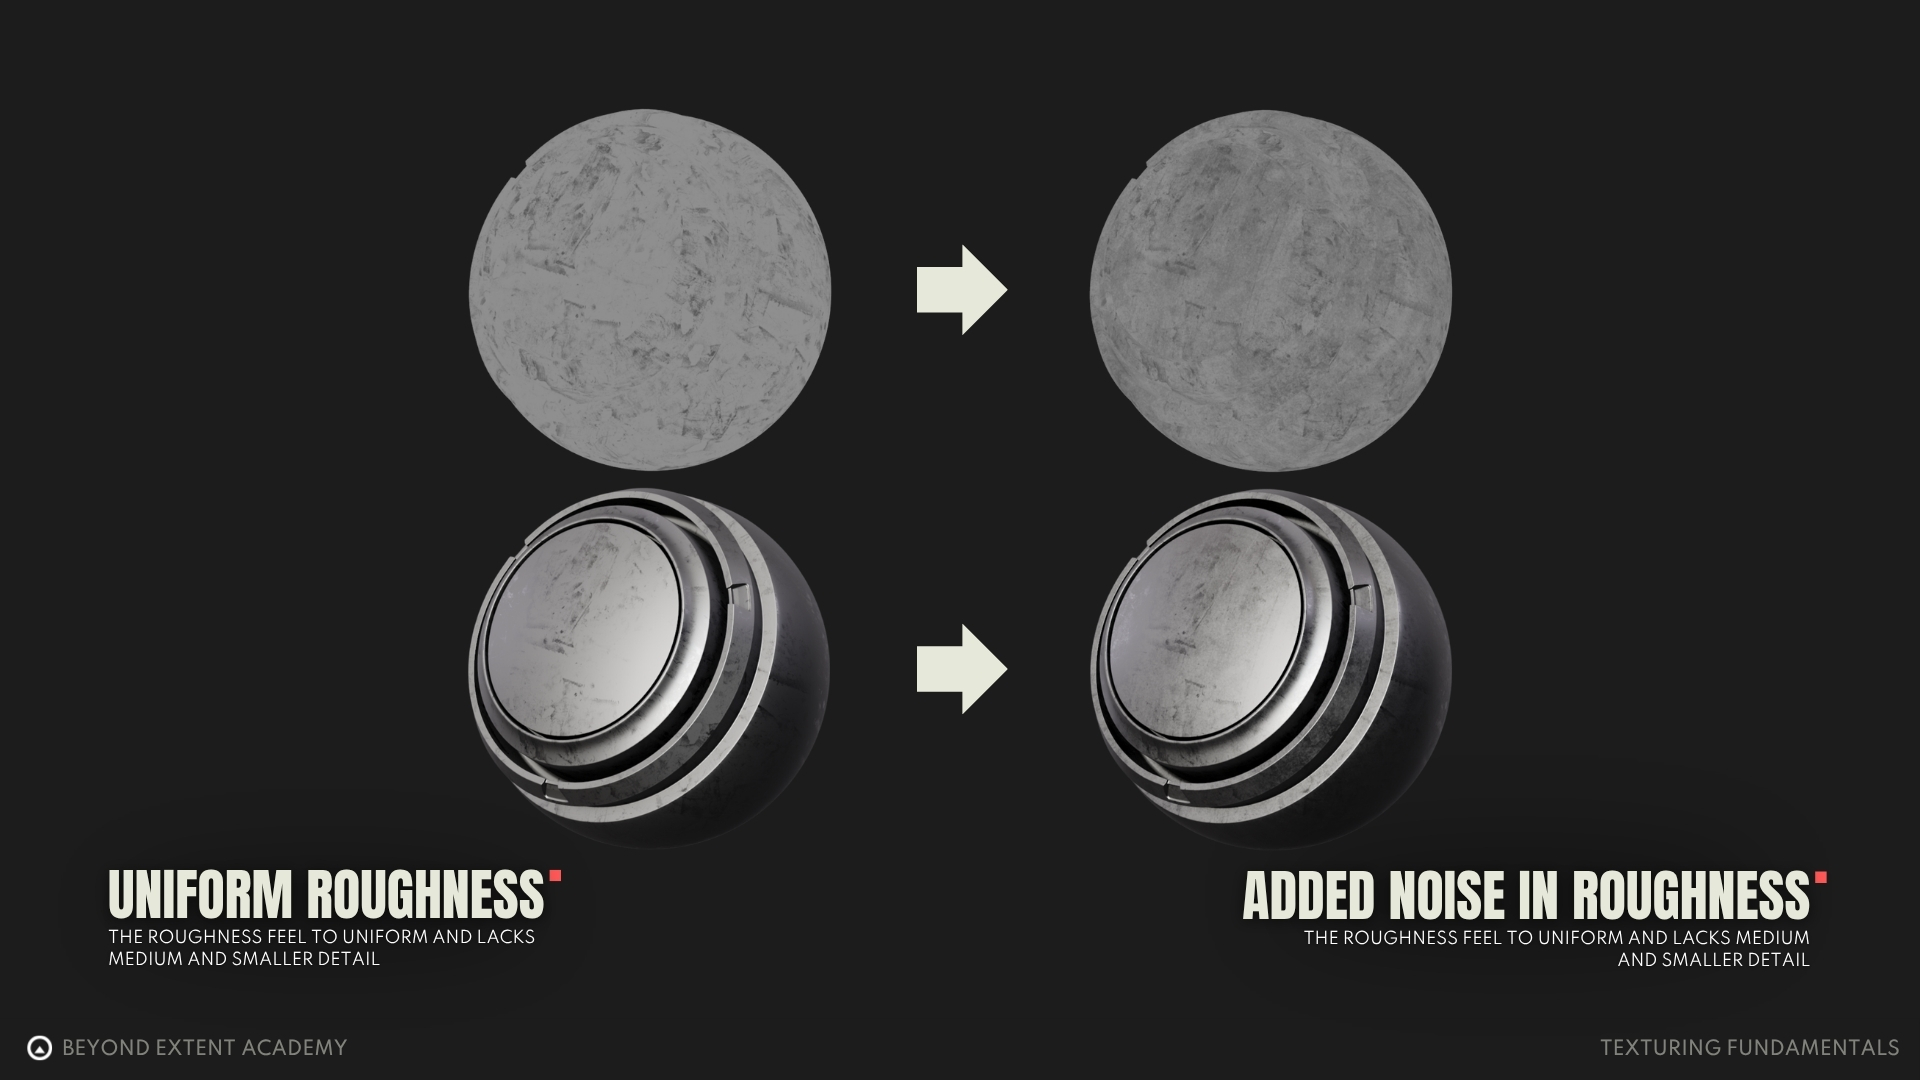
Roughness textures also add contrast to an asset by defining rough and smooth areas. As mentioned above, there are no perfectly smooth surfaces. Depending on how much unevenness a surface has, light will be scattered in less (smooth) or more (rough) random directions. A realistic roughness texture therefore never has just one value. As with base color, do not overdo roughness variation, otherwise the texture will appear noisy.
Take a look at the bronze part of this candle holder with two different roughness maps. The first one is perfectly smooth, whereas the second one has both smooth and rough areas.
Similarly, these plastic crates also demonstrate the importance of roughness. The second plastic crate has more interesting and realistic light reflections because of these variations. This type of contrast between two different roughness values makes the asset more visually appealing.

Reference photos and videos are your best friends when it comes to creating realistic roughness textures. By observing how highlights behave, you can determine whether your map produces a similar result. Of course, it is not possible to recreate a texture that looks exactly like the reference. It is about achieving similarity.
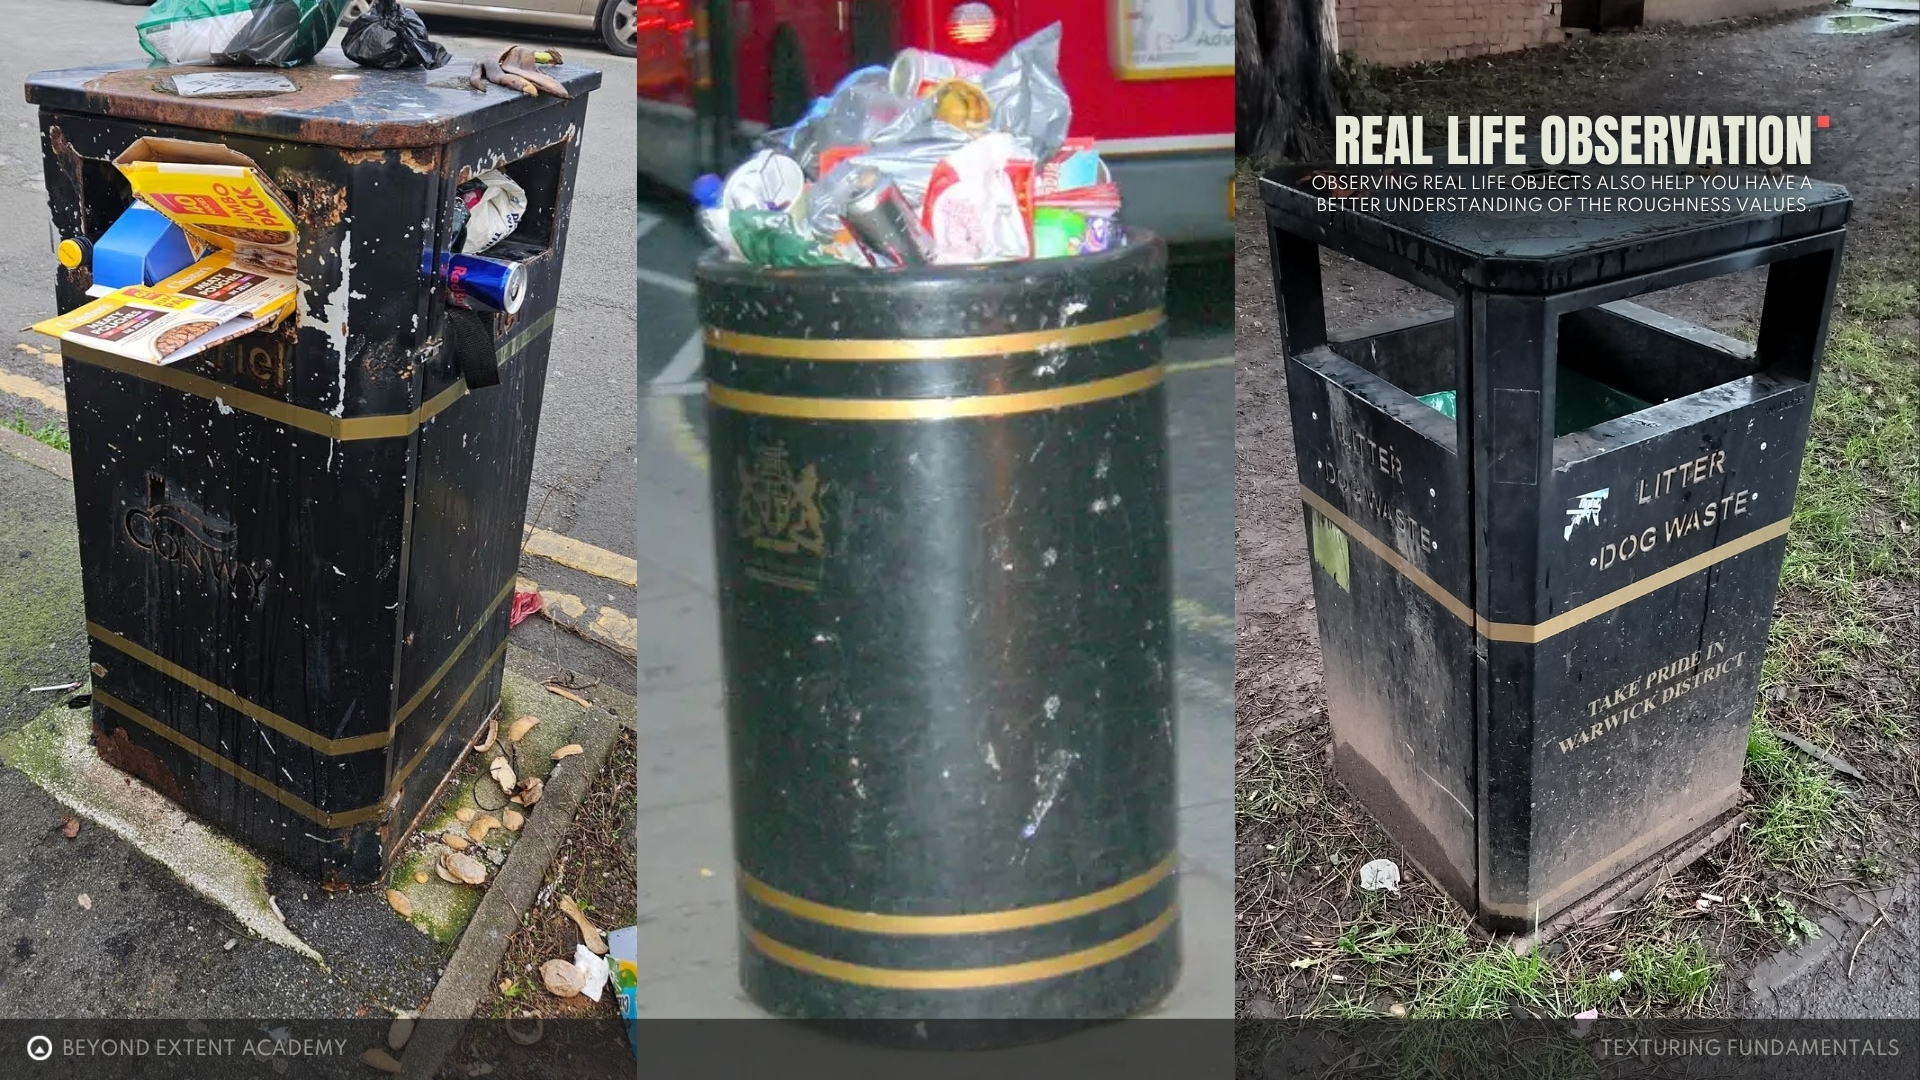
Observing real-life objects also helps you develop a better understanding of roughness values. Every day, we come into contact with different types of objects. We can always feel what causes their surface behavior, but we rarely actively think about it.
For example, a trash can made of painted metal is typically shiny. However, since it is placed on the street, dirt and dust begin to accumulate on it, resulting in a rougher surface in some areas. Additionally, people throwing away unfinished drinks can cause splashes and drips on the trash can, making those areas glossier.
Workflow of texturing
Let’s take a look at what the general texturing workflow looks like. The process can be described in three steps:
- Creating a base material
- Adding wear and tear
- Hand-painting details
Before we dive into these steps, we should first look at the basic elements of the process: layers and masks.
Layers and Masks
The fundamental elements of the texturing process are layers and masks. A layer contains different types of information: base color, height, roughness, metallic, and normal. These five properties are the most common in PBR texturing. It is important to understand that layers stack on top of each other and, by default, overwrite one another.
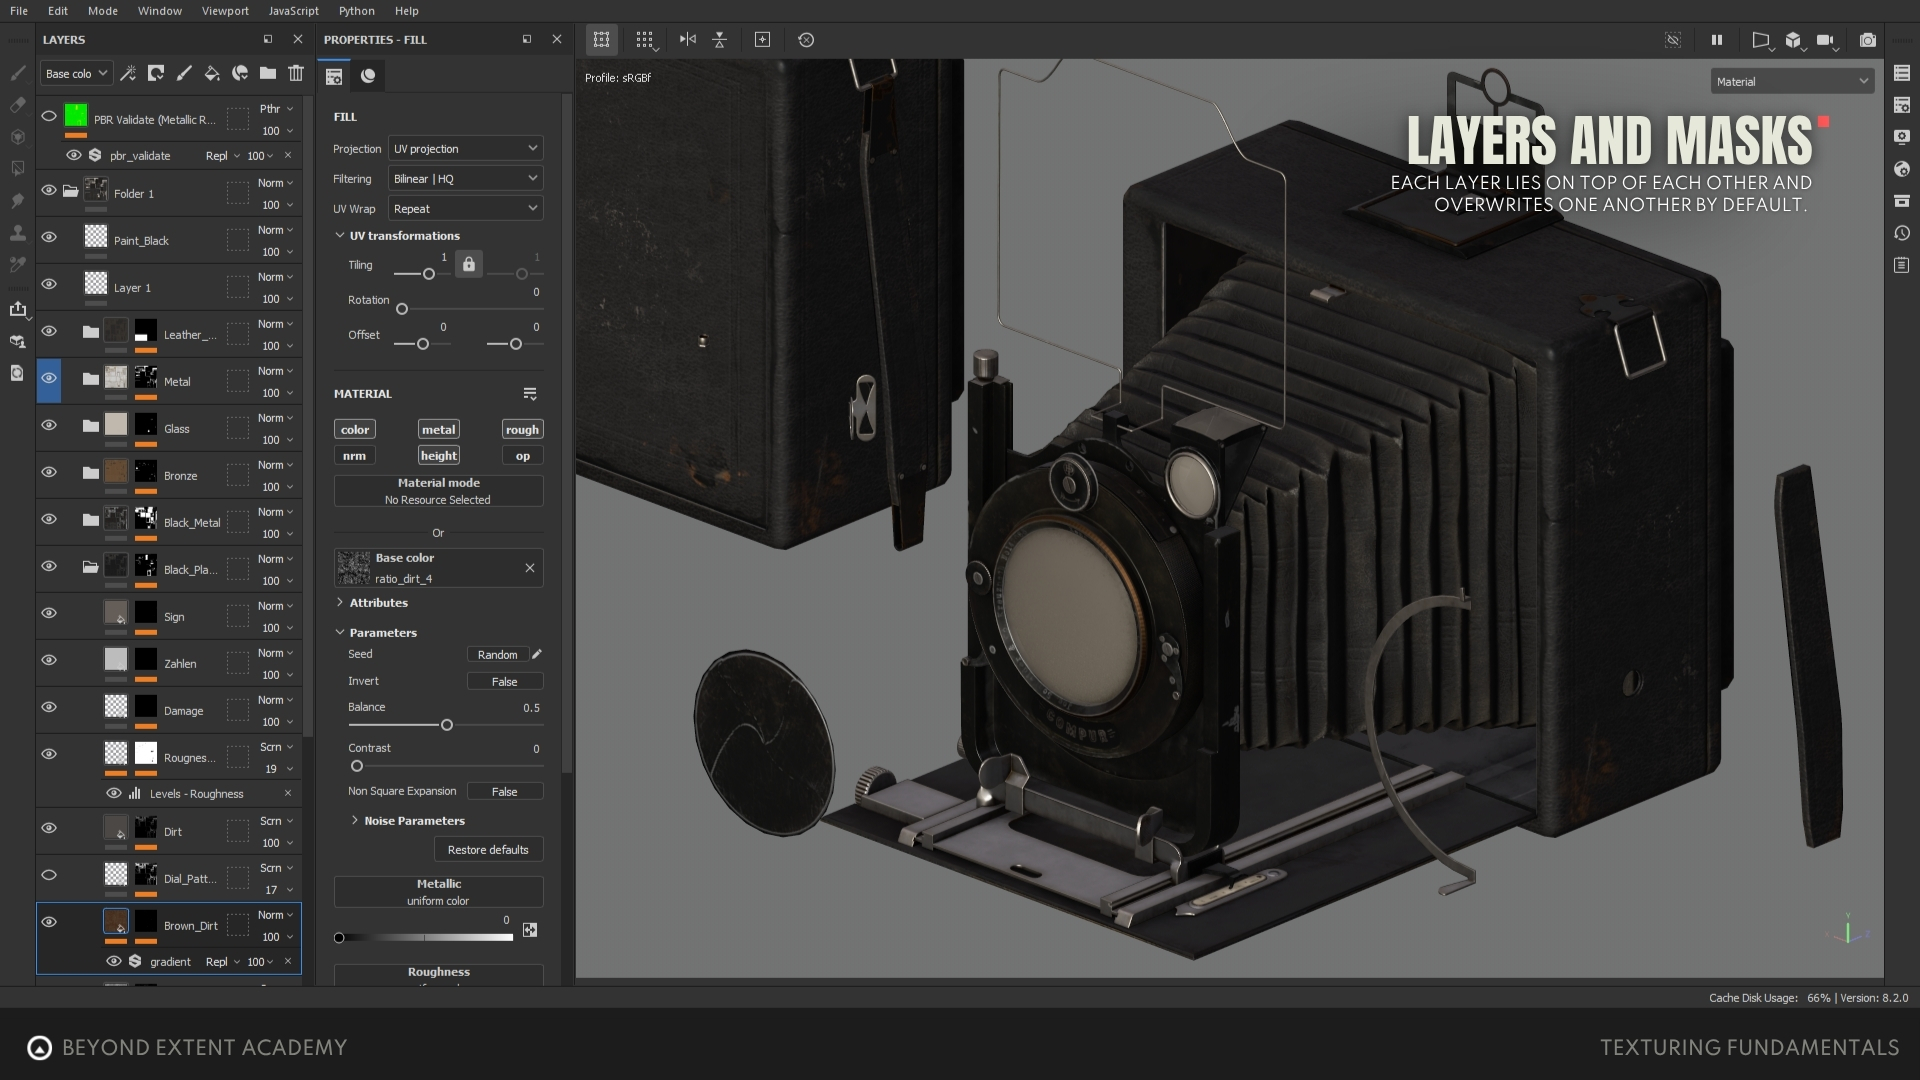
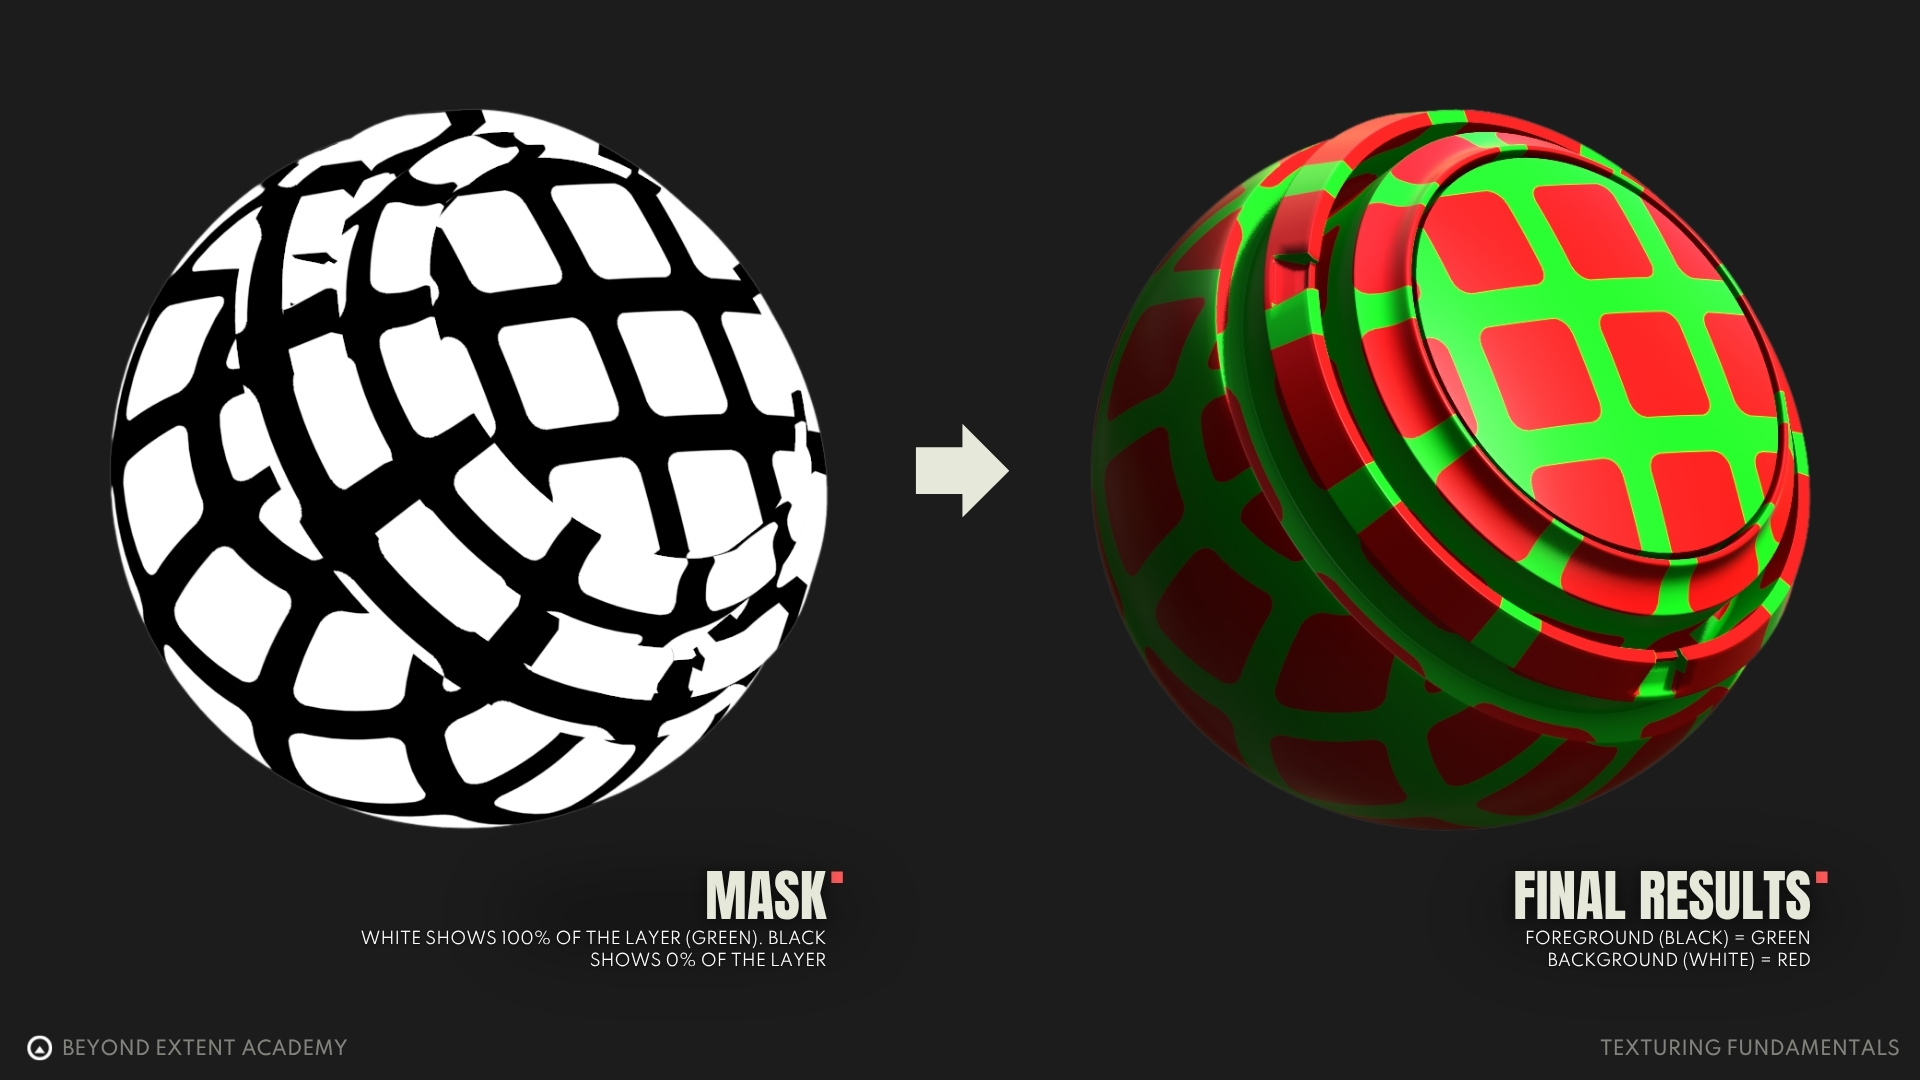
However, if we keep adding layers, wouldn’t it always just show the top layer? That is where masks come into play. Masks determine which part of a model will display the properties of a layer. A mask is in greyscale. You can think of it as a percentage, where black is 0% and white is 100%. Masks can be applied to all types of maps, from roughness to base color to normal maps.
So the general flow of texturing consists of the following two steps, repeated as needed:
- Create a layer that defines the PBR properties (base color, roughness, etc.)
- Create a mask for the layer and decide which part of the model should display the given information
Step 1: Creating a Base Material
The first step of texturing is to create a base material, which represents the primary material the asset is made of. In this phase, no additional elements such as dirt, rust, or stains are taken into account, only the material itself, including its color and roughness variations.
As previously mentioned, every surface has some level of noise and imperfections. Therefore, a base material should recreate these color and roughness variations. At this stage, the focus is solely on the material itself, without considering any wear and tear like dust, edge damage, or cracks.
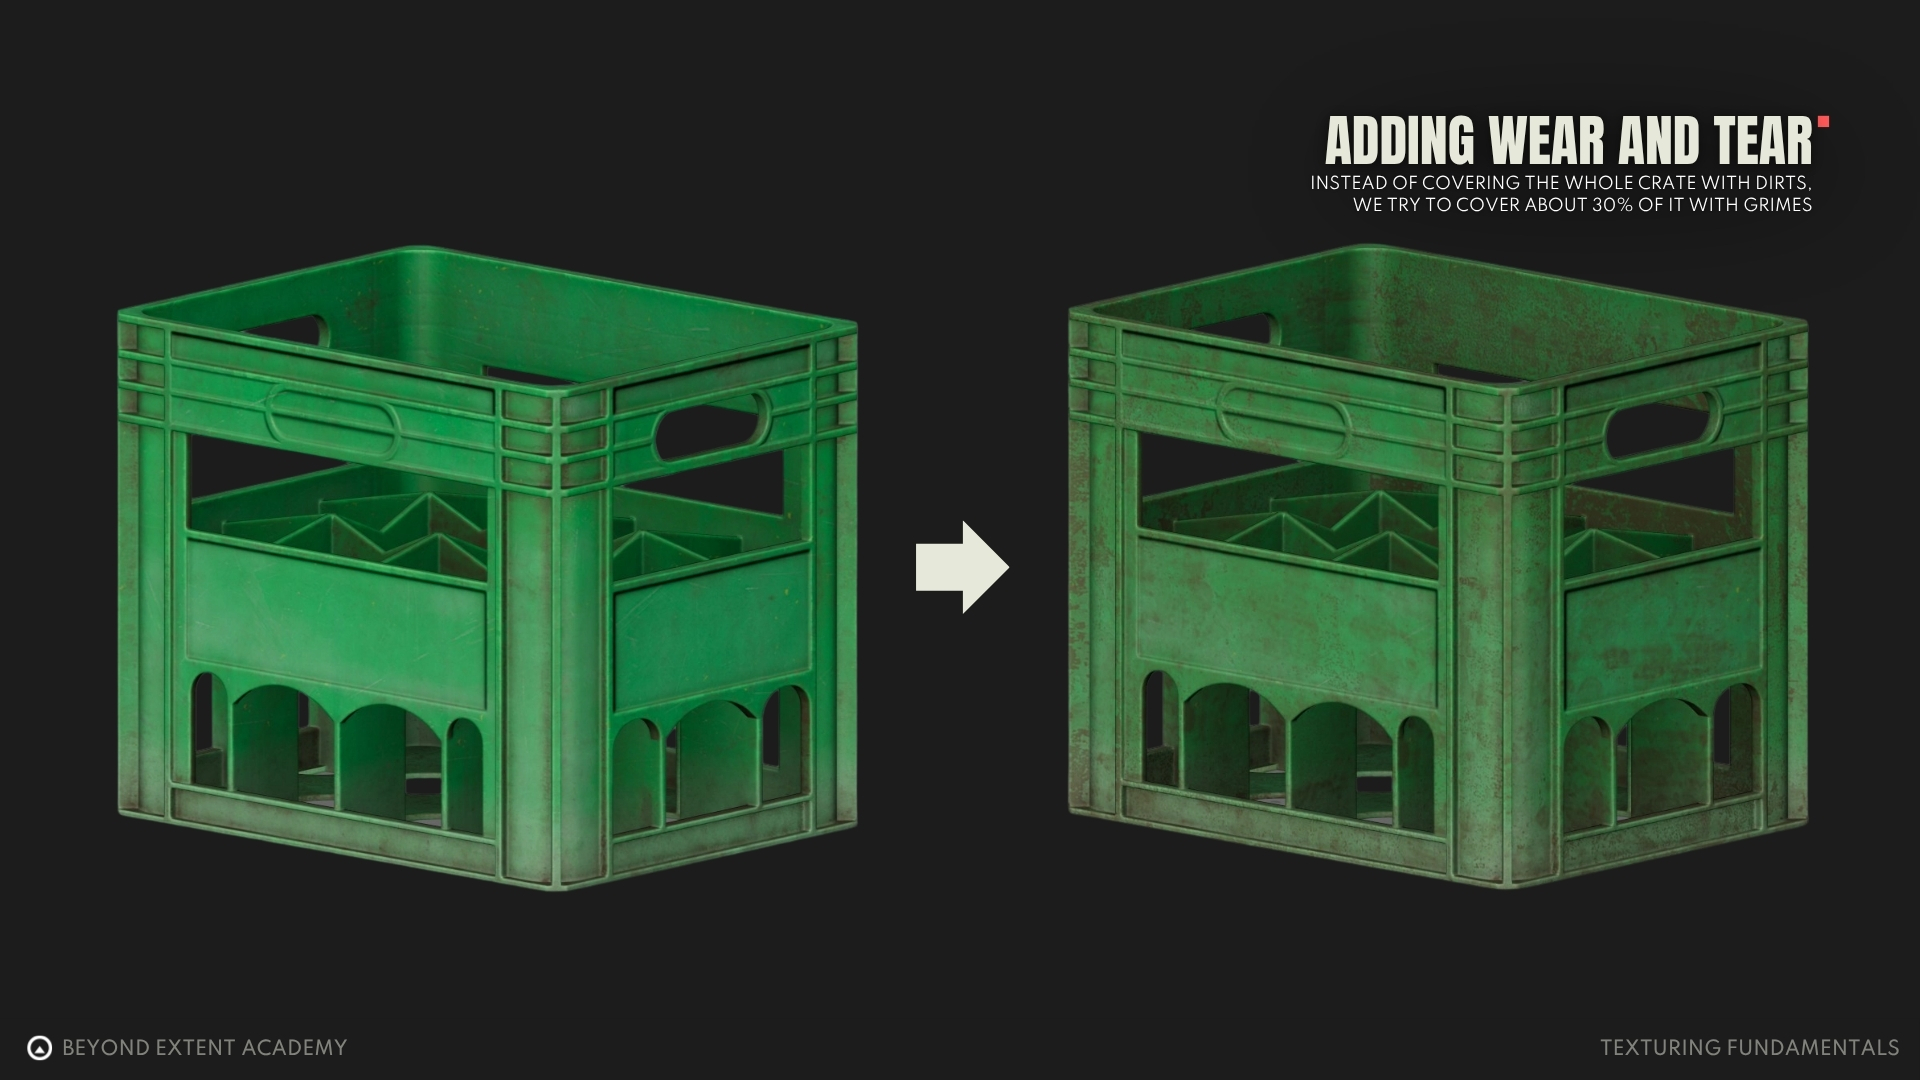
Step 2: Adding wears and tears
In the next step, we can start thinking about the questions mentioned in the ‘Reference Gathering’ section and take a closer look at our reference images. This is the stage where we add wear and tear to the texture. This usually happens procedurally, meaning we use existing tools provided by the software to texture more efficiently. For example, instead of painting edge wear by hand, we can use a tool to apply it instantly and later refine it to our liking.
People often tend to overdo the addition of grime and dust. As a result, the texture can appear too noisy and difficult to read. Keep in mind the 70/30 rule: 70% of the texture should be relatively clean, and 30% should contain more detailed wear. This is a solid rule of thumb, but it should always be adapted to the needs of each asset or project. Flexibility is key. For example, instead of covering the entire crate with dirt, we aim to cover about 30% of it with grime.
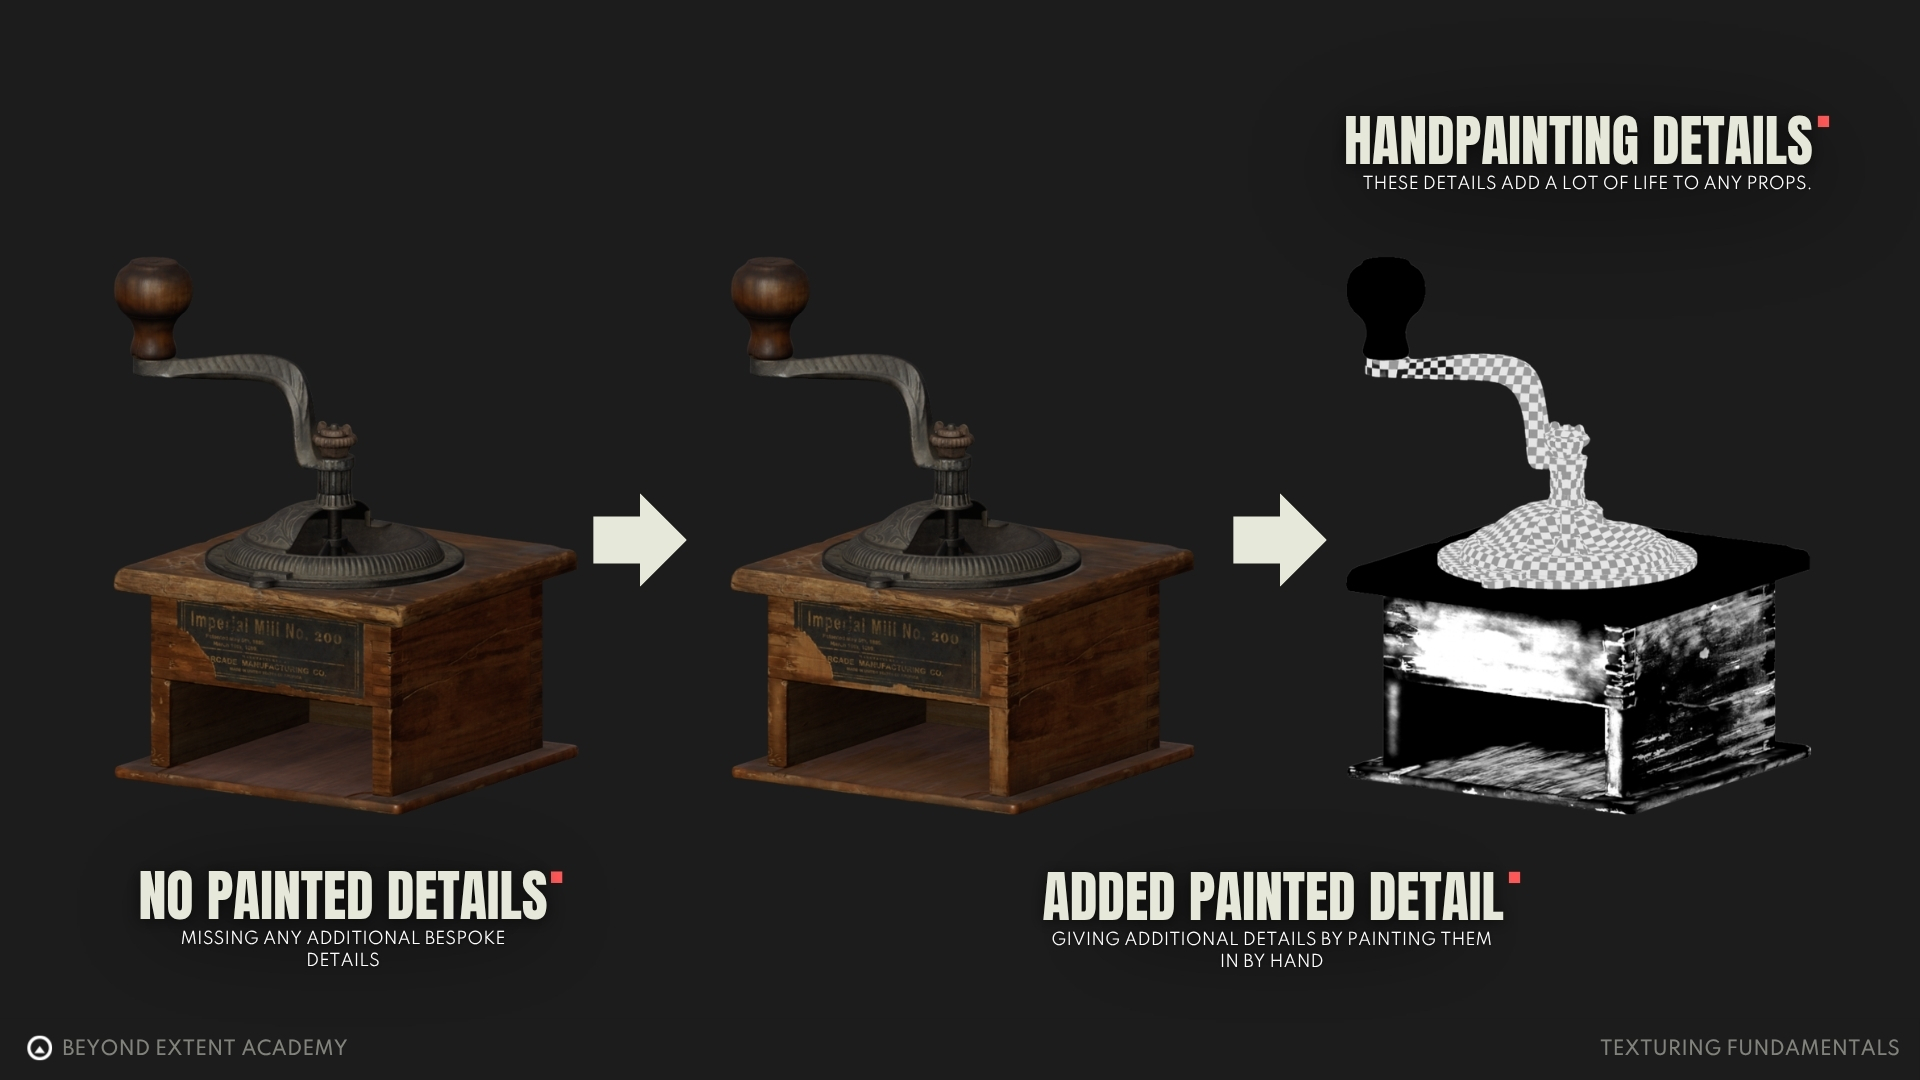
Step 3: Handpainting details
The last step is about final touches. The wear added in step two often looks generic and procedural, so the goal here is to break up that look and make it feel more natural and closer to how an object would appear in real life. Adding hand-painted details that are difficult to recreate procedurally helps the texture appear more convincing. However, the downside is that this approach is destructive, meaning that if the position, size, or design of the model changes, those painted details will not be preserved
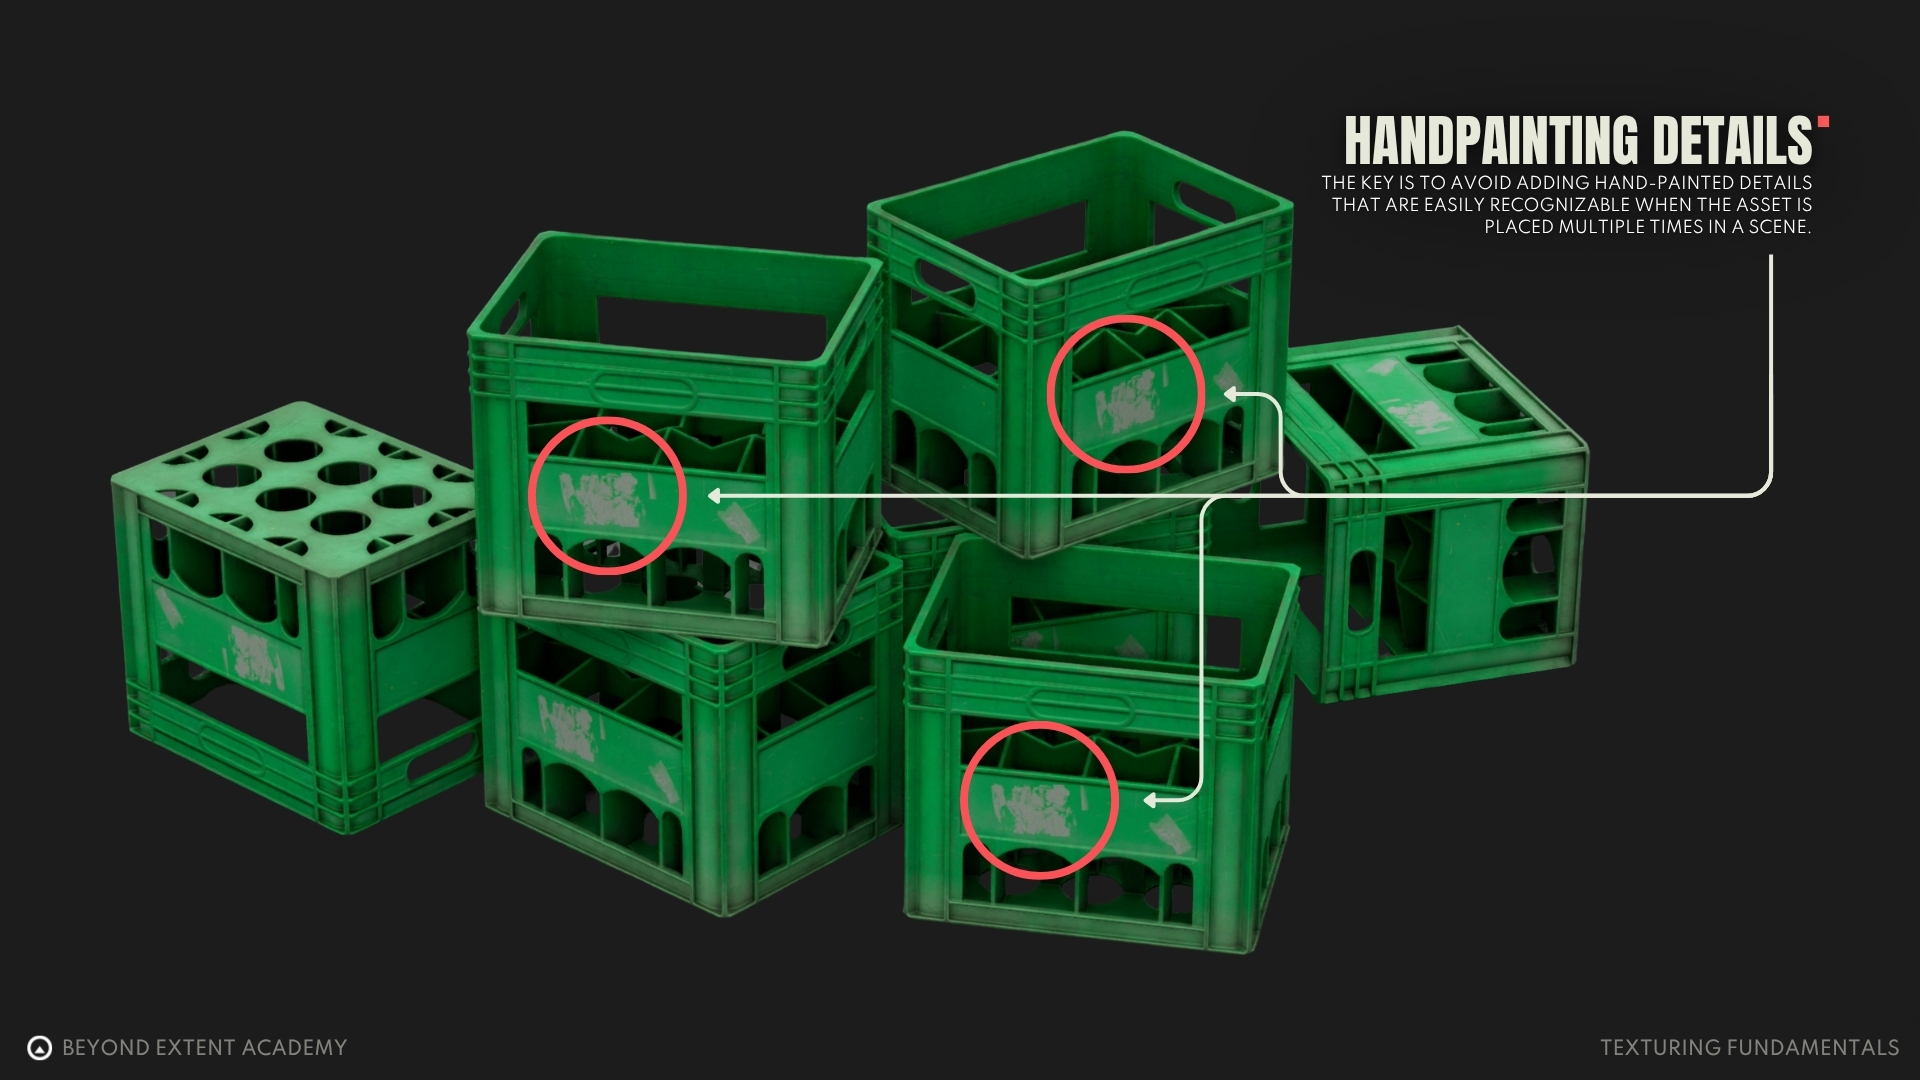
This step might seem relevant only for hero assets, as hand-painted details can feel too specific for set-dressing assets. However, set-dressing assets benefit from this process too. It improves overall quality and helps them feel less procedurally generated. The key is to avoid adding hand-painted details that are easily recognizable when the asset is placed multiple times within a scene.
The tools we use
Now that we’ve explored the texturing workflow, you might be wondering how to create specific effects or textures. If you want a layer to look like dust, do you have to paint it by hand? If you want to add edge wear to a model, do you have to manually mask all of those areas? Luckily, the answer is no. There are many tools that assist us during the texturing process, allowing us to avoid creating every effect or detail from scratch. We will be demonstrating tools in Substance Painter, but many of these are also applicable in other software as well.
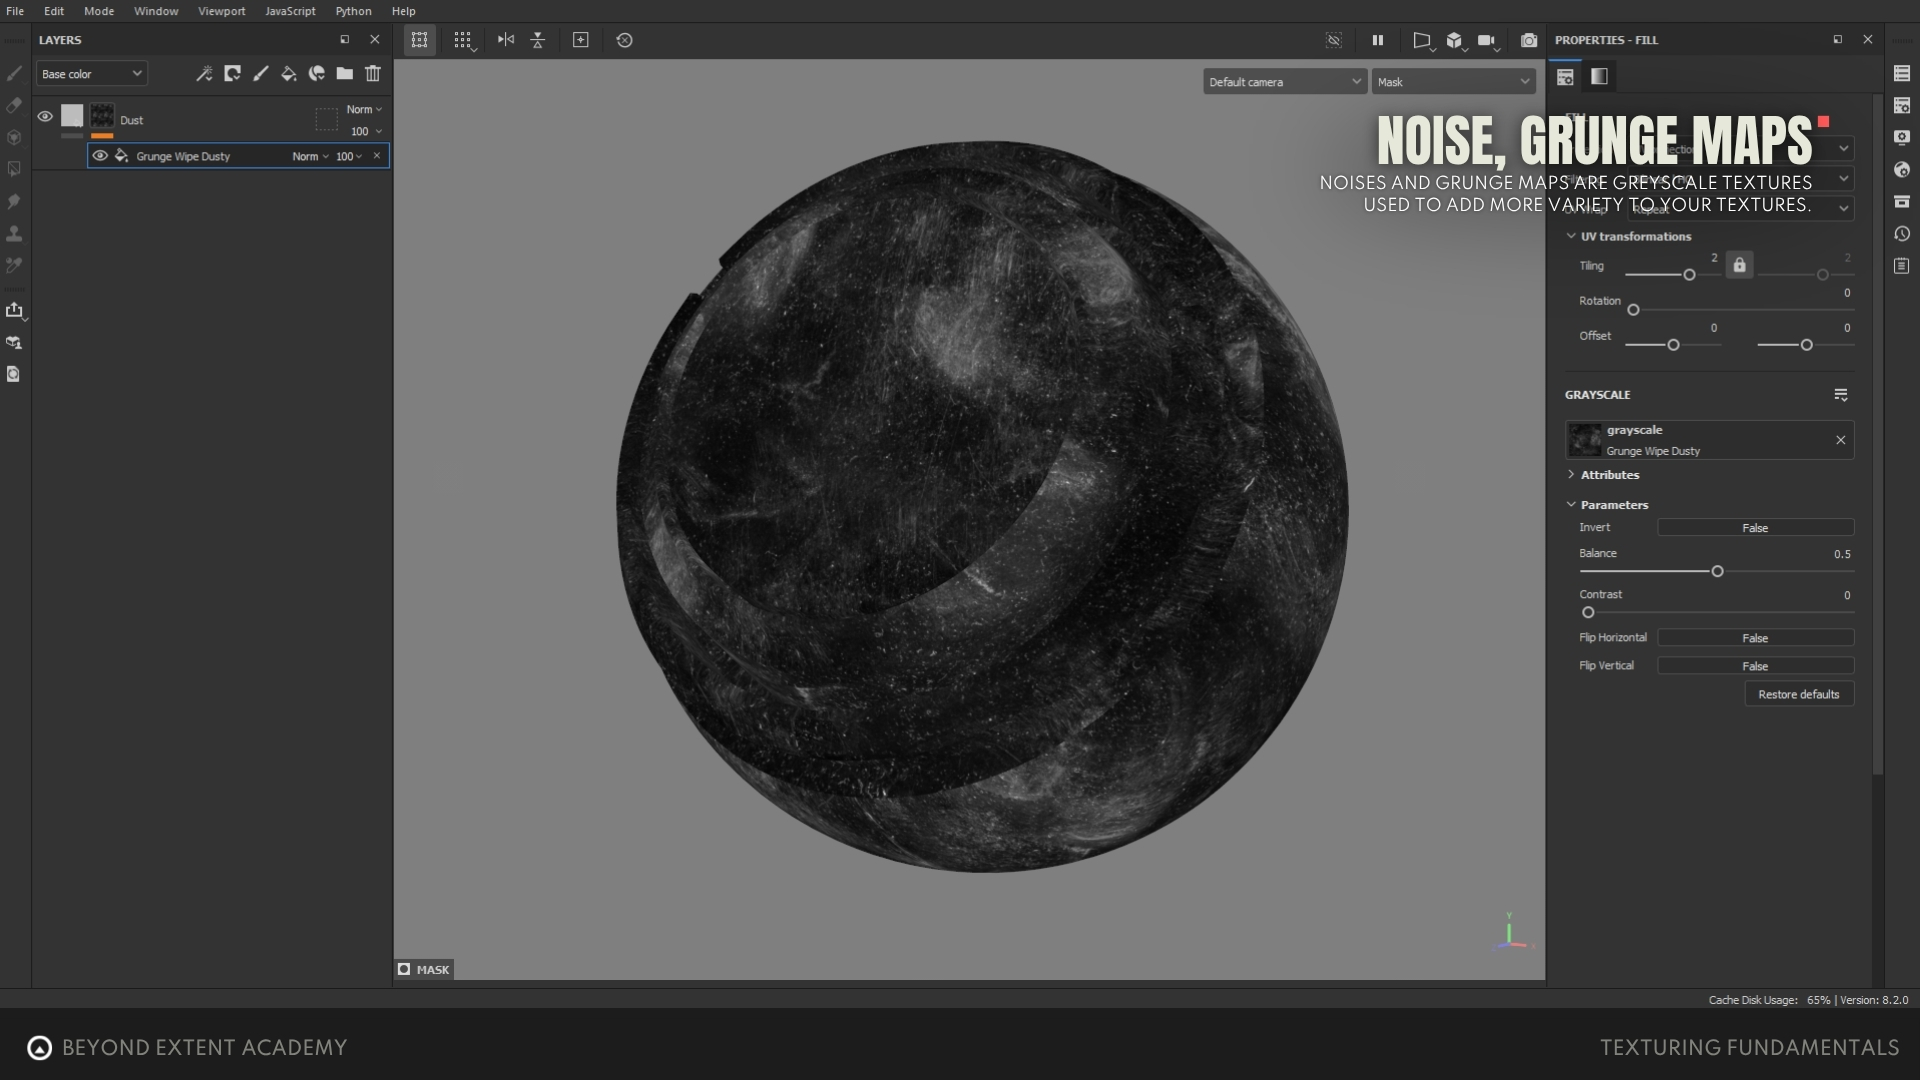
Noise, grunge maps
Noises and grunge maps are greyscale textures used to add variety to your textures. They are the bread and butter of texturing. Most grunge maps represent imperfections or grime, such as dust, scratches, or water stains. Since these textures are greyscale, they can be used as masks to control where effects appear.
Creating a believable mask is an important part of texturing. If you want a layer to look like dirt, you need a mask that mimics its natural distribution and shape. If you want scratches, the mask should imitate them as well. That’s exactly what grunge maps are for.
Noises are greyscale textures that introduce randomness. Unlike grunge maps, they don’t resemble specific effects like dust or cracks. That said, they’re still very useful for adding subtle variation and breaking up uniformity in surfaces.
Realistic surfaces naturally have bumps and variations, so adding noise gives them a more realistic, natural look.
Blending modes
Most of the time, it is not enough to apply just one grunge map and call it a day. Blending different kinds of noises and grunge maps helps create more interesting detail and variation. It is a key step toward achieving impressive results.
But how do we blend them together? The answer is blending modes. Every layer has a blending mode, which allows an upper layer to combine with a lower layer. Now let’s take a look at the most commonly used blending modes.
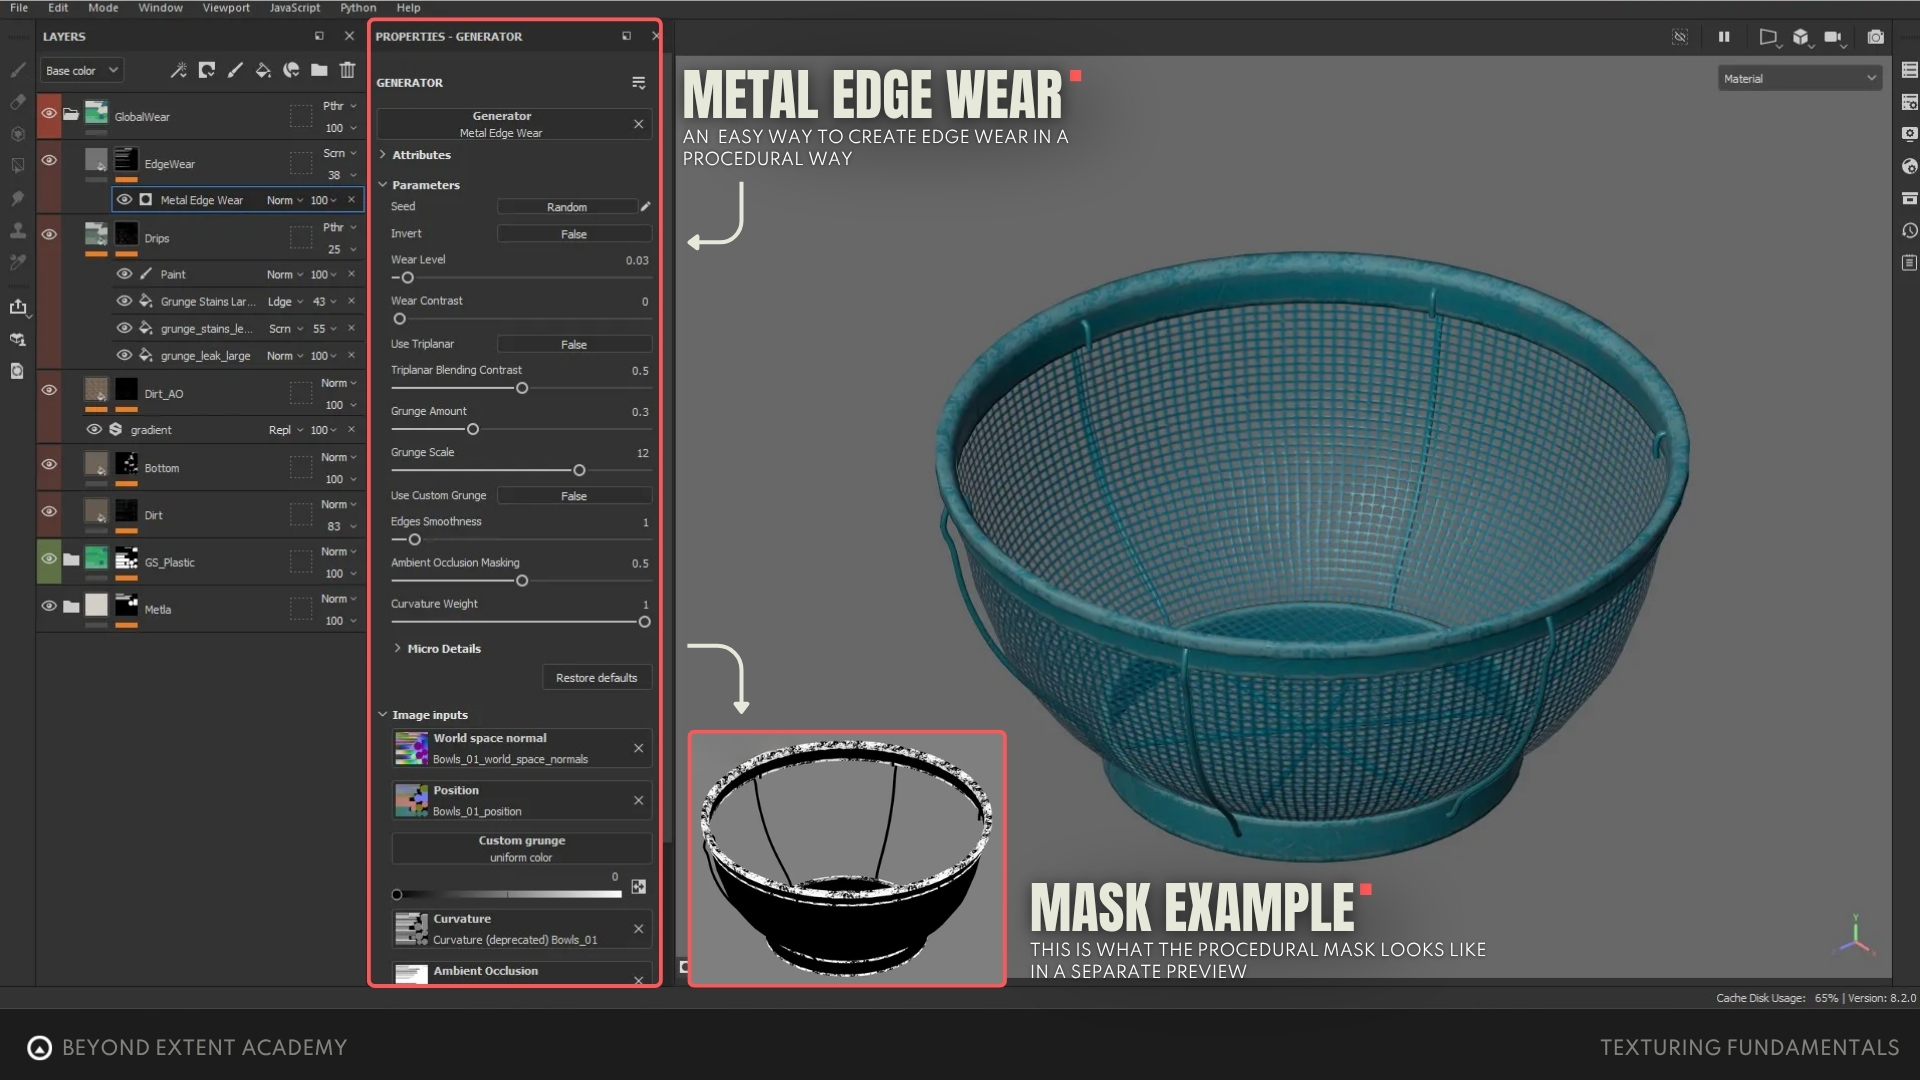
Generators
Generators are an important tool in Substance Painter. They can automatically create masks based on your baked maps, such as curvature, position, and ambient occlusion. This allows you to generate realistic wear and tear quickly (for example, adding edge wear or dust in cavities) without painting everything by hand.
Since generators are dependent on your baked maps, they are non-destructive and adaptive. So if you change your model, they will still work on your updated asset, as long as you remember to re-bake it and adjust any affected hand-painted areas.
Filters
A filter is a tool that manipulates the content of a layer or a mask. Filters are useful when we want to adjust the overall behavior of our masks or layers in a non-destructive manner. Is the mask too sharp? Use a blur filter. Does the mask need more contrast? Use a contrast filter. Keep in mind that filters only affect everything beneath them.
Adding height details
While not a dedicated tool, this method allows you to add height details (such as cracks or screws) in a precise, non-destructive, and controllable way. Simply create a fill layer with height enabled and add your pattern to the mask. You can control the height intensity with a slider and even combine multiple patterns or noises in the mask to create more complex, intersecting effects.
It’s important to note that just because it is called height doesn’t mean it only applies to a height map. All height information will be translated into the asset’s normal map when you export textures at the end. So, no height map is needed when using this method to add height details.
Stencils
As mentioned earlier, adding hand-painted details is necessary to break up the procedural look of a texture. This means manually adding scratches, damage, or even leaks. Don’t worry, this has nothing to do with drawing skill! With stencils, these details can be added easily.
Stencils are grayscale masks with specific patterns, often non-tileable. They work like real-life stencils: when painting through them, the brush only applies to the white areas. Substance Painter has limited options for realistic imperfection stencils, but you can easily create your own using a photo editing program and a camera (even a phone camera works). Alternatively, you can find or purchase stencils from other artists on platforms like ArtStation or Gumroad.
Anchor points
The Anchor Point is a very handy tool for referencing information from other layers or masks. While you could copy and paste layers and make changes on top, any edits to the original layer would not update those copies. By placing an anchor point on a main layer or mask, you create a source that can be referenced by any layer above it. Any changes to the source will automatically update wherever the anchor point is used.
Anchor points are especially powerful when combined with generators. For example, if you add height details such as stamped text or panel lines, generators will not normally account for them because they are manually added and not baked into the mesh maps. By placing an anchor point on that layer, you can reference it in the micro height section of a generator. This means a metal edge wear generator will now include your manually added details in its effect.
Conclusion
Texturing is an essential part of asset creation. It is what brings an asset to life! So take your time and don’t rush the process. Think about all the questions mentioned in this article before you start texturing. Remember that there are no perfectly smooth surfaces in the real world, so make sure your Base Color and Roughness maps reflect that. At the same time, avoid overdoing it, as this can make your texture look noisy.
At first, all the tools available might feel overwhelming. Take your time to explore and get familiar with them. Test them out on small projects to understand each tool’s workflow. With enough practice and experience, it will become increasingly clear how to use them together to achieve your desired results. Happy texturing!
RESOURCES

⚠️
MISSING RESOURCES