


LESSON OVERVIEW
WHAT IS UNREAL ENGINE?
It’s a game engine which is a software with built-in tools for video game creation. It can handle graphics, animations, physics, sound and interaction so you don’t have to code everything from scratch. Unreal Engine, developed by Epic Games, is one of the major game engines in the industry and it’s especially known for its cutting-edge visuals. For this same reason, Unreal Engine is considered industry standard for Environment Artists due to its robust tools for creating realistic and stylized environments. Unreal Engine is free to use, with a royalty-based pricing model for high revenues.
There are many other game engines available and each of them have their pros and cons for video game creation. Many game companies also code their own proprietary custom engines, that have the advantage of being less bloated, more specialized, and tailored toward the production of specific games.
Common use cases for different game engines:
- Unreal Engine: For larger AAA productions and film with a focus on visual fidelity. Examples: Fortnite, Borderlands series, Star Wars Jedi: Fallen Order, Black Myth: Wukong, It Takes Two.
- Unity: Flexible for 2D and 3D games, easy accessibility across multiple platforms, low barrier of entry. Great for indies, mobile and VR/AR games. Examples: Hollow Knight, Cuphead, Ori and the Blind Forest, Pokémon GO.
- Godot: Fully free and open-source, lightweight and easy to use. More often used by indie and solo developers making 2D games. Examples: Cassette Beasts, Brotato, Halls of Torment.
- Game Maker: Easy to prototype 2D games without many technical constraints. Examples: Undertale, Hyper Light Drifter, Hotline Miami, Spelunky.
Due the high cost for training staff, developing and maintaining a proprietary engine, many companies have recently shifted towards other engines available to the public, especially Unreal. Although great results can also be achieved with other game engines, learning how to work with Unreal Engine is considered the best way to prepare yourself for the games industry. Like with most other software, the knowledge can always be transferred to other engines with some extra training.
In this showcase, you can see a few examples of games created with Unreal Engine.
Unreal Engine isn’t just for games. It’s also used widely in architecture visualization, movies, TV, automotive design, VR experiences, and even live concerts, as real-time rendering can significantly reduce production time. Filmmakers use it for virtual sets, architects for photorealistic walkthroughs, and developers for everything from small indie projects to AAA blockbusters.
This video shows an example of Unreal Engine being used in LED screens for a virtual production.
Fab Asset Store
Unreal Engine also comes with it's own content marketplace, called Fab. It’s like a giant treasure chest of props, environments, characters, materials, and even fully functional gameplay systems. Some resources are free, some paid. Every month, a few premium assets become available for free for a limited time, which usually include full environments that can be used as learning material.
UNREAL ENGINE SETUP
To install Unreal Engine, first we need to download and install the Epic Games Launcher. Through the Launcher you will be able to download Unreal Engine, manage versions, see your projects and any asset you have acquired from the asset store.
The latest version of the launcher can be downloaded here:
Download the lastest Epic Games Launcher
After downloading the launcher, installing it and creating your Epic Games’ account, follow these steps to install Unreal Engine:
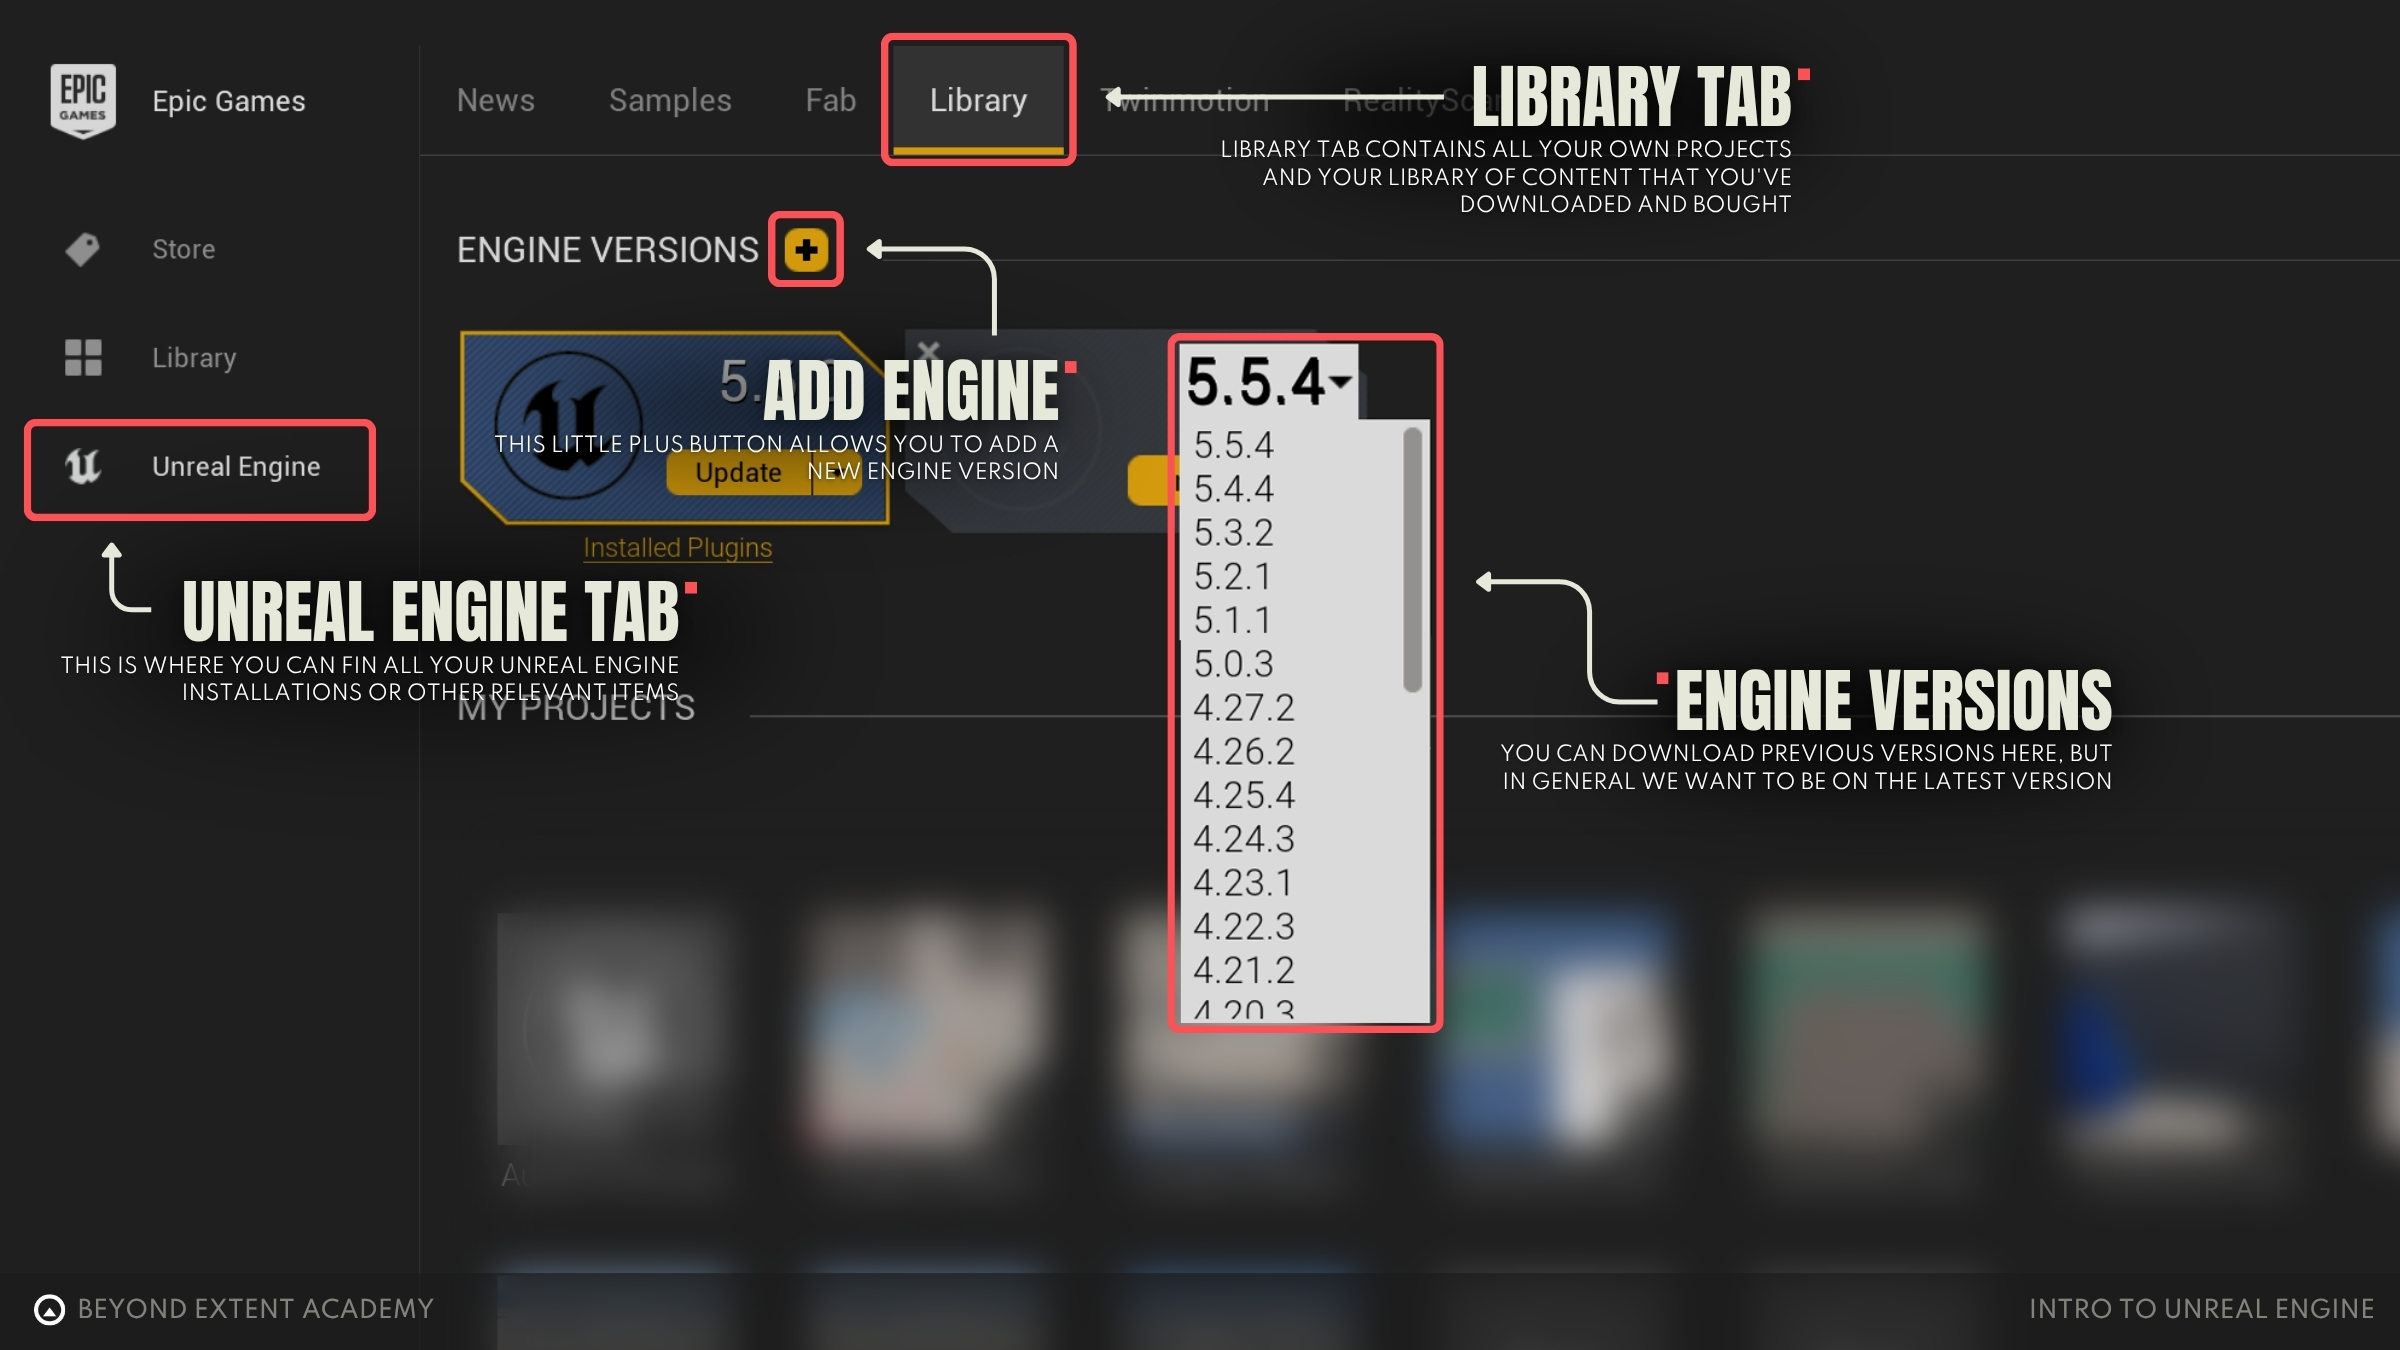
- On the left menu, click 'Unreal Engine'.
- Go to the ‘Library’ tab.
- Click the “+” button next to ‘Engine Versions’. A new install slot will appear.
- Select the engine version you want to install. You’ll most likely want to install the most recent version.
- Click ‘Install’.
It's generally recommended to always get the latest version of Unreal Engine on the beginning of a project. However, when already in the middle of one, it can get quite tricky to do a full upgrade to a newer version. After the installation is complete, open Unreal Engine. You will be presented with the following Project Browser:

- The tab ’Recent Projects’ will be empty on your first access. In the future it will show any projects you have created and you will be able to open them here.
- Click the ‘Games’ tab. Here you will find different templates with some basic functionality for a few types of games. The other tabs have more templates to get you started quicker depending on your needs.
- Click on ’Blank’. For now, all we need is a blank, empty project without any clutter as we’re are starting from scratch.
- Keep the Project Defaults as they are. It’s especially important that it’s set to ‘Blueprint’. We will explore Blueprints in more detail in the future.
- Set your project location and name, and click ’Create’.
Your first project is all set!
INTRO TO UI
The first time you open your blank project, you will probably see something like this:
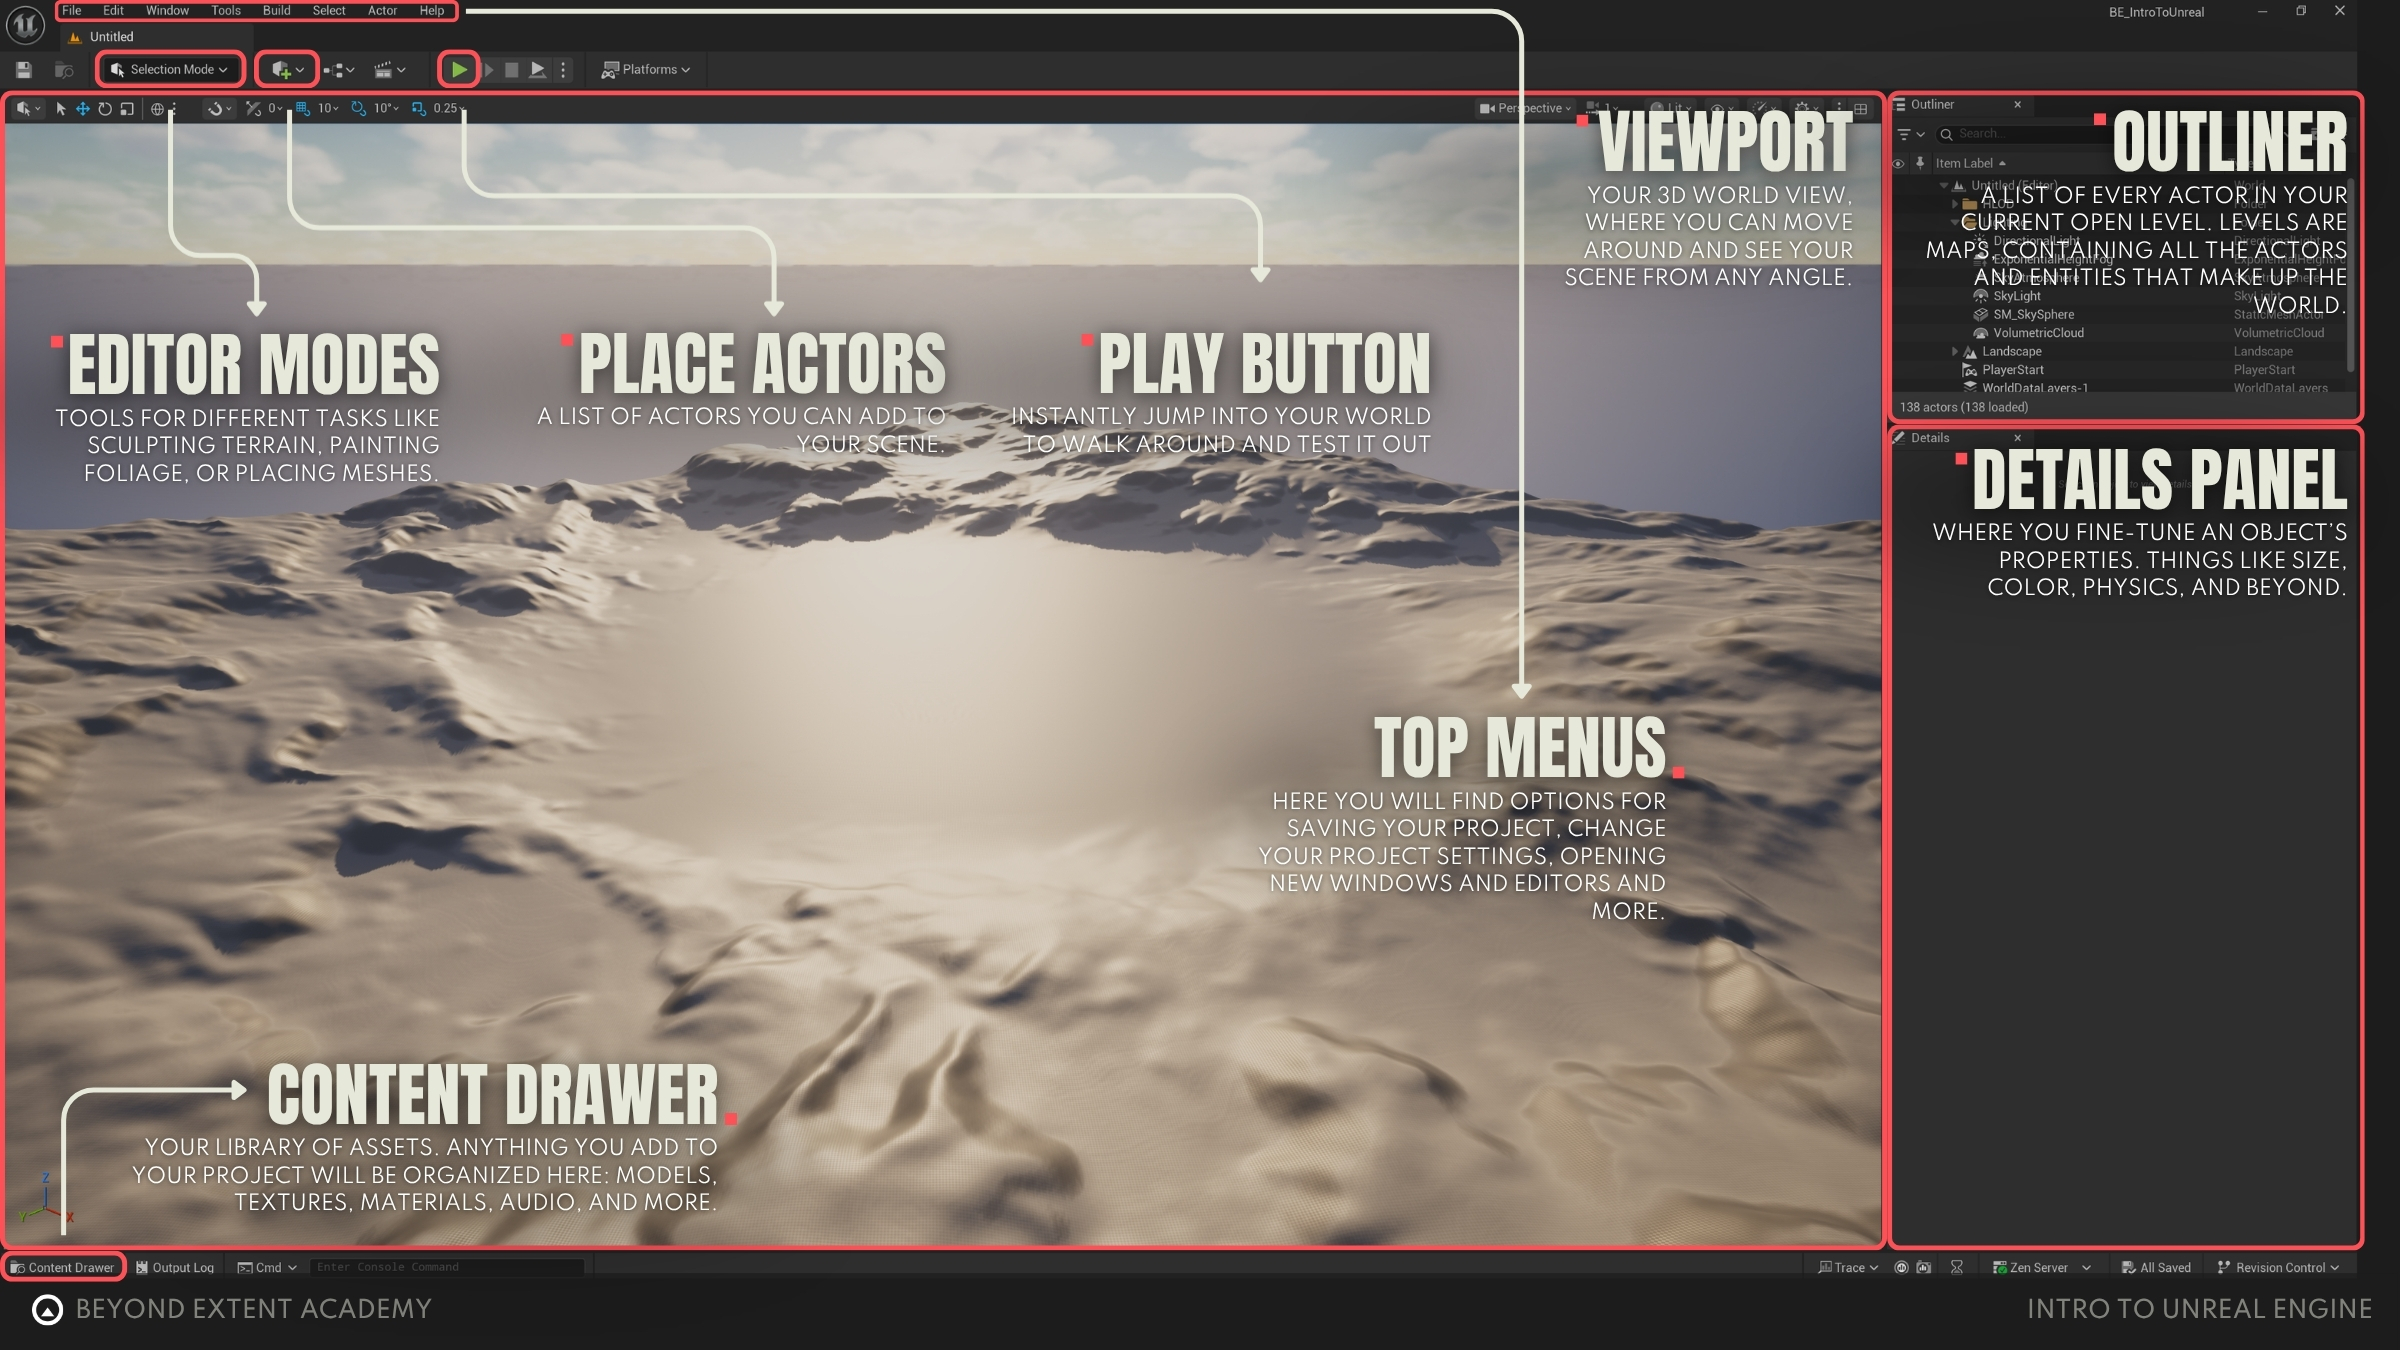
Here are the main elements of the interface to keep in mind for now:
- Viewport - Your 3D world view, where you can move around and see your scene from any angle.
- Content Browser - Your library of assets. Anything you add to your project will be organized here: models, textures, materials, audio, and more.
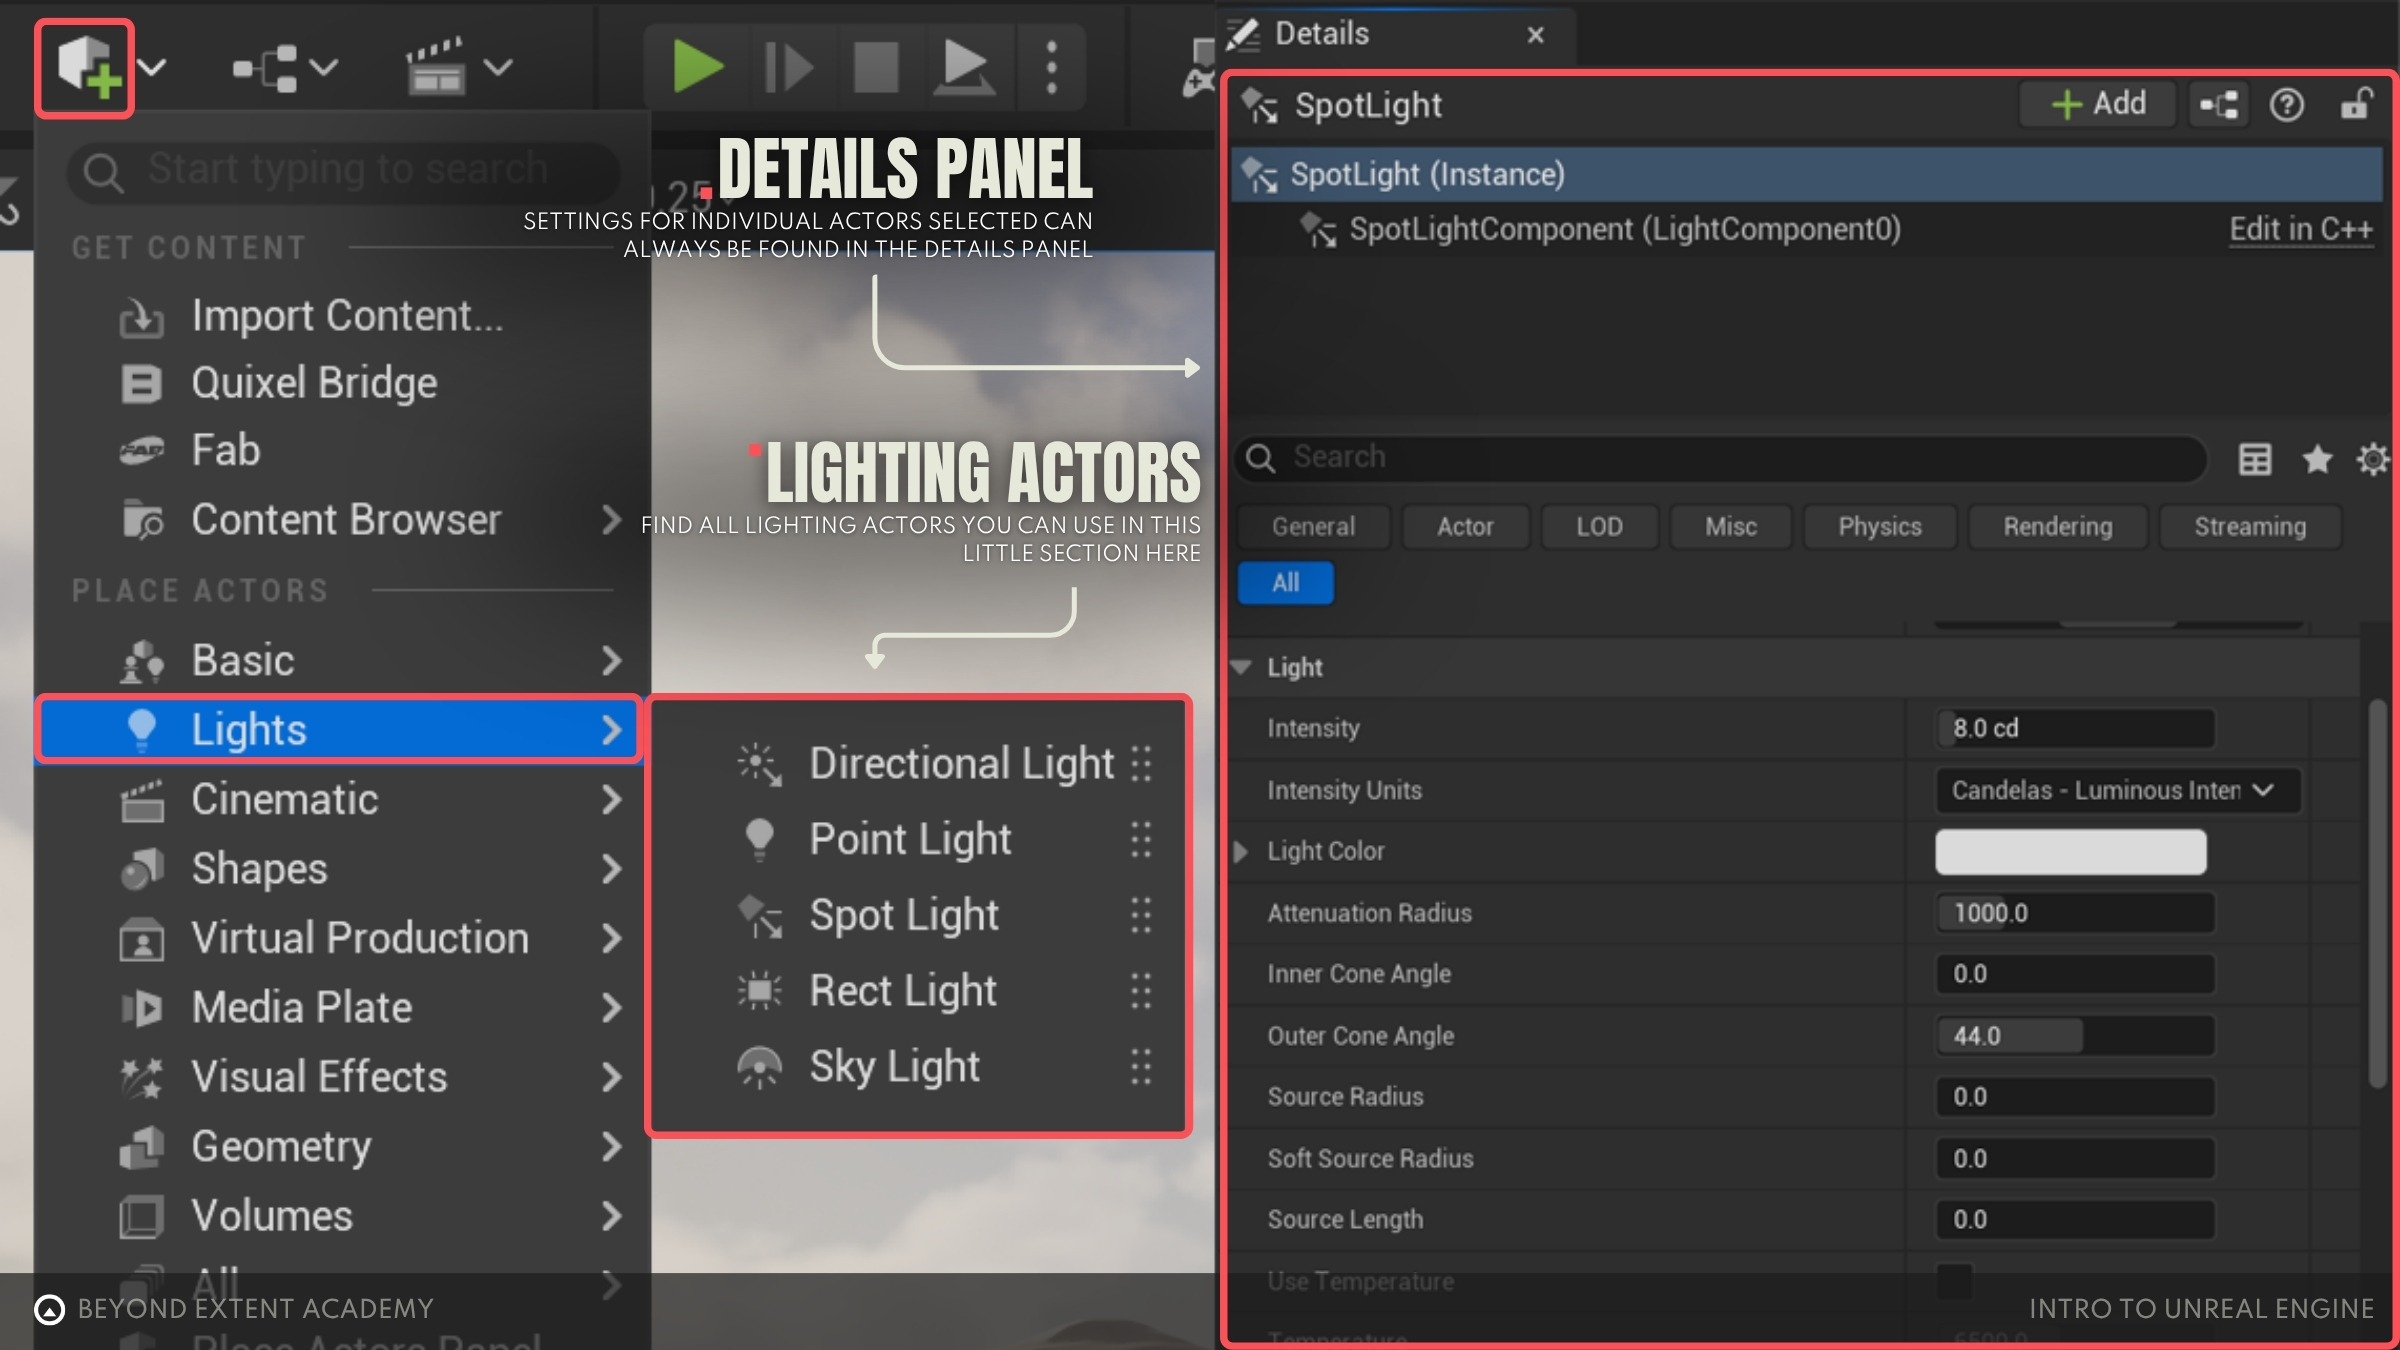
- Place Actor - A list of actors you can add to your scene. Actors are objects that can be placed into a level, like static meshes, lights and cameras.
- Outliner - A list of every actor in your current open level. Levels are maps, containing all the actors and entities that make up the world.
- Details Panel - Where you fine-tune an object’s properties—size, color, physics, and beyond.
- Top menus - Useful menus that we will see in more detail as we go. Here you will find options for saving your project, change your project settings, opening new windows and editors and more.
- Editor Modes - Tools for different tasks like sculpting terrain, painting foliage, or placing meshes. We will dive deeper into those options in future lessons. For now, we will spend most of our time in Selection Mode.
- Play - Instantly jump into your world to walk around and test it out.
Keep in mind that depending on the engine version you have installed, some interface elements might look a little bit different or be located somewhere else. Here we're using version 5.6.
VIEWPORT AND CONTROLS
The Viewport is where you build and navigate your scene. Let’s try it out and look at the most important viewport options.
exercise
Navigating Unreal Engine

Navigating Unreal Engine
overview
In this lesson we will be going through navigation of the engine and exploring how to get into Unreal
lesson example content
Get into it instantly by downloading the starter content for this lesson
download lesson contentHOTKEYS
Here is a reminder of the most useful hotkeys:

LIGHTING
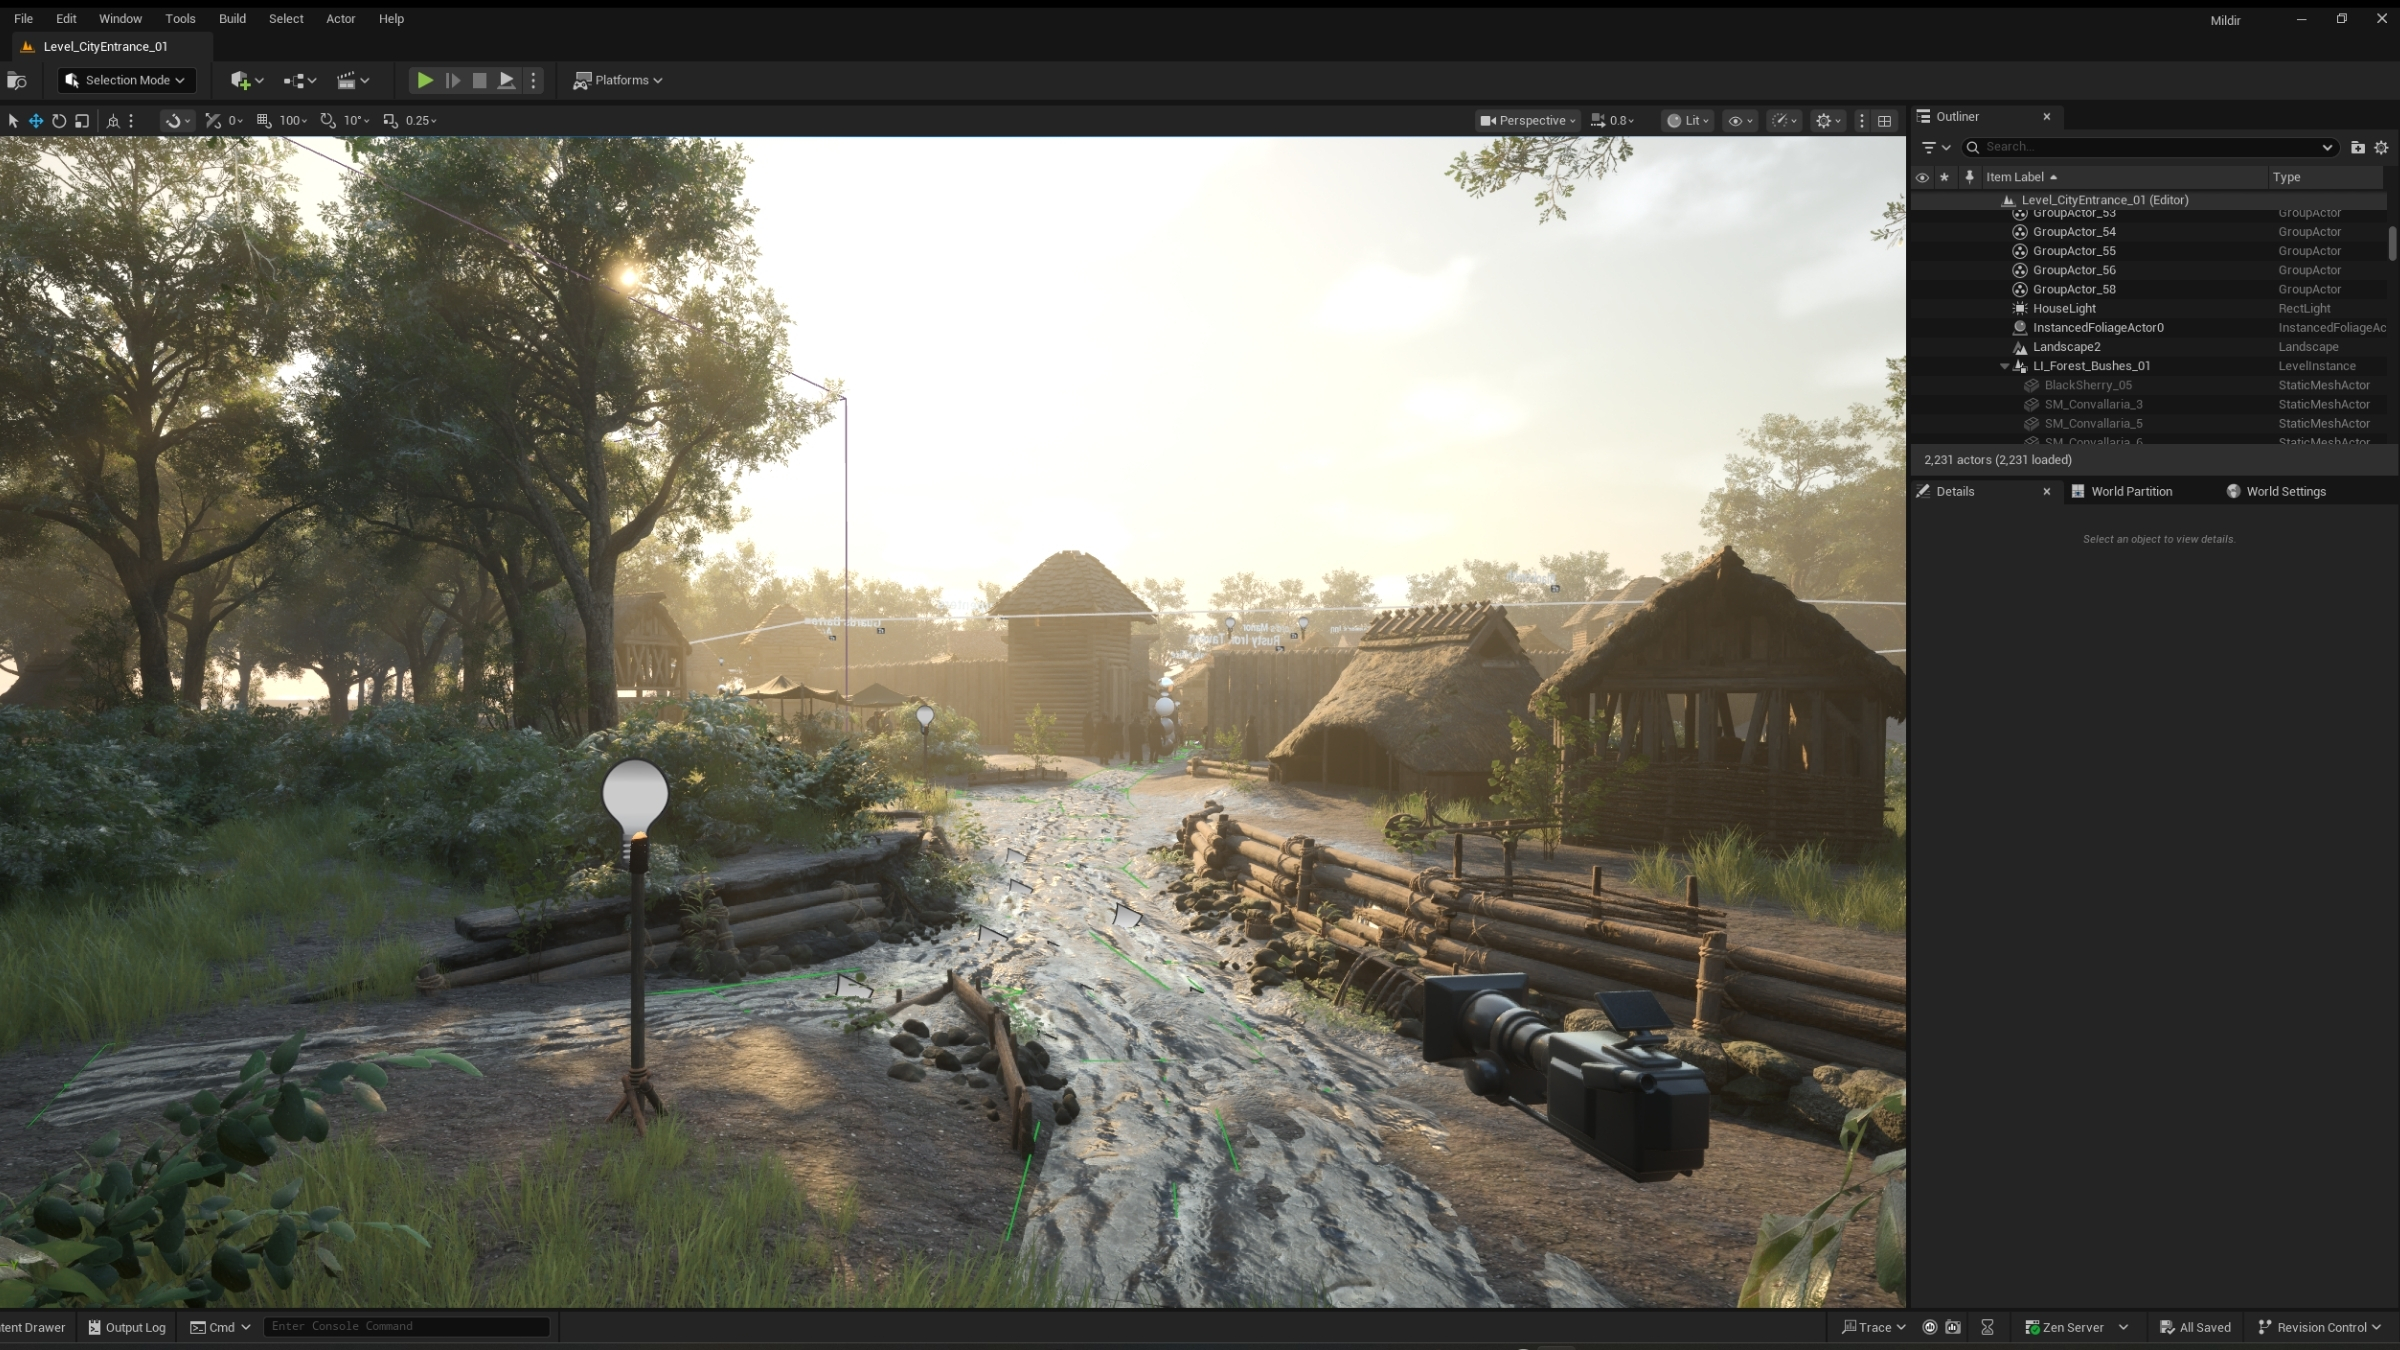
Since we opened a pre-existing level it already comes with a setup that allows us to see the world. These actors in the "Lighting" folder in our outliner are there for this reason and are part of Unreal Engine's Lighting system. Those actors can cast light into the scene, simulate the sky and clouds and create fog. You can find these actors in the ‘Lighting’ folder in the Outliner.

By hovering over the Lighting folder and clicking the little eye icon next to it (the ‘Toggle Visibility’ button), it will hide all those lighting actors and the scene will turn black. This is what happens when there are no light sources injecting light into the scene.
Although we’re not going into detail yet on how each of those actors work, you can toggle their visibility individually to have an idea of how each one of them is affecting the scene. You can also head over the ‘Place Actors’ menu and play around with the different types of light sources. In the Details panel you will be able to tweak a light’s intensity, color, radius and more.
In order for games to render multiple frames in real-time, Unreal employs many optimization techniques behind the hood. Achieving realistic graphics in real-time can be very taxing on performance, and lighting is no different. Because of that, Unreal has a few different lighting systems, each with their own use cases. Let's go through what these systems are!
STATIC LIGHTING
Previous generations of games were able to achieve good looking and highly performant lighting by pre-calculating the scene’s lighting information, including indirect light (light rays that bounce off surfaces like in real-life, also known as global illumination) and storing it in textures called lightmaps. The downside is that objects within a scene can’t be moved since the light sources can’t cast light and shadows dynamically. Nowadays Static Lighting is mostly used for games that want to achieve a single lighting scenario, such as in Dead Island 2 or on platforms such as mobile or VR to save on resources.
DYNAMIC LIGHTING
With this lighting system, light and shadows are calculated in real-time. It’s more flexible and realistic, especially for interactive worlds where day-night cycles are very important to the world, but it’s also heavier on performance compared to baked, static lighting. A downside is that there’s no global illumination. In order to make up for this lack of indirect light some other techniques are employed, like relying on the SkyLight actor to inject light on shadowed areas, adding fake fill lights, which are localized lights placed to simulate the light bounces and that in many cases don’t cast shadows to save on performance or relying on plugins and custom solutions.
Lumen is the new default lighting system of Unreal Engine 5. It is a dynamic lighting system that features some smart solutions for achieving global illumination and better reflections, while still maintaining good performance. With Lumen, emissive objects can also cast light. It makes the lighting process more straightforward and easier to achieve good results, although knowledge of the system is still necessary to keep the optimization in check.
VIDEO PLACEHOLDER
This video demonstrates the power of Lumen’s global illumination. The light rays bounce around the room, lighting up the walls. When hitting the ball, the orange color is also reflected around the space. When Lumen is turned off, the light bounces from global illumination are gone. Although the light still rotates and casts dynamic shadows, everything else is pitch black since the light is not being reflected off of any surface.
There are other rendering systems that can make lighting look even more realistic, like Ray Tracing, reserved for higher-end graphics cards, and Path Tracing, used mostly on film and architecture visualization due to the longer rendering times. But for now, we are good to go by sticking to the default Lumen system.
Those are the very basics of Unreal Engine’s lighting system, we just wanted to give you a good appreciation on how these basic components work, should you already want to play around with them. However, we will be further exploring these in future lessons.
CONTENT BROWSER
The Content Browser is our asset library. Here is where all of the assets in our project are located and organized, from 3D models, levels, textures, to materials and everything else. Let’s take a look at the Content Browser’s structure:
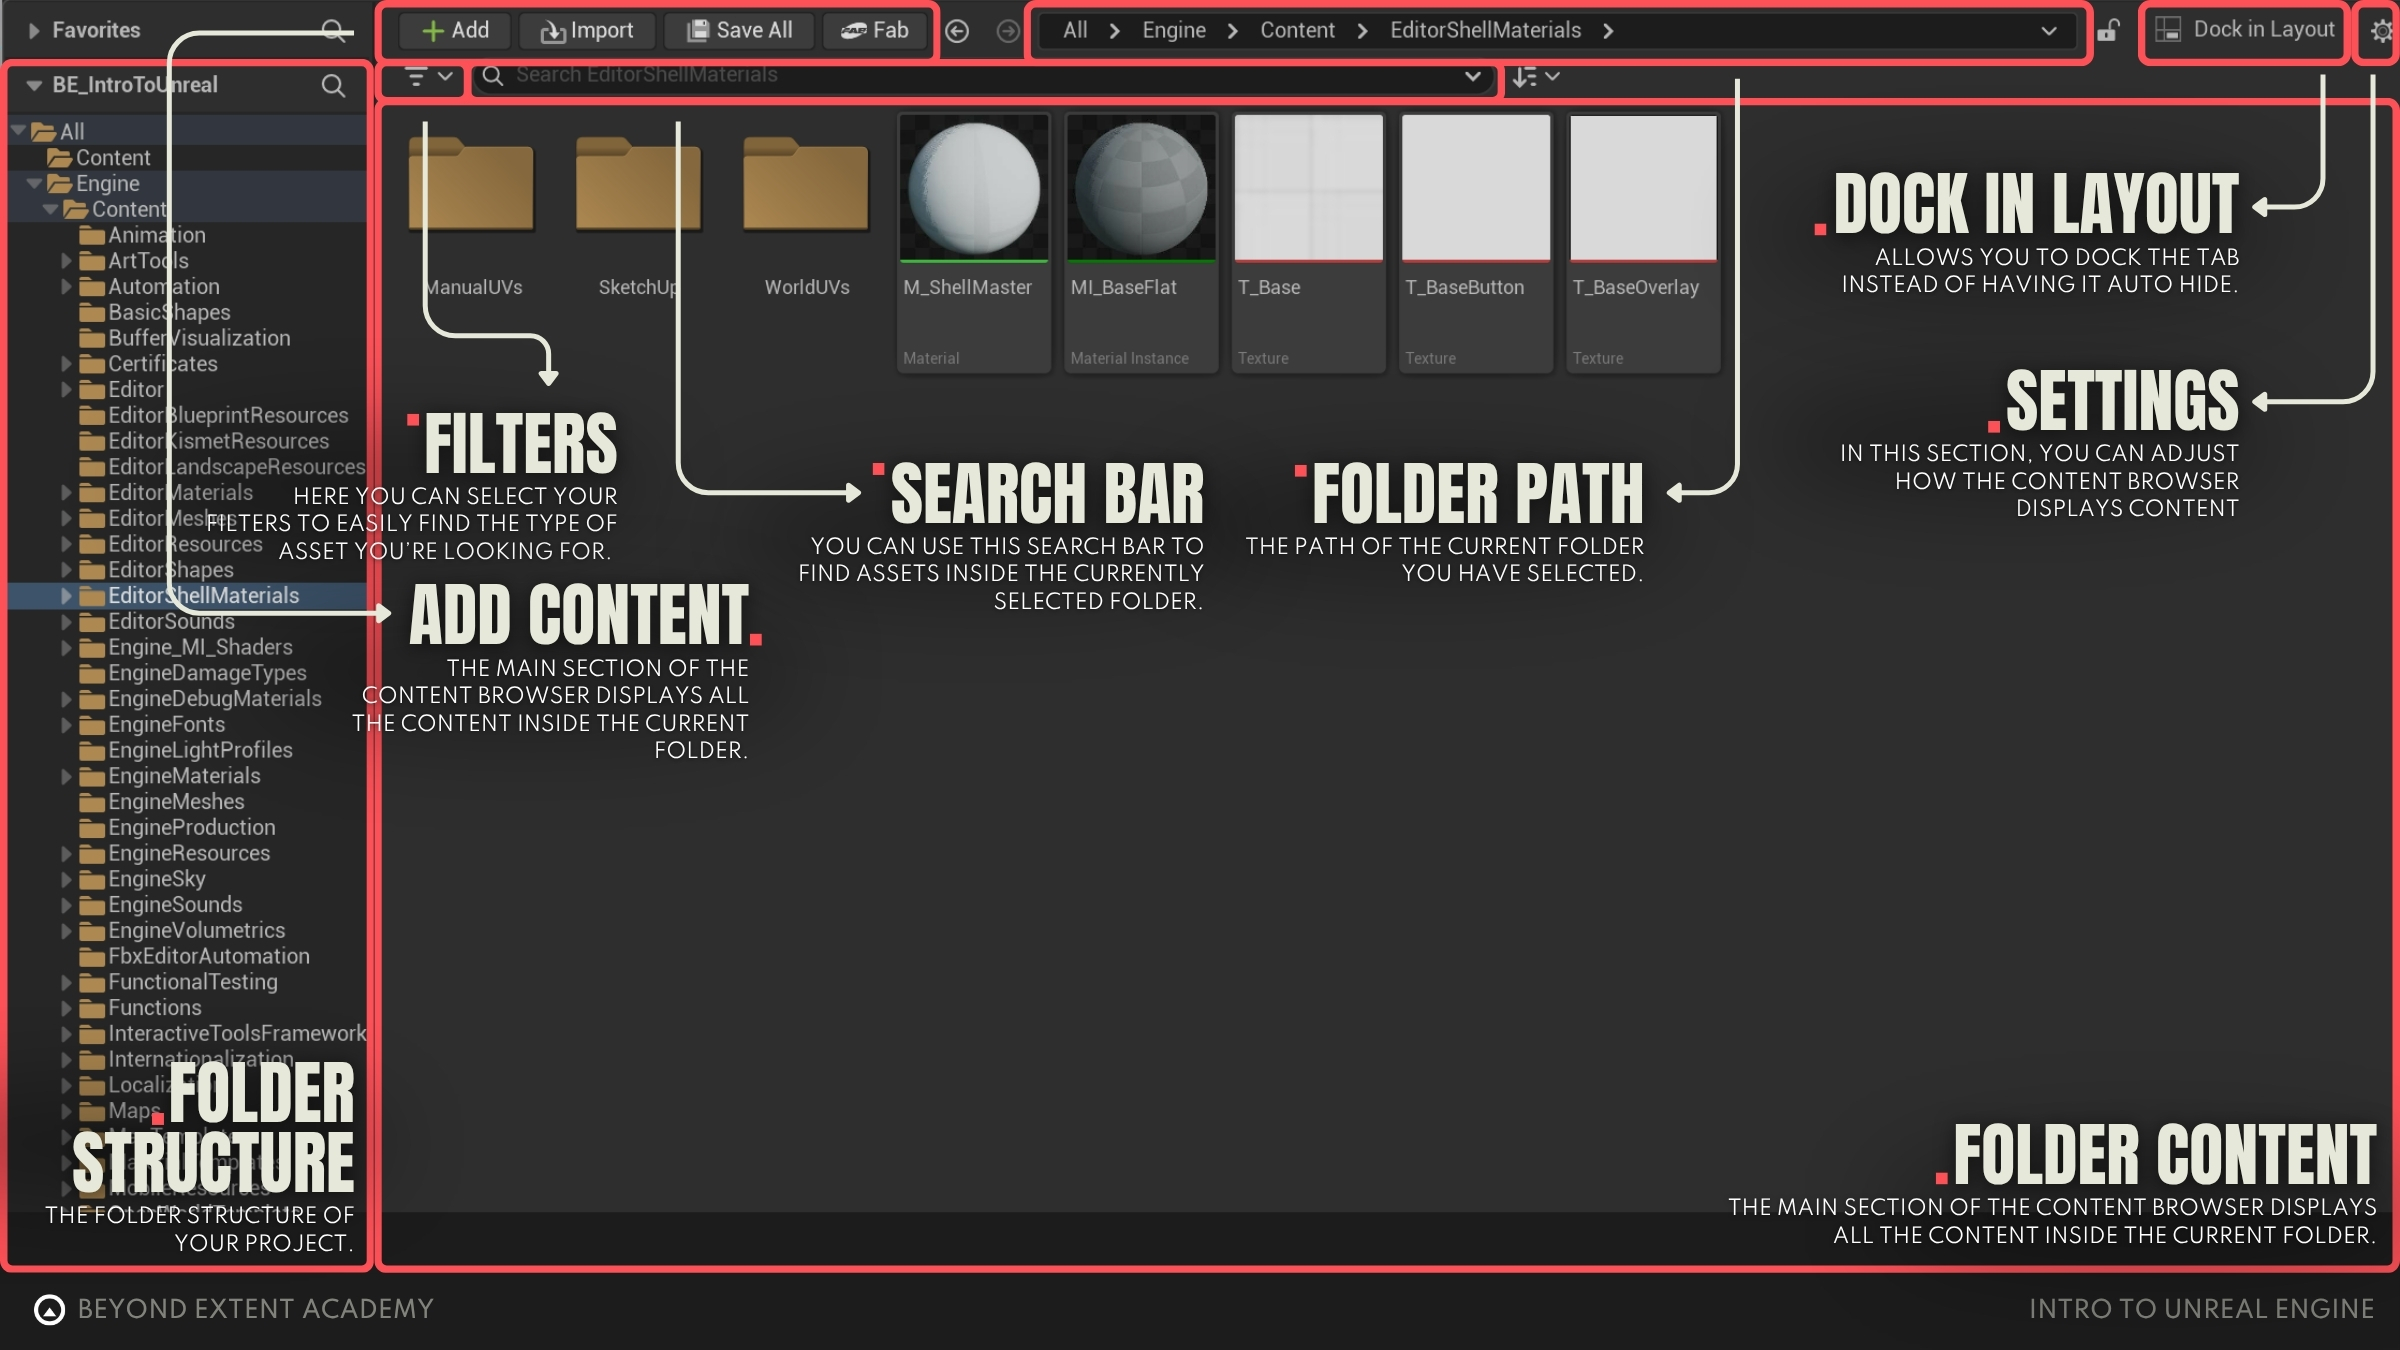
- Folder Structure: Here you can see the folder structure of your project.
- Folder Content: The main section of the Content Browser displays all the content inside the current folder.
- Folder Path: The path of the current folder you have selected.
- Search Bar: You can use this search bar to find assets inside the currently selected folder.
- Filters: Here you can select your filters to easily find the type of asset you’re looking for.
- Add Asset buttons: With these buttons you can add new assets to the current folder (you can also right-click the folder view to open the same menu), import assets from your computer, save any modified assets or even access the Fab asset store directly.
- Settings: Here you can change how the Content Browser content is displayed, like the thumbnails size and choosing grid or list display. You can also activate/deactivate some default project folders, like the Engine, Developers and Plugin folders. As you can see in the screenshot, we have enabled "Engine Content" in these settings.
- Dock in Layout: You can lock the Content Browser to your interface and stop it from closing automatically when you click outside of it.
In any production, no matter the size, it’s important to keep your files well organized in the Content Browser. Make sure to name your assets and folders properly and keep a tidy folder structure to make things clear and easy to find.
ℹ️ By selecting an actor in the viewport and pressing ‘CTRL + B’, you will be automatically taken to its folder location in the Content Browser.
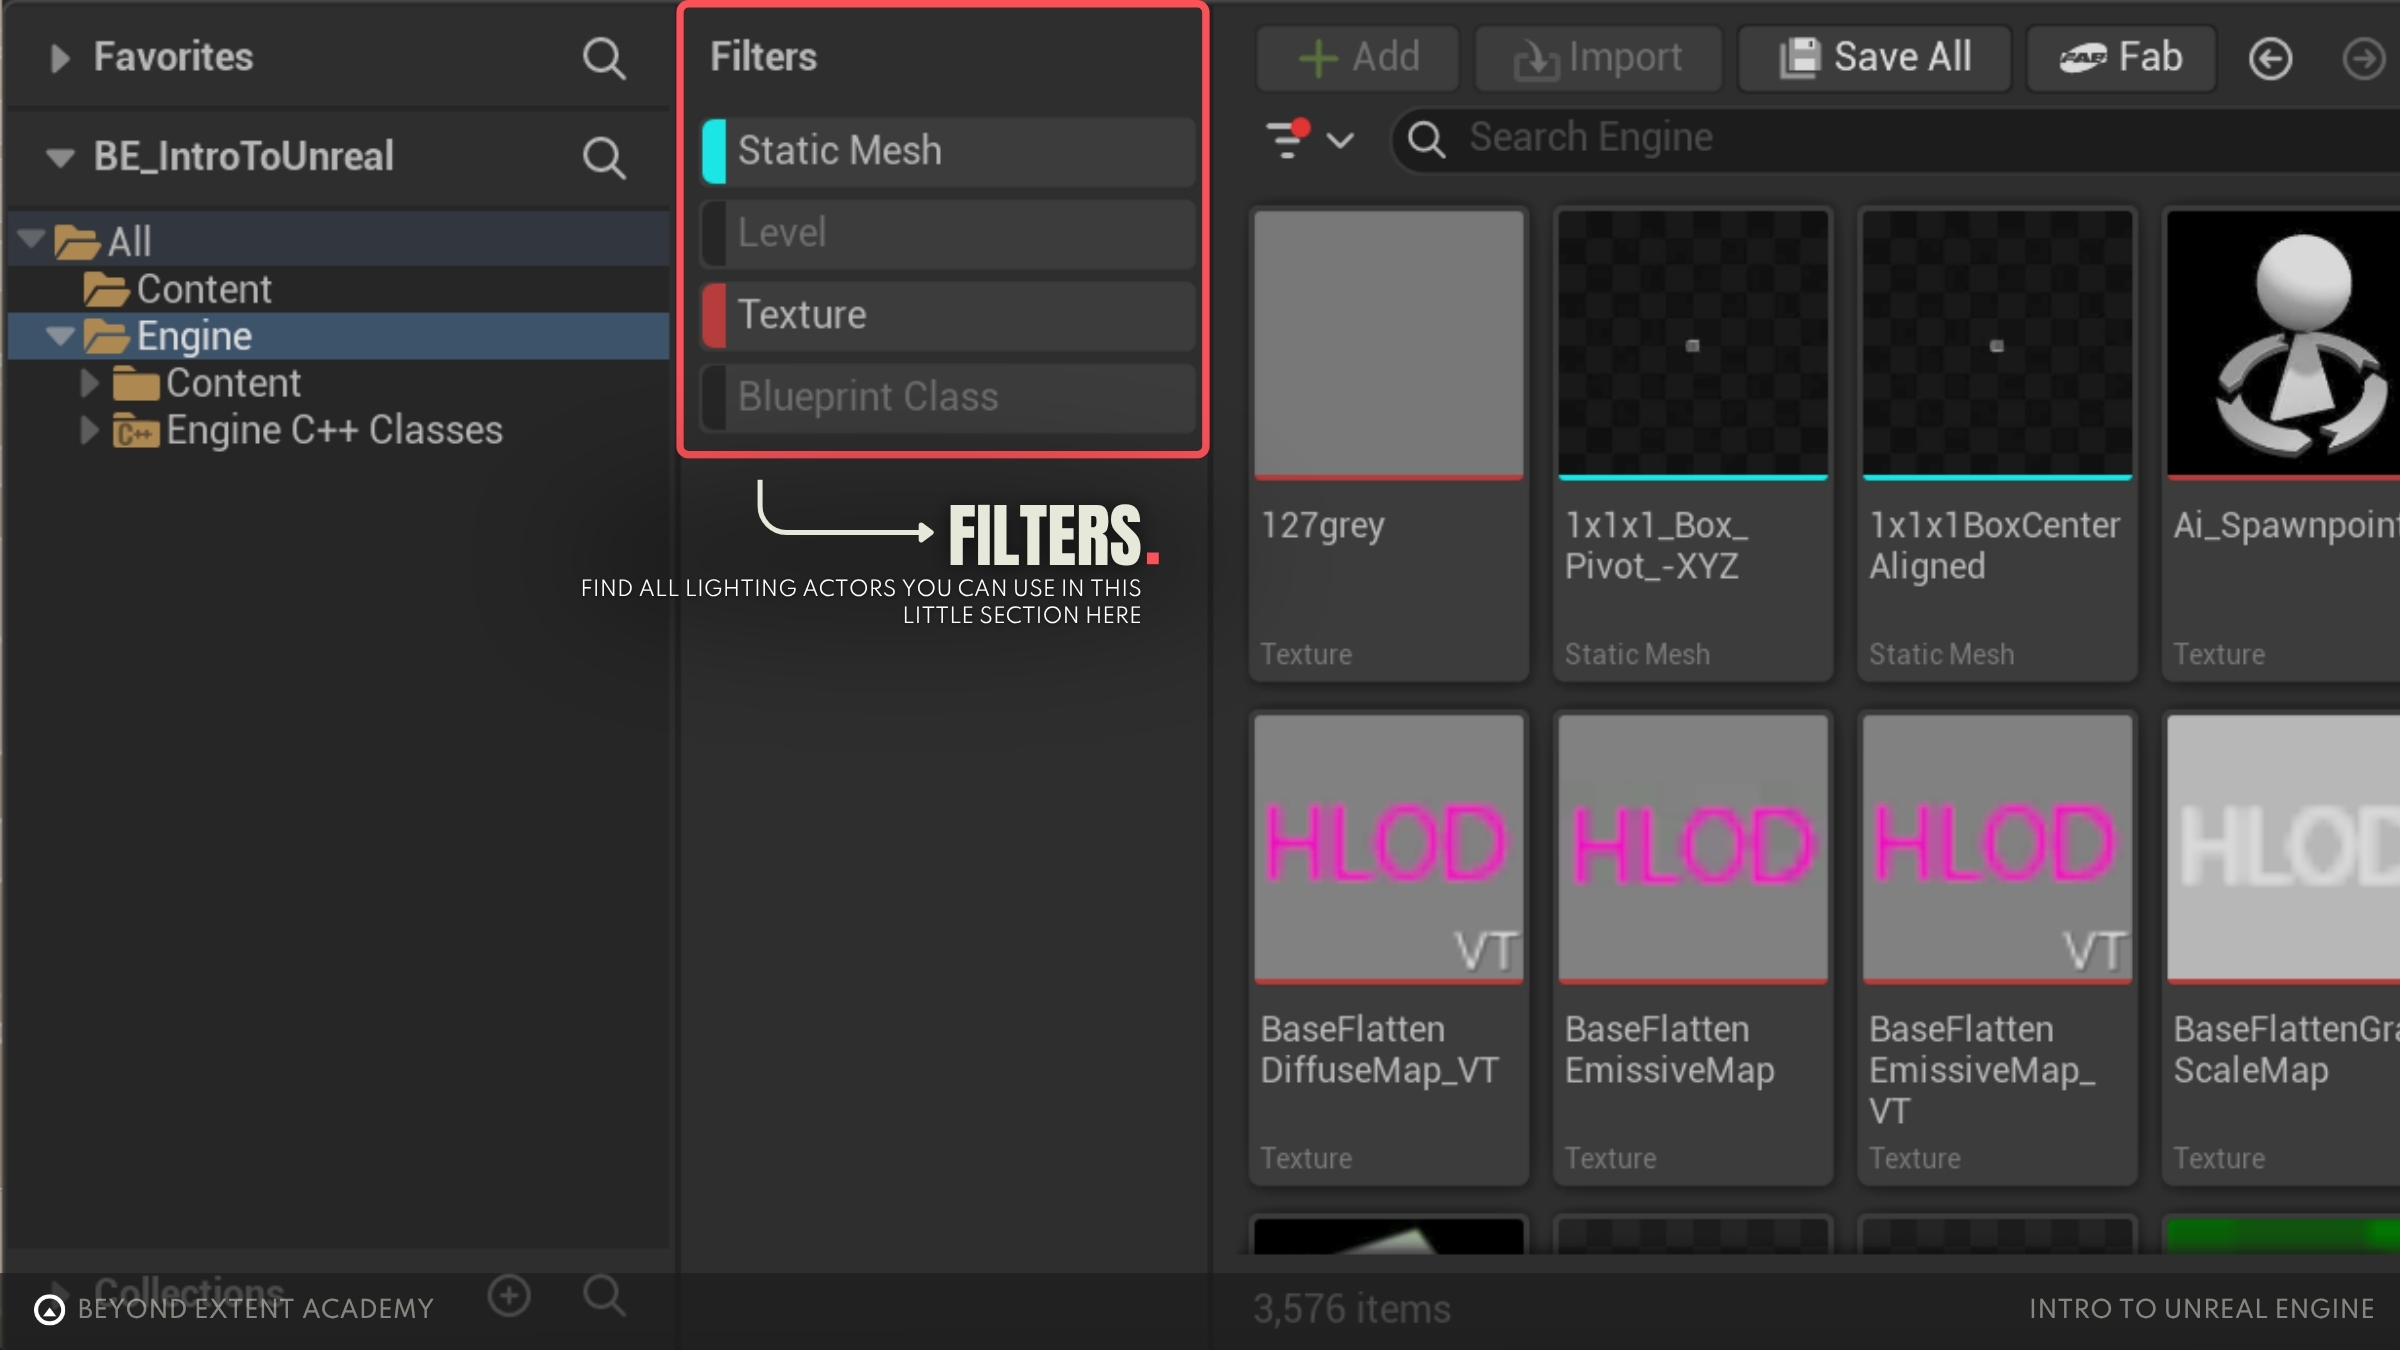
FILTERS
Filters are tags that can be used to locate assets in your Content Browser. By selecting any number of filters in the Filters menu (shown as number 5 in the previous image), a new section will appear in your content browser. You can then click to activate/deactivate them individually! In this example, four filters are selected, but only the filters ‘Static Mesh’ and ‘Texture’ are activated, listing all the Static Meshes and Textures inside the Engine folder.
ASSET PREVIEW
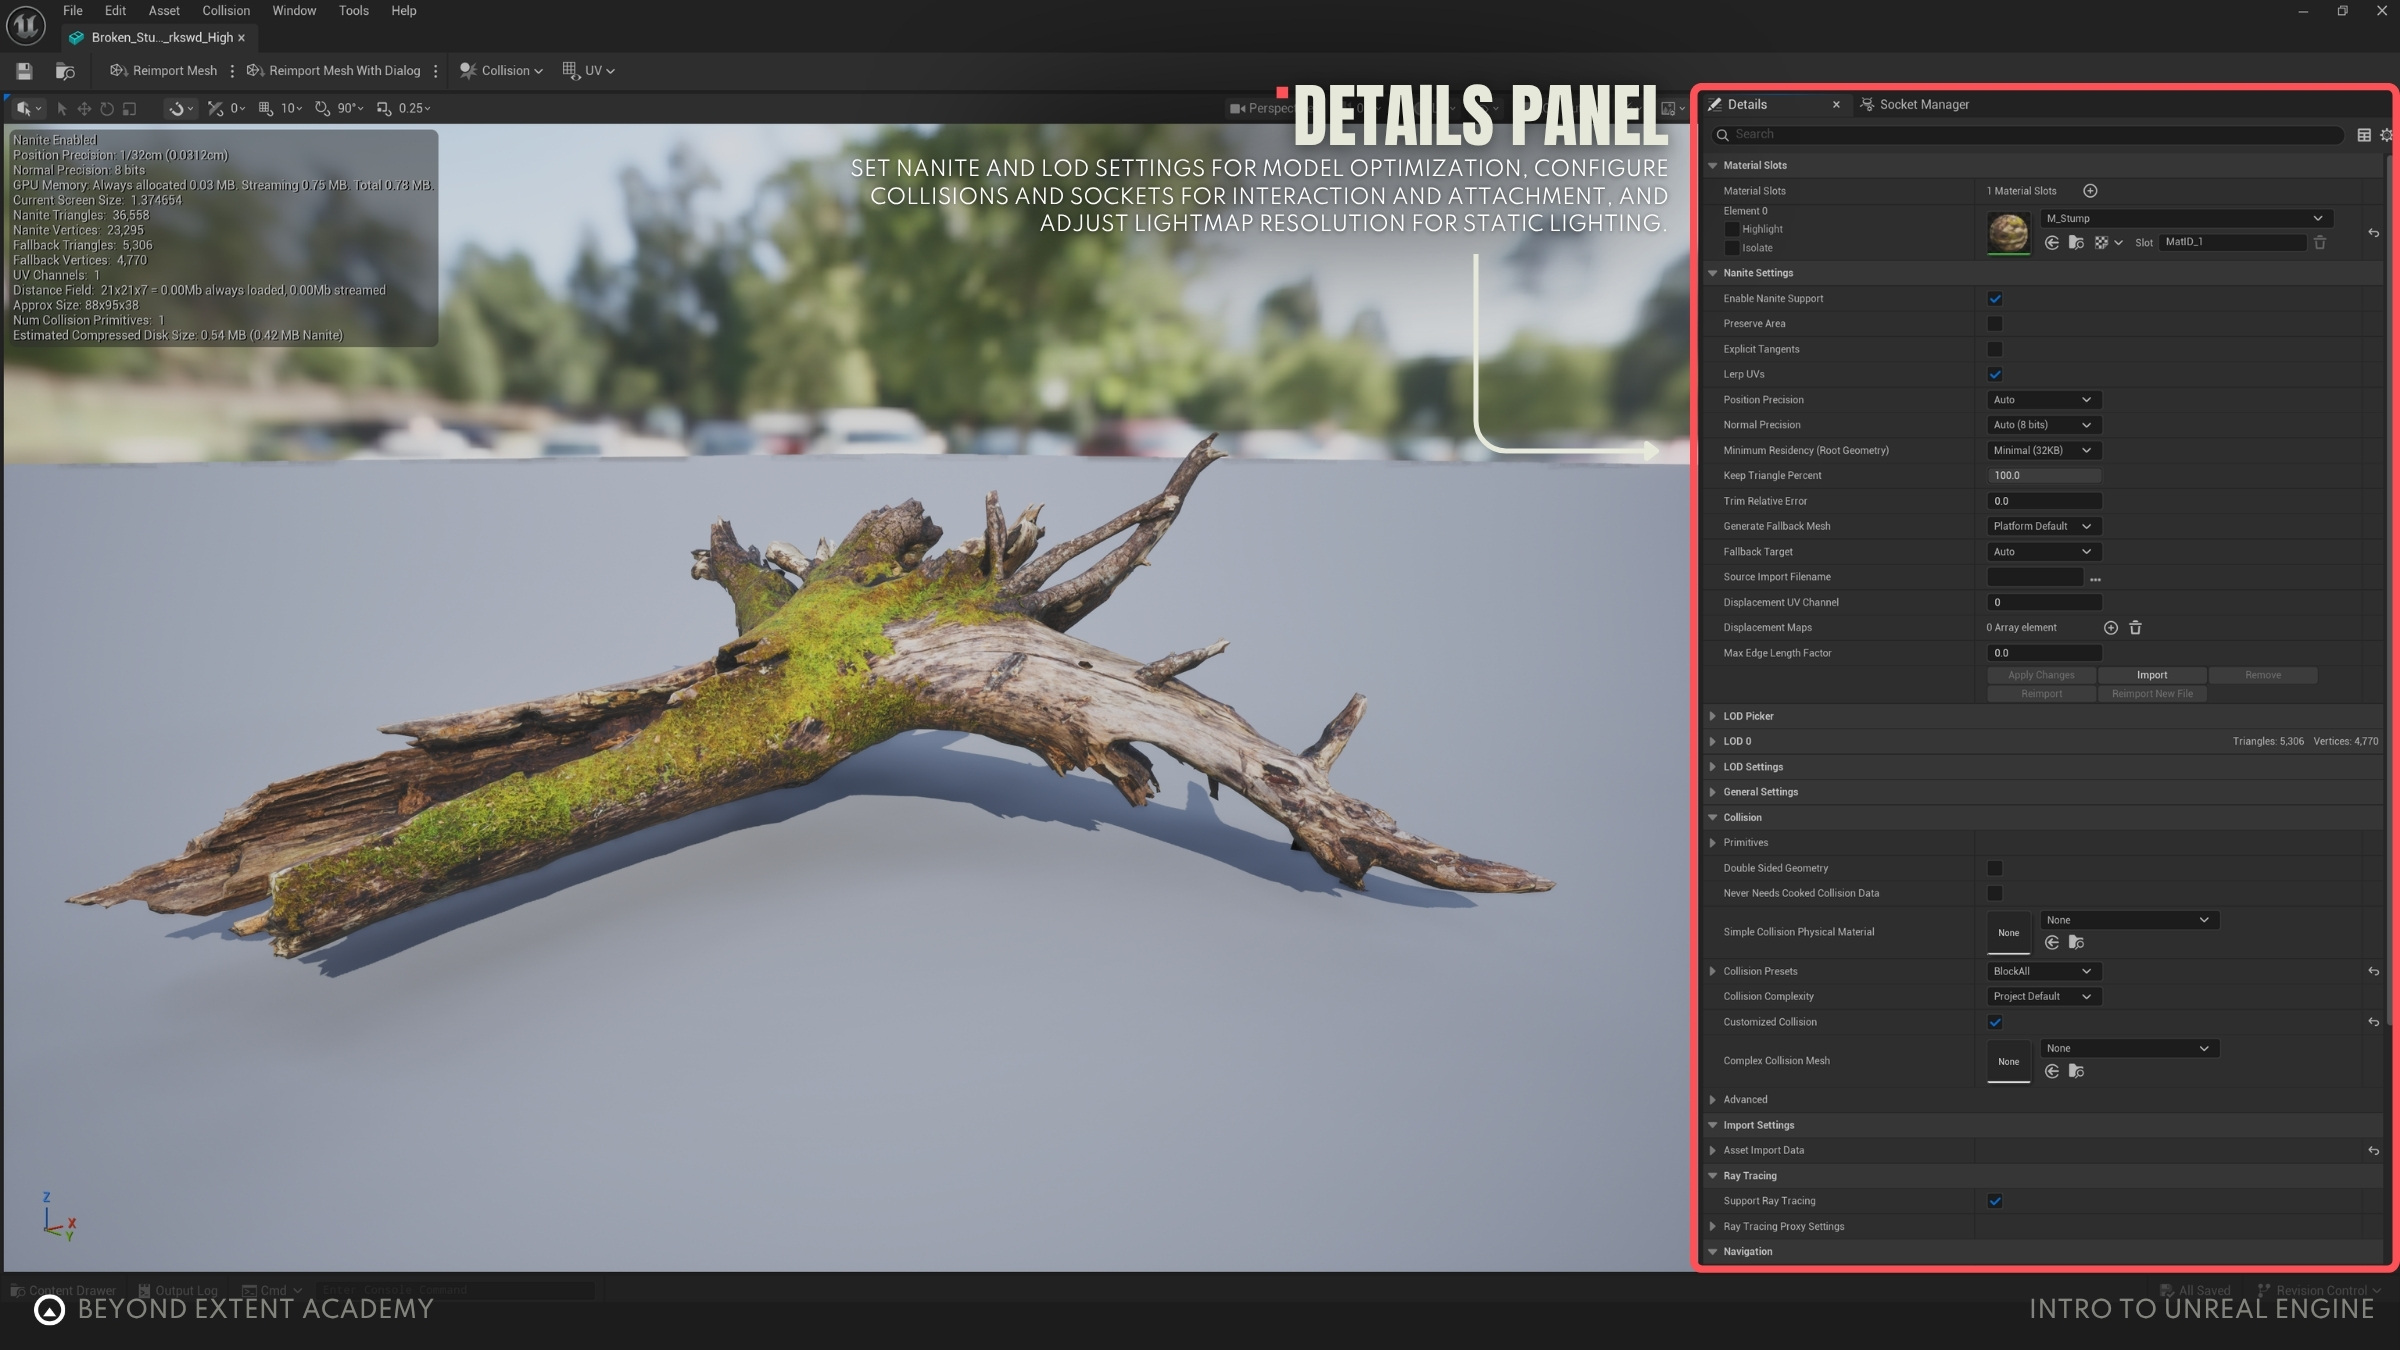
You can open the Asset Preview window by double clicking any Static Mesh in the Content Browser. Besides assigning materials, you can find many other useful options in the Asset Preview window like:
- Set Nanite and LOD settings. They are techniques employed by the engine to simplify the models based on camera distance and gain performance. These are important settings, but we will go into more detail in future lessons.
- Inspect your asset’s collisions, create simplified and auto-convex collisions and change general collision settings. ‘Collision’ refers to how objects come into contact with each other in games. Collisions can be used to block objects when they collide, or trigger events and effects.
- Create Sockets, which are reference points placed on assets for a variety of uses. You can for example attach objects to the socket location of another object, like attaching a weapon to the hand of a character, or defining from where the bullet particles come out from a gun model.
- Set Lightmap resolution, relevant for games and scenes using Static Lighting.
TEXTURE PREVIEW
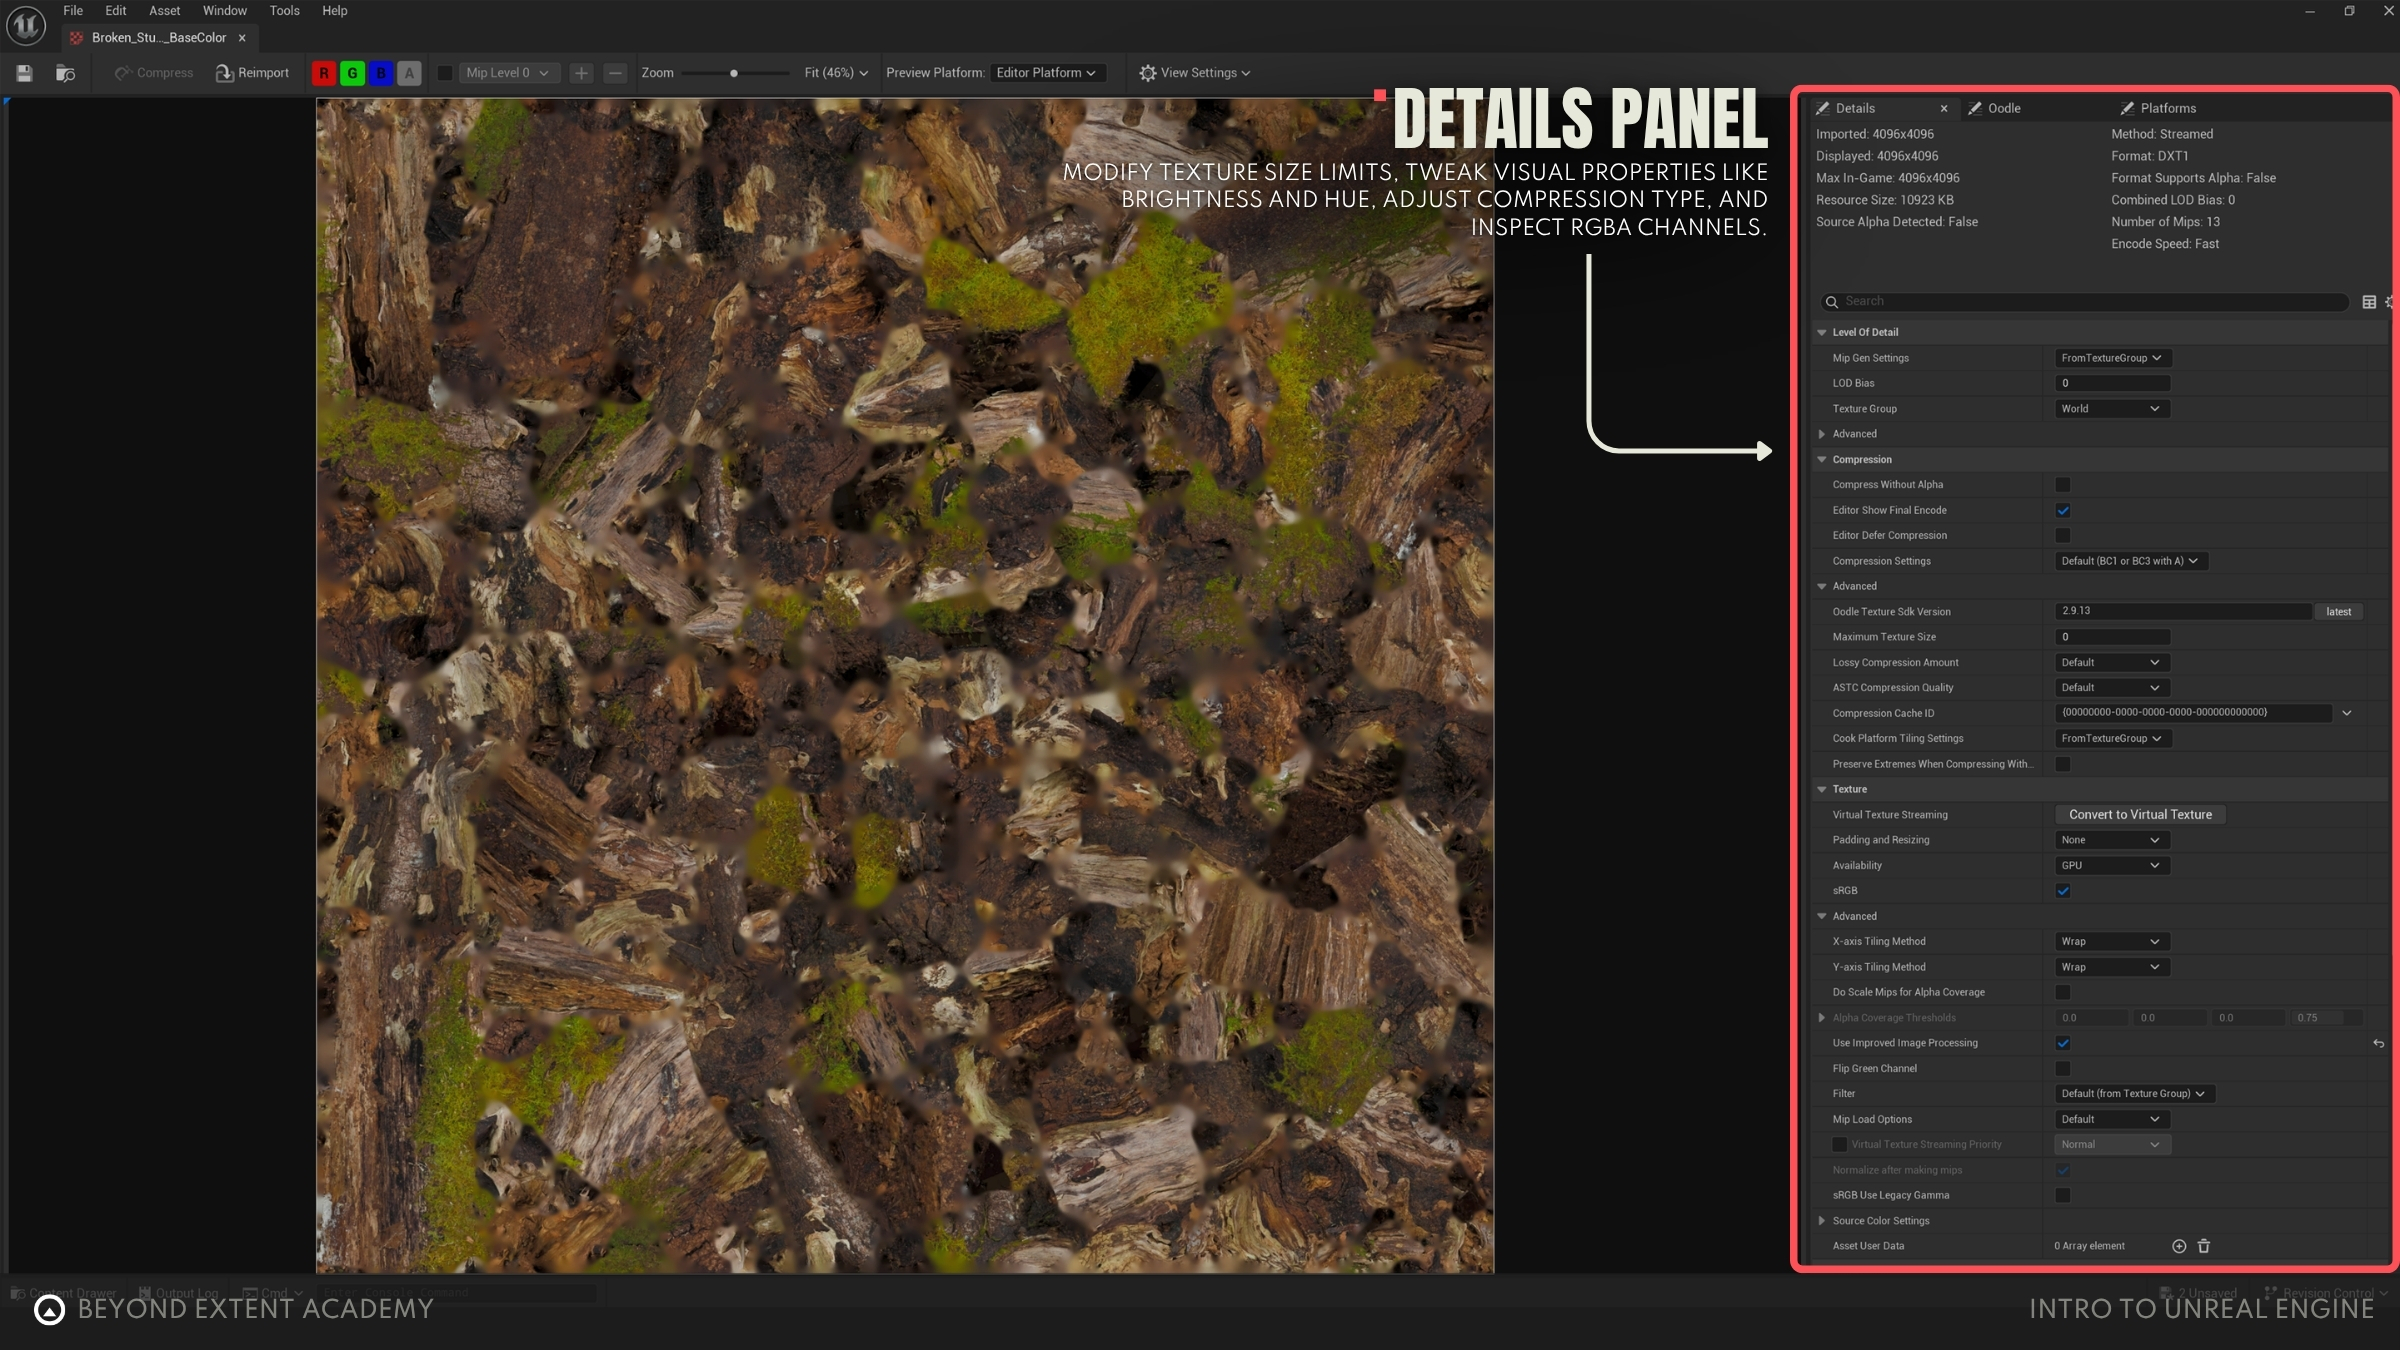
To open the Texture Preview window, double click on any texture in the Content Browser. Here you can also find some useful settings, like:
- Change the maximum texture size. For example, you can import a 4096x4096 pixels texture but decide to set the maximum size to 2048x2048 pixels in order to save on performance.
- Adjust settings like brightness, saturation and hue.
- Change texture compression type.
- Inspect the content of the individual RGBA channels of a texture.
ASSET IMPORT
Game engines allow you to bring in external assets made in other software, like 3D models made in Blender or Maya, textures made in Photoshop or Substance Designer and many other asset types. Don’t worry, the process is very straightforward!
Let’s try it out with this Broken Stump that you can get for free on Fab:
https://www.fab.com/listings/767f5e4d-21ca-4971-8554-aab5ebd532f1.
Download the high-quality FBX and extract the zipped file. You’ll find an .fbx file (the actual stump 3D model) and a bunch of texture maps. For this example we will need only the stump FBX, the BaseColor, Normal and Roughness textures. Feel free to delete the rest.

In order to import an asset, all you have to do is drag and drop the file from your computer to a folder in the Content Browser, or click the “Import” button in the Content Browser and select the file you want to import. It’s always a good habit to create properly named folders to keep things organized, so head over to the ‘Content’ folder and create a few folders so that your structure looks similar to this:
All → Content → Props → Stump
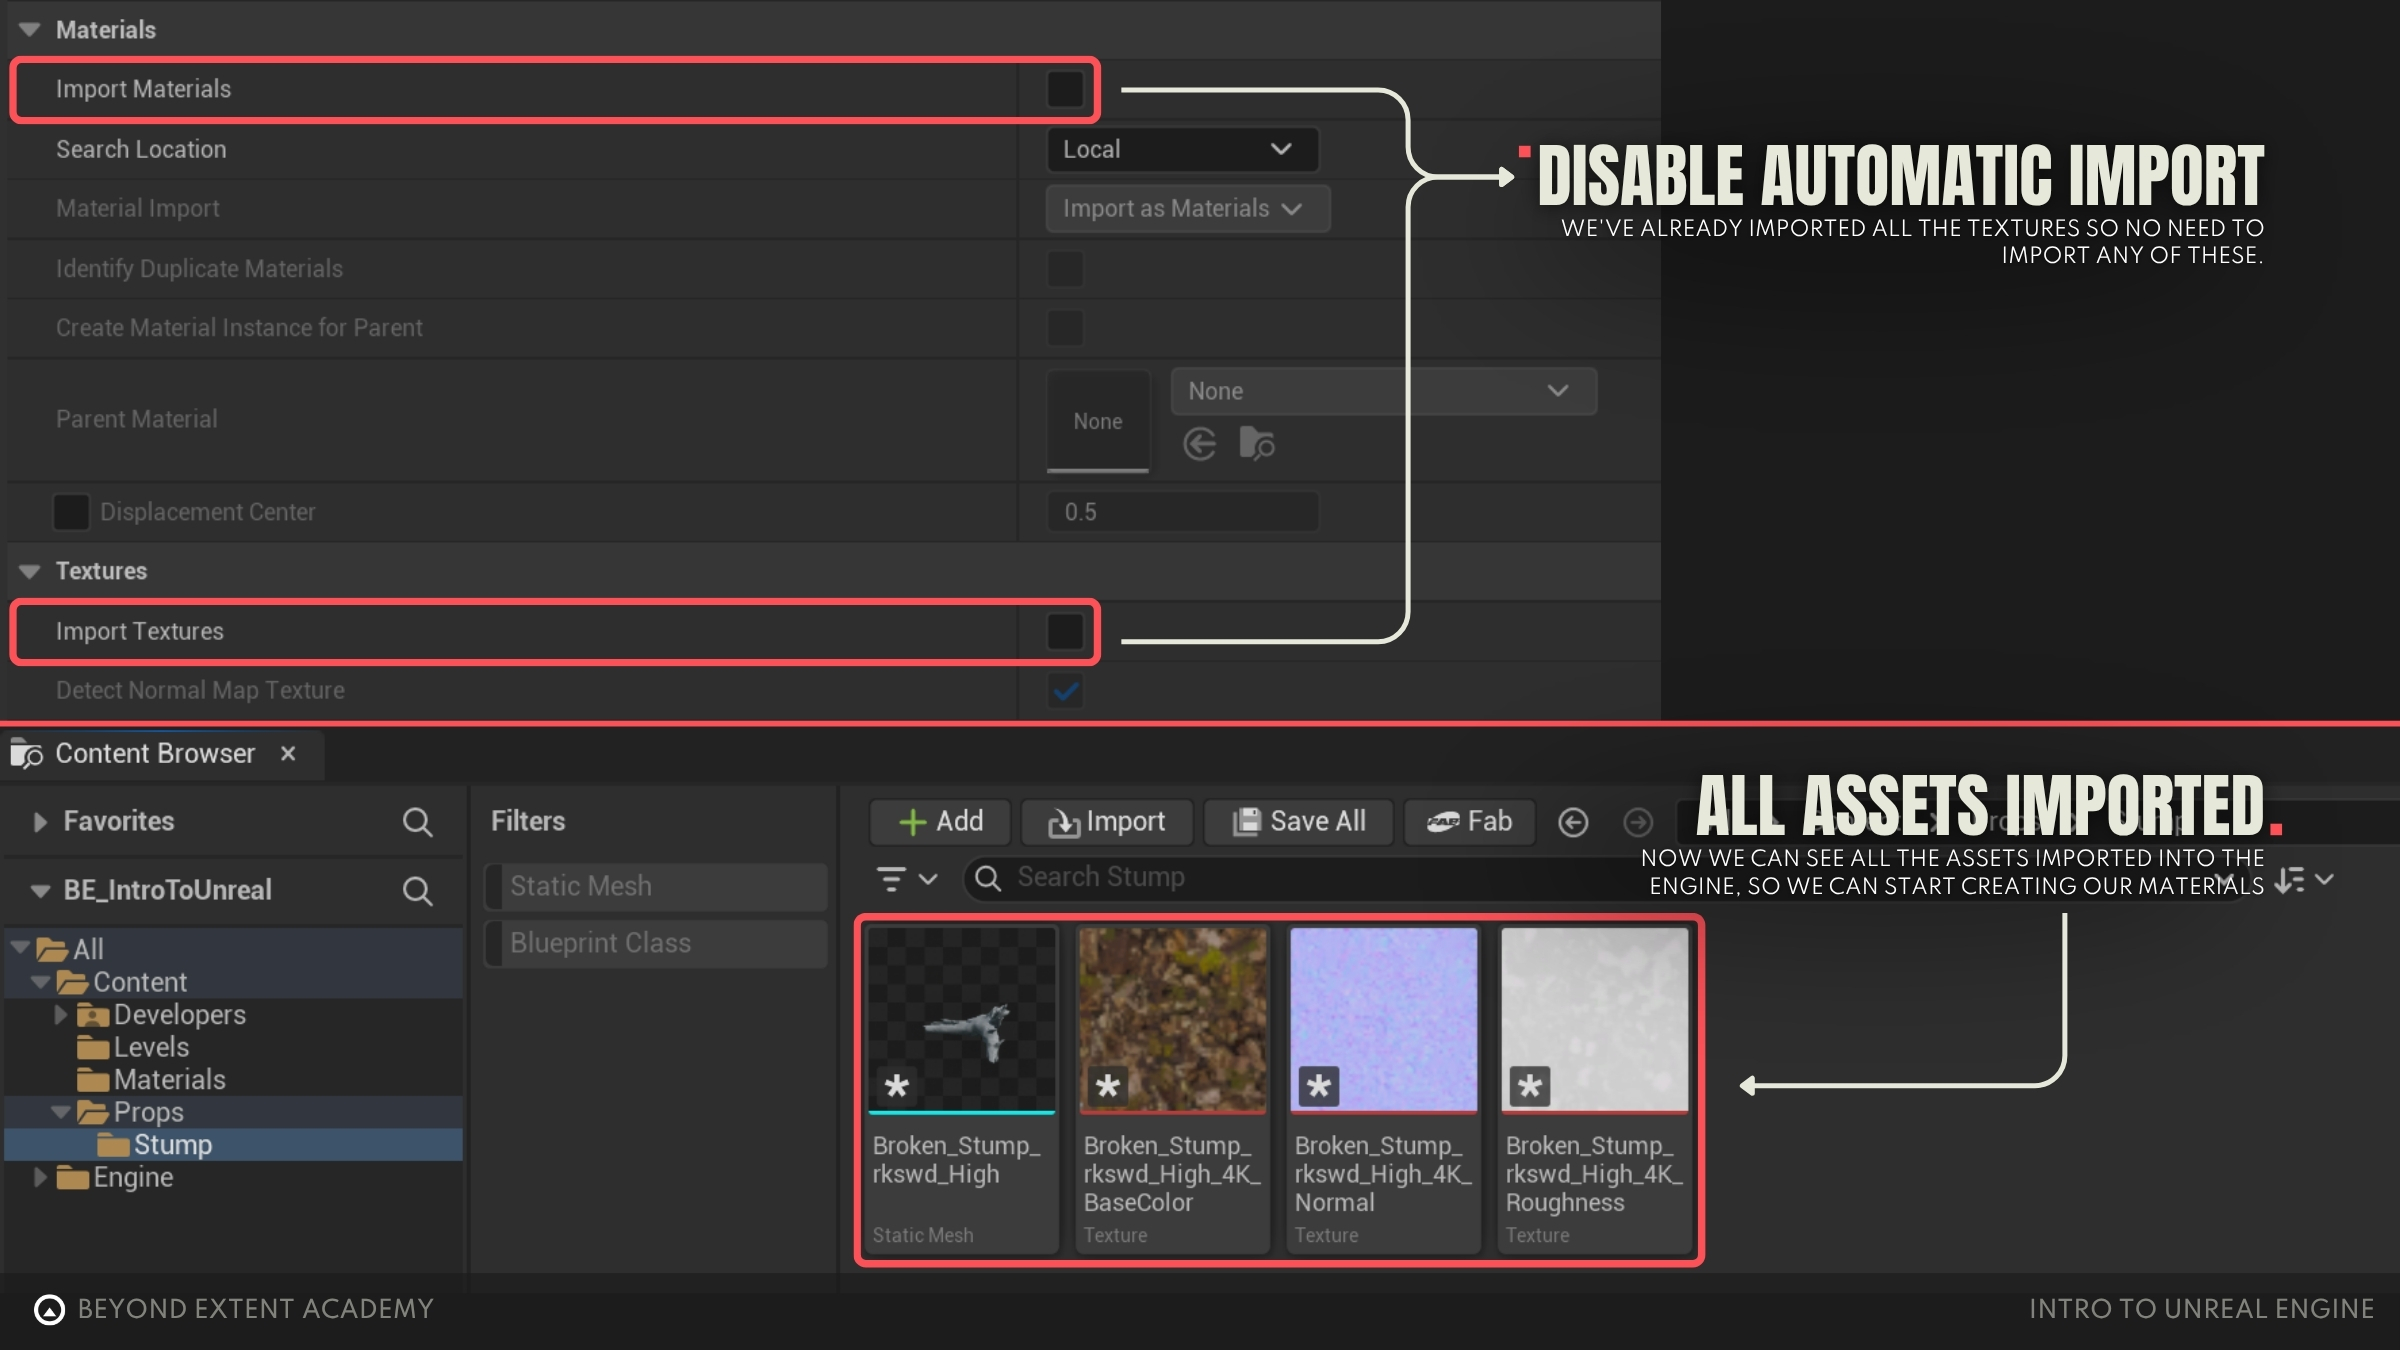
Let’s import our textures first. Simply select the three of them and drag and drop them into the Stump folder in your Content Browser. They will be quickly processed and appear in your folder view.
Now let’s do the same with the FBX file. You’ll notice that as soon as you drag and drop it, an 'Import Content' window will appear. For now, keep the default settings, but scroll down and un-check the boxes in “Import Materials” (we will be creating our own material soon), and “Import Textures”, as we already did that.
Your folder should look like this:
IMPORTANT NOTE
Notice the asterisk (*) icon on the asset thumbnails. This is a reminder that these assets are unsaved, either because they’re new, or because they have been modified. You can go to ‘File’ and select either ‘Save All’ or ‘Choose Files to Save’ if you want to do that individually.
exercise
Importing your first asset
Importing your first asset
overview
lesson example content
Get into it instantly by downloading the starter content for this lesson
download lesson contentFILE EXTENSION
Unreal supports a variety of file types, but for now, let’s stick to the most commonly used:
- Static Meshes - The industry standard file format for 3D game assets is .fbx. It supports all the information needed, like static meshes, materials and animation. FBX is also one of the most used formats for sharing assets between people that use different 3D software, since they can all import and export this type of file.
- Textures - The most common format for textures is .png. You can also use .tiff or .tga if your texture has information stored in the alpha channel.
REIMPORTING
If you make any changes to the source asset you imported, instead of going through the importing process again, you can just right-click the asset and choose ‘Reimport’. This will quickly update your asset. If for any reason Unreal can’t locate the source file, you might have to choose the option ‘Reimport With New File’ and choose the source file manually again.
KEEP ASSETS CONSISTENT
Keeping the names and locations of assets consistent can help you speed up the process. Also, when exporting files directly to the Content directory of your Unreal Engine project the engine will even detect it for automatic import.
POTENTIAL IMPORTING ISSUES
Unexpected things can always happen, especially when we’re still learning the process. Here are a few common issues that can happen when trying to import 3D assets.
Inverted normals
If you notice that your 3D model has invisible or see-through parts, those polygons might have inverted normals.
TO RECAP
A ‘normal’ is basically a tiny arrow (a vector) that points away from a surface in 3D. It tells the engine which way the surface is facing in order to be rendered correctly.
This example is showcased in Blender, where the purple lines represent the normals’ direction. The normals coming out of the blue polygons are pointing outwards, meaning that they are pointing the correct way. On the other hand, the polygons represented in red have their normals pointing inwards.
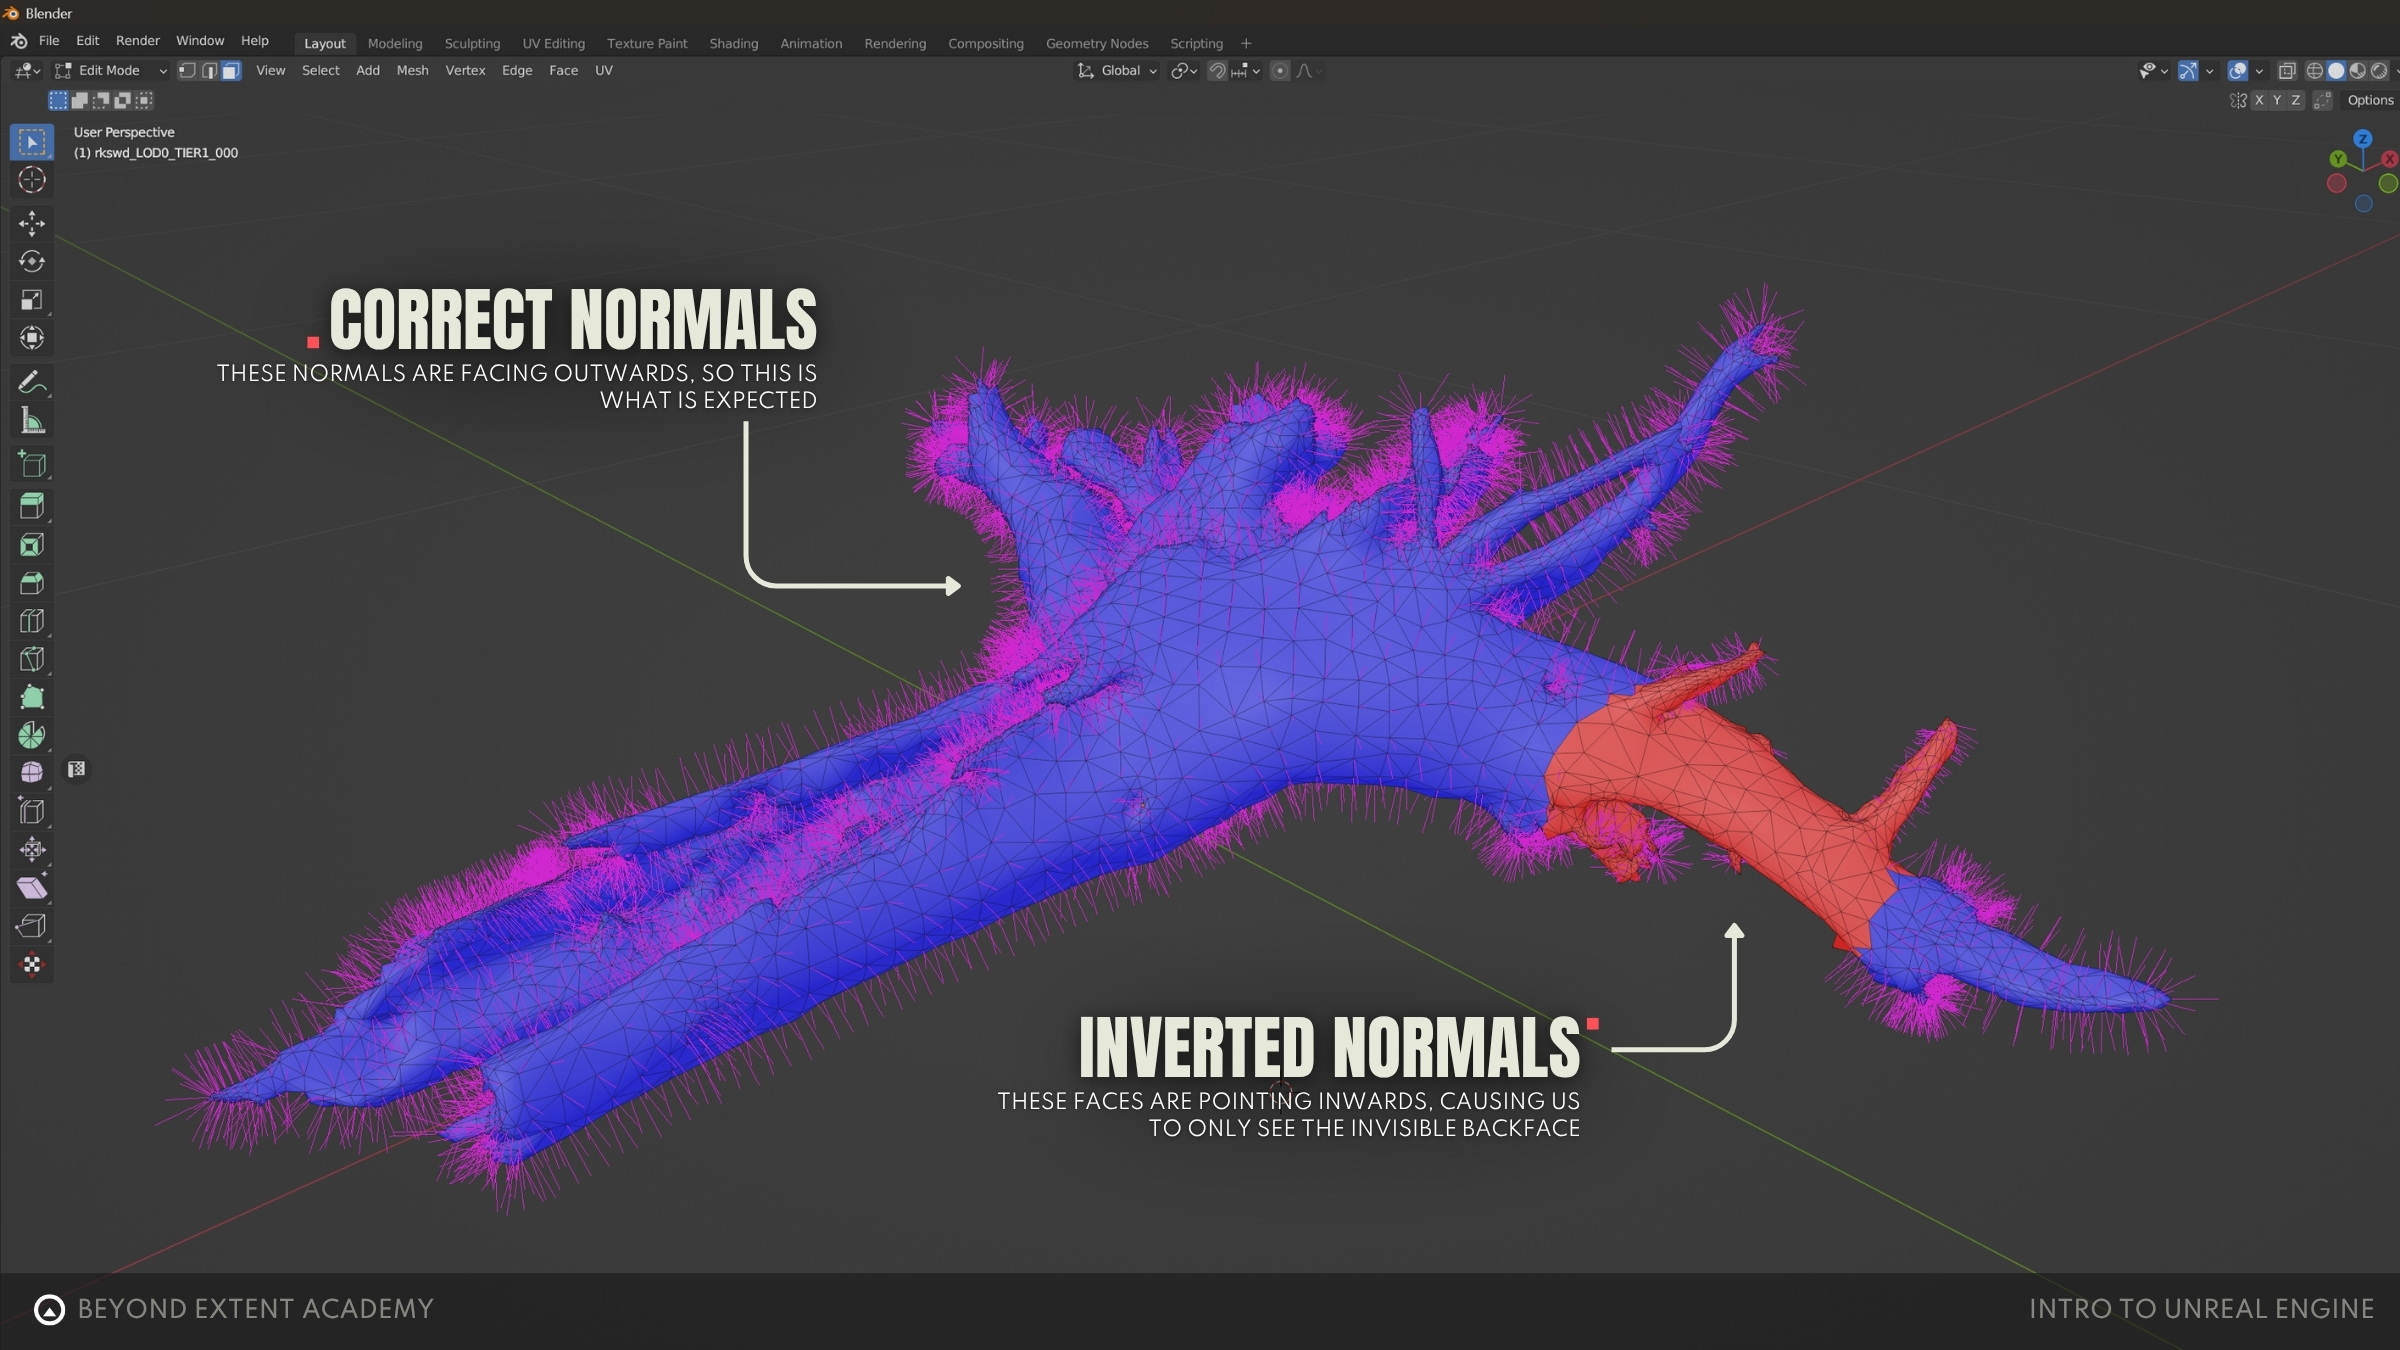
This is how this mesh would look in the Unreal Engine viewport. Notice that we can see through the polygons that have normals facing the wrong way.

To fix this issue, go back to your 3D modeling software (Blender, Maya…), fix the normal direction of the problematic faces and reimport the asset.
Object scale
If your asset scale looks off, you might have exported it with the wrong scale from your 3D software. Make sure the scale is applied (set to 1) and your 3D software is using the correct reference units (Unreal uses centimeters).
Pivot offset
If your asset appears offset from its pivot after importing into Unreal, it usually means the mesh was exported away from the world origin in your 3D software.
In this example, the pivot was placed correctly at the bottom of the object. However, when exported, the FBX file uses the world origin as the reference point, which overrides the custom pivot and causes the offset.
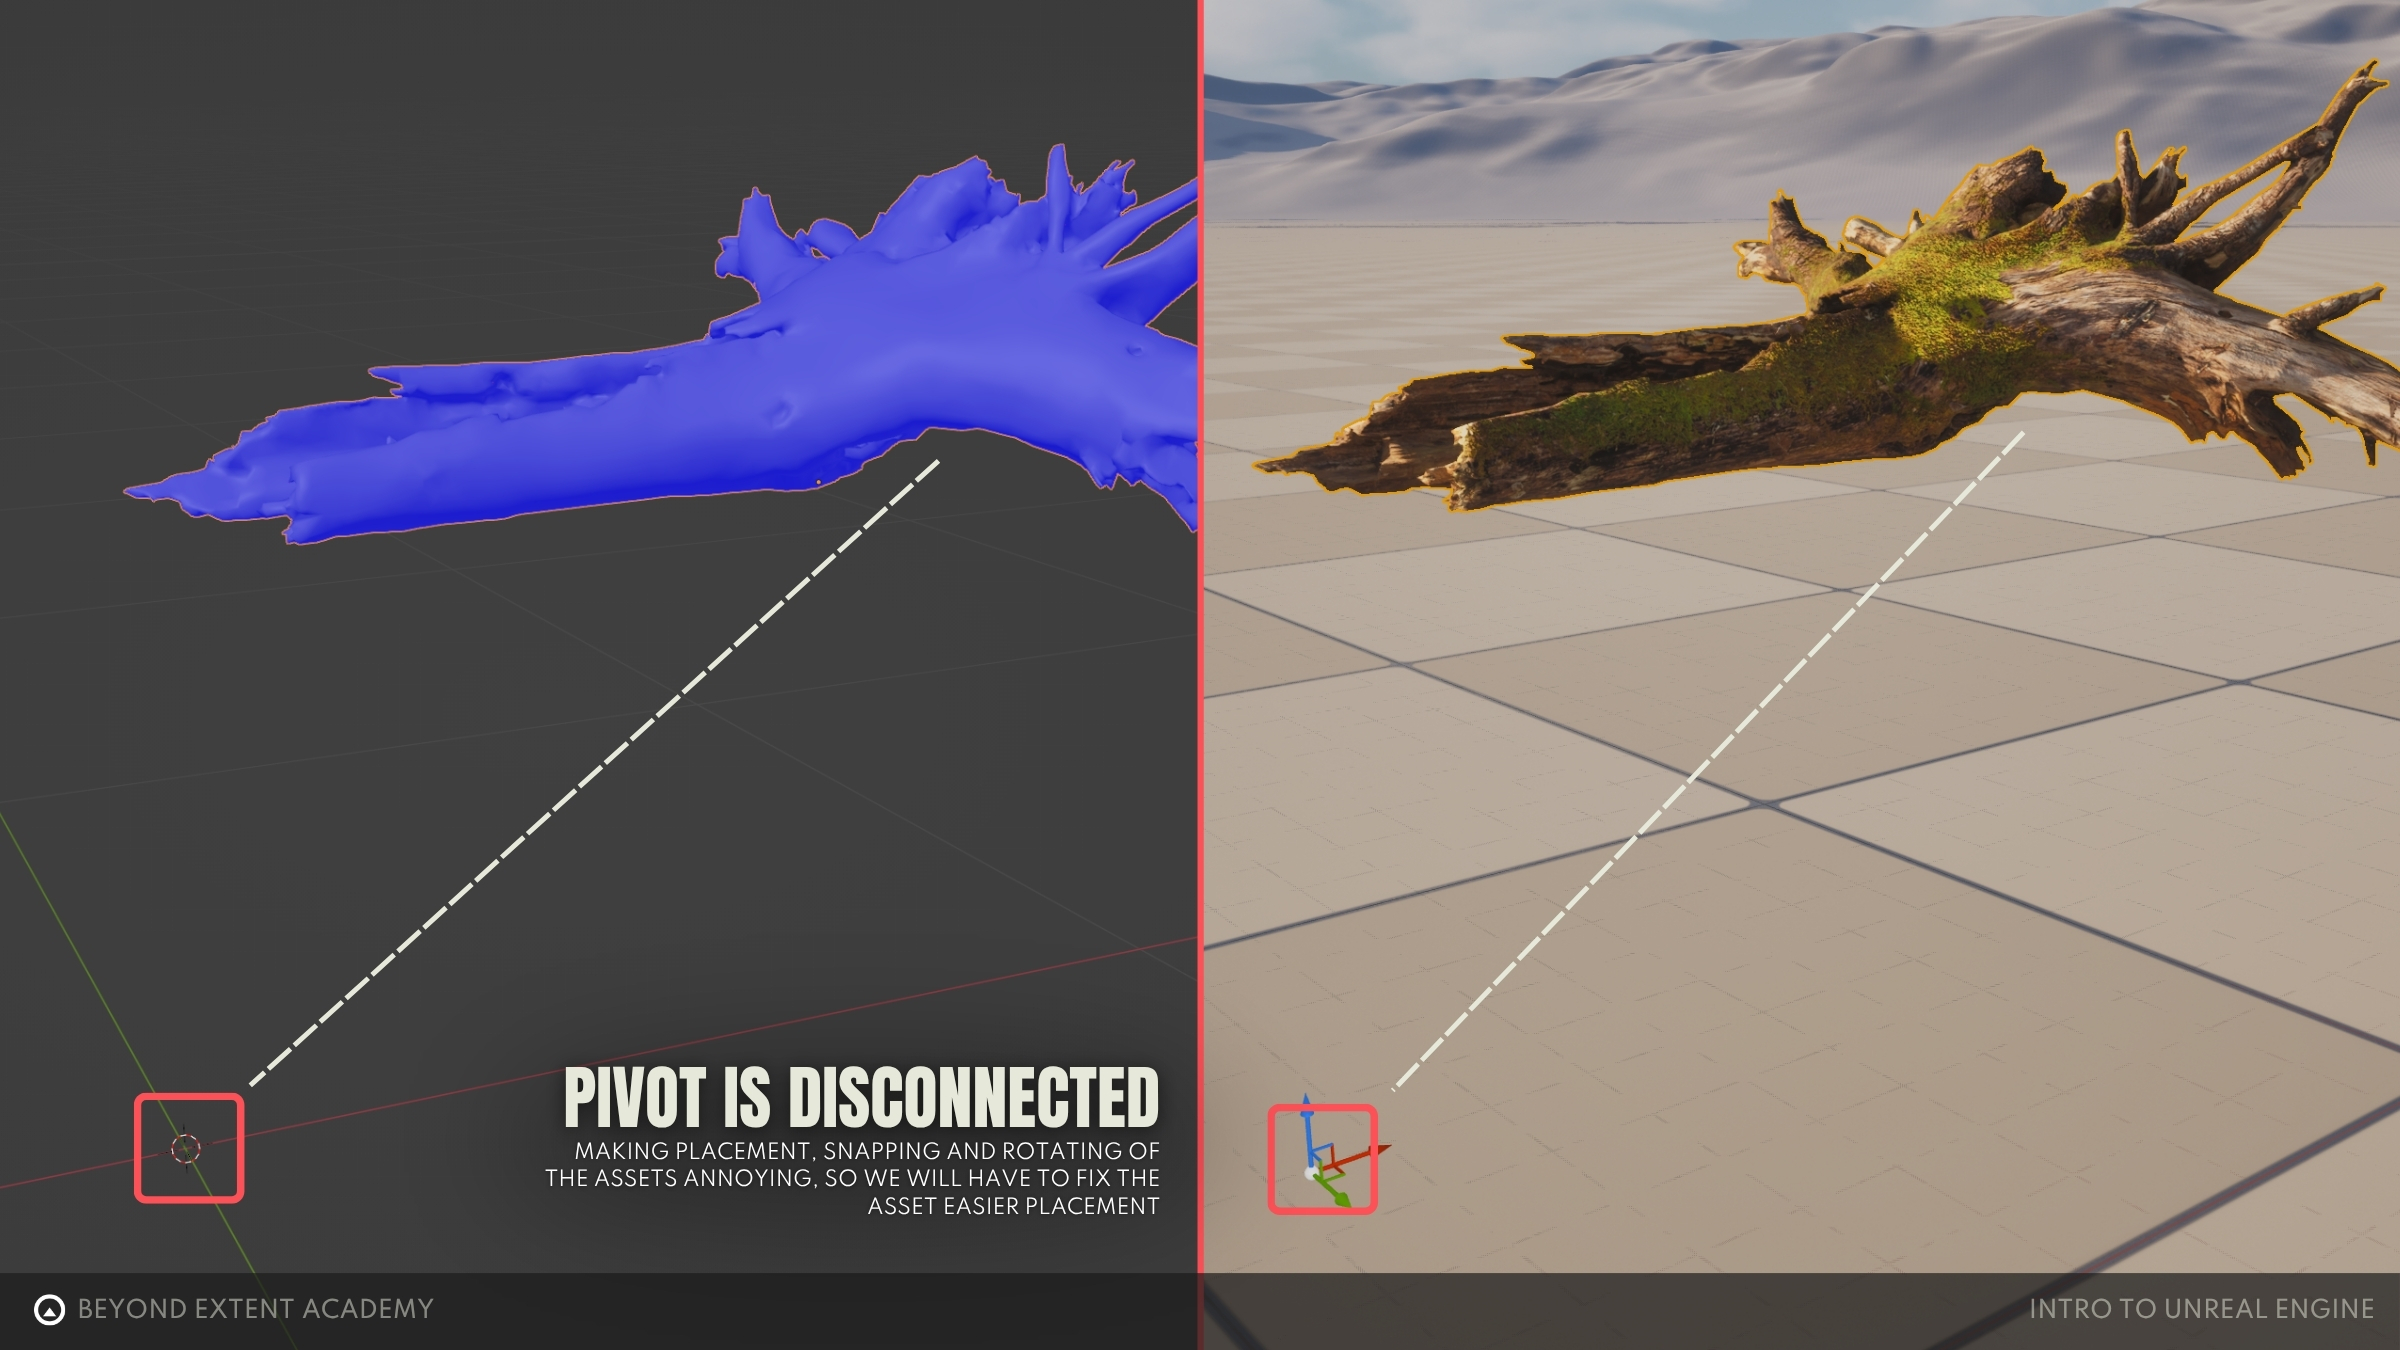
To prevent this, make sure your asset is placed on the world origin (0,0,0 location) before exporting.
MATERIAL EDITOR
Even though we have our Stump textures, we can’t directly apply them to our model. First, we need to create a Material. Materials define the visual properties of an object, like color, shininess, and texture. In order to do that, we can use the different texture maps we imported inside a material. Let’s create a very basic material together so we can see how this works.
First, right click inside the Stump folder in the Content Browser or click the ‘Add’ button and select ‘Material’. This will create a new Material asset in the folder. Name it ‘M_Stump”.
NAMING CONVENTIONS: it’s common to add prefixes when naming different types of assets, like ‘M’ for Materials, ‘SM’ for static meshes and ‘T’ for textures. Naming conventions change depending on the company and project, but keeping it consistent is the key to more organized project folders.
Double click the new material to open the Material Editor.

Since we just want to get started and create something very basic, let’s focus on the center part of our material graph.
The Material Editor in Unreal Engine works by connecting nodes. You can think of a node as a box that takes information, does something with it, and passes the result along. Each node receives some data through their inputs (the small white dots on the left of a node), perform a specific function, and then passes the result out through an output (the small white dots on the right). By connecting nodes, you’re building a chain of instructions that tells Unreal how to shade a surface.
Notice the yellow node called M_Stump. This is the ‘result node’ of our material. It will gather and combine all the properties connected to it and display us the result. In order for us to see the stump textures, we need to bring them in and connect the properties to the corresponding inputs of this node.
You can conveniently open the Content Browser while in the Material Editor by pressing ‘CTRL+Space’. Now, locate and select the three stump textures (Base Color, Roughness and Normal) from the Content Browser and drag and drop them in the material graph. This will create one Texture Sample node for each texture.
Now, connect the RGB output of each node to their corresponding property in the result node. You will see that the preview sphere on the left will now display the textures you just connected. Click ‘Apply’ and ‘Save’.

Before we use this material, there’s one thing we need to fix first.
Our Roughness texture was automatically imported with the default compression setting. This means it comes with sRGB color information and Unreal will apply gamma correction as if it were a color texture. Data maps like roughness and normal maps need to be read as pure linear values, not color-corrected images, otherwise their result will look different than expected.
To fix this, find the Roughness texture in the Content Browser and double click it to open the Texture Preview. Now on the right side, look for ‘Compression Settings’ and change it to ‘Masks (no sRGB)’.
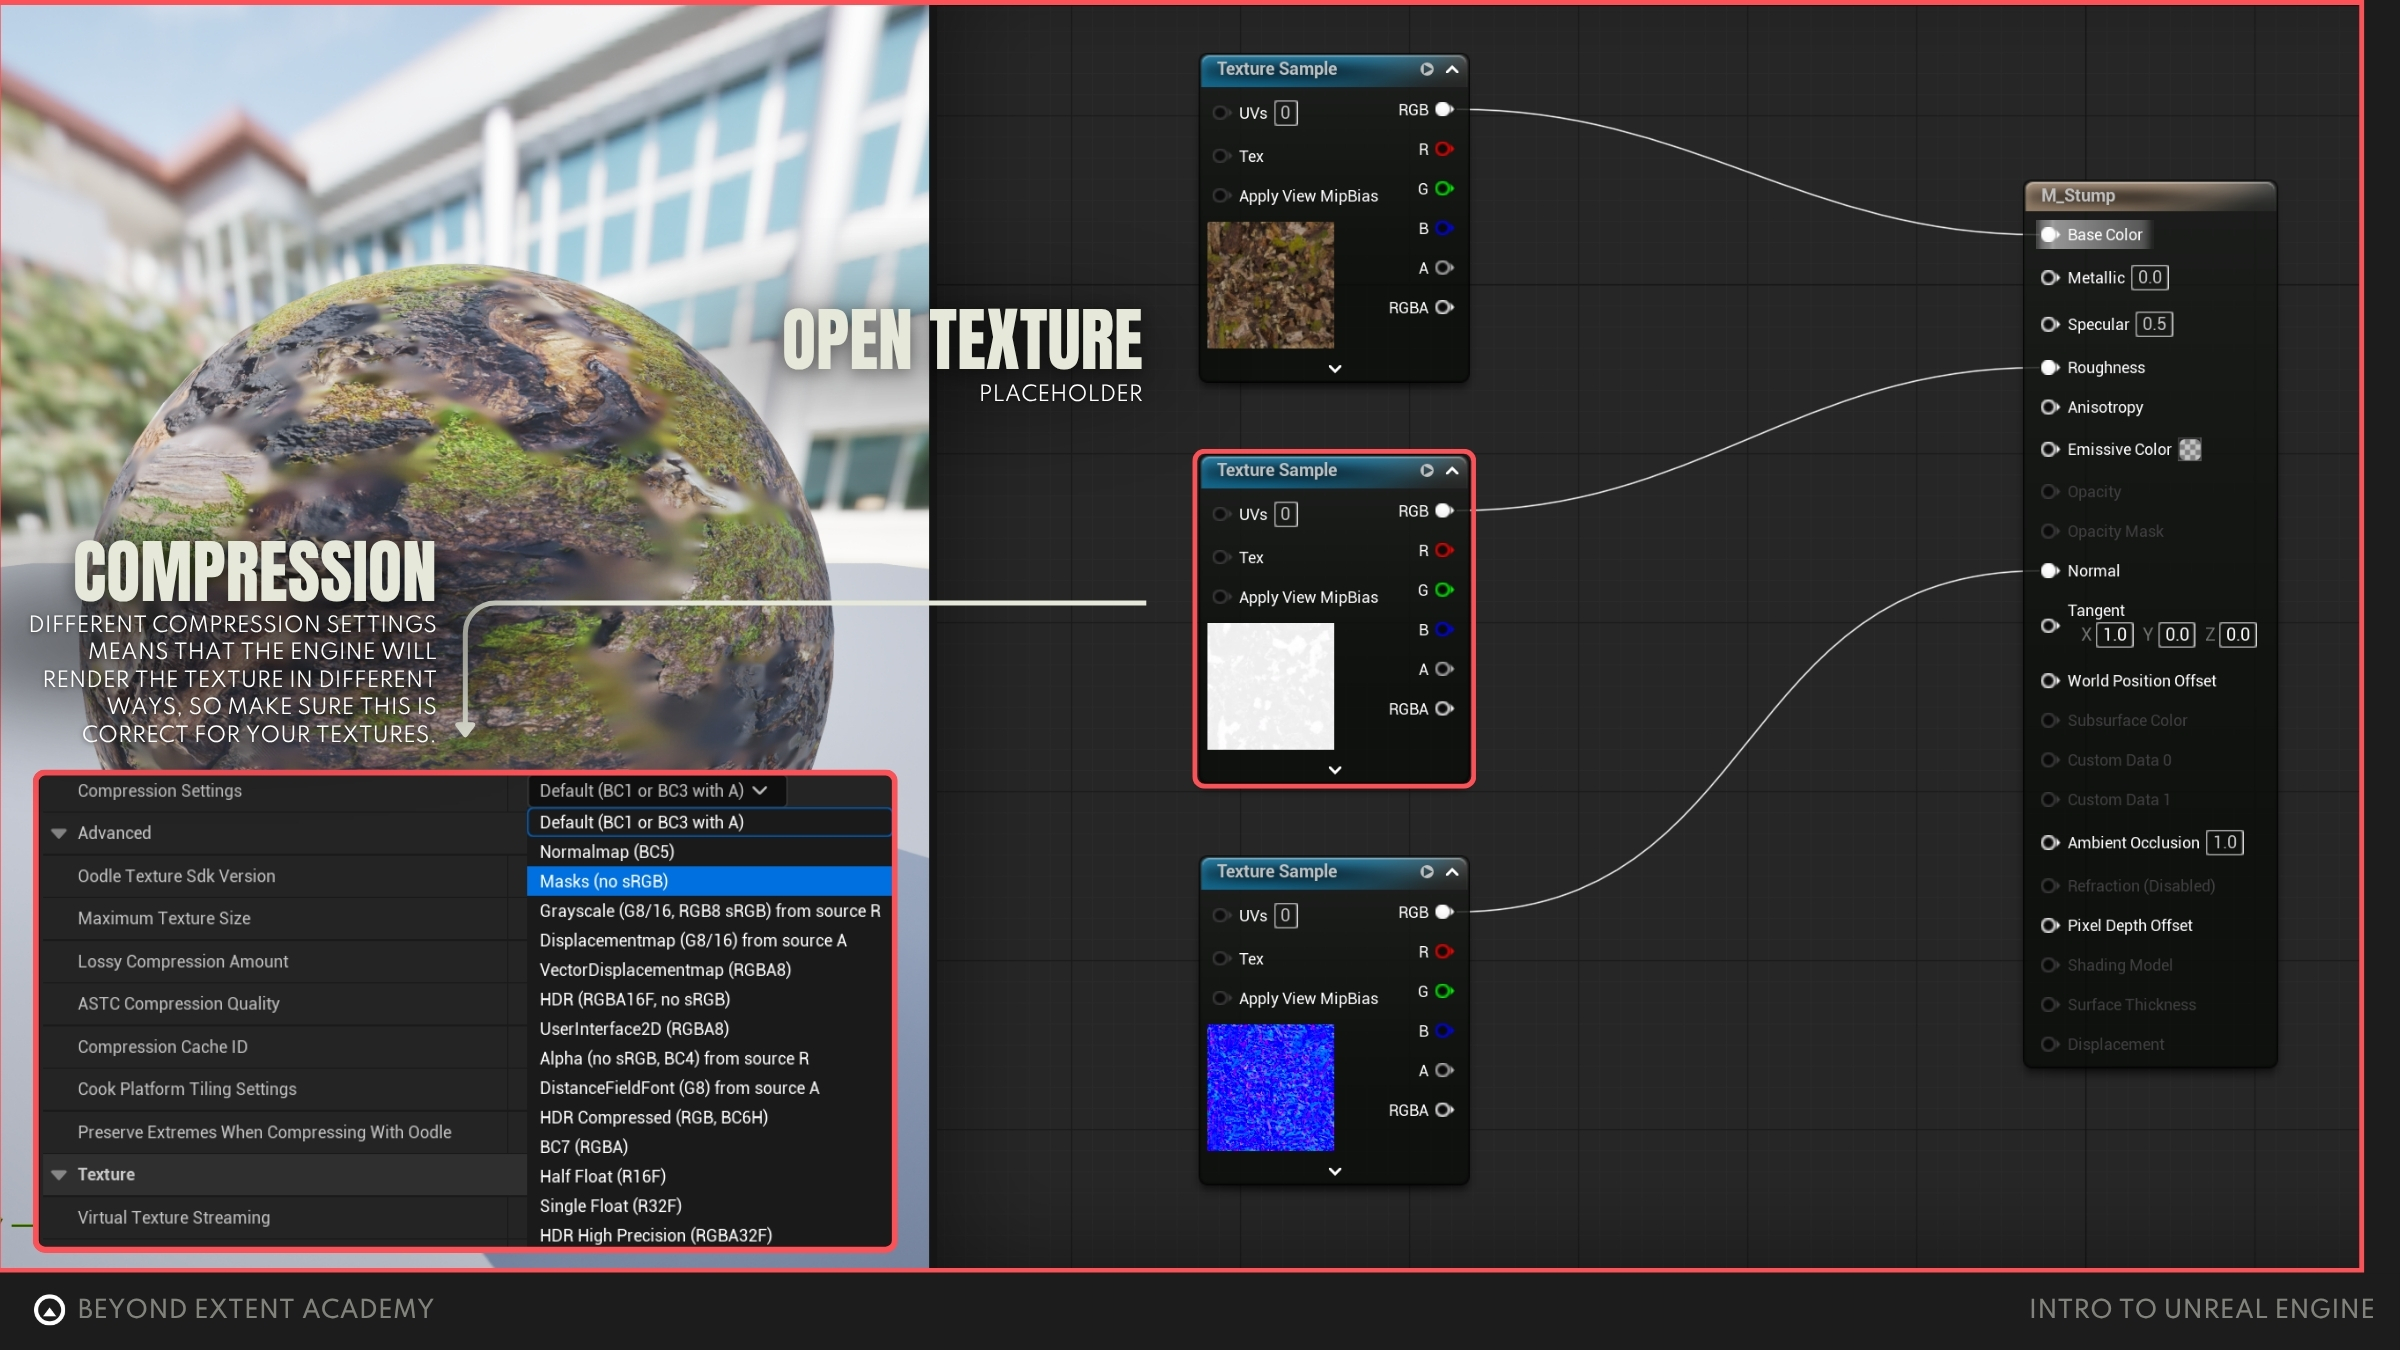
NORMAL MAP: Don’t worry about the compression settings of the Normal Map. Unreal usually detects and changes them to the correct ‘Normalmap’ compression setting automatically on import.
You will notice that now your material is throwing a scary error. Fear not. Our roughness Texture Sample node just wasn’t updated with the new compression we set for the Roughness Map. You can see on the bottom that the error is telling you exactly that. We need to change our texture sample settings from ‘Linear Color’ to ‘Mask’. Select the roughness Texture Sample node, and in the Details panel on the left look for the ‘Sampler Type’ and change it to ‘Masks’. Apply and save again.

Now that we have our material, we’re ready to assign it to our stump. Find the Stump asset in the Content Browser and double click it to open the Asset Preview.
On the top right you will find the material slot where we need to assign the material. You can either drag and drop the material we just created from the Content Browser (you can use again the ‘CTRL + Space’ hotkey) or just click on the dropdown menu of the material slot and search for the material from there.
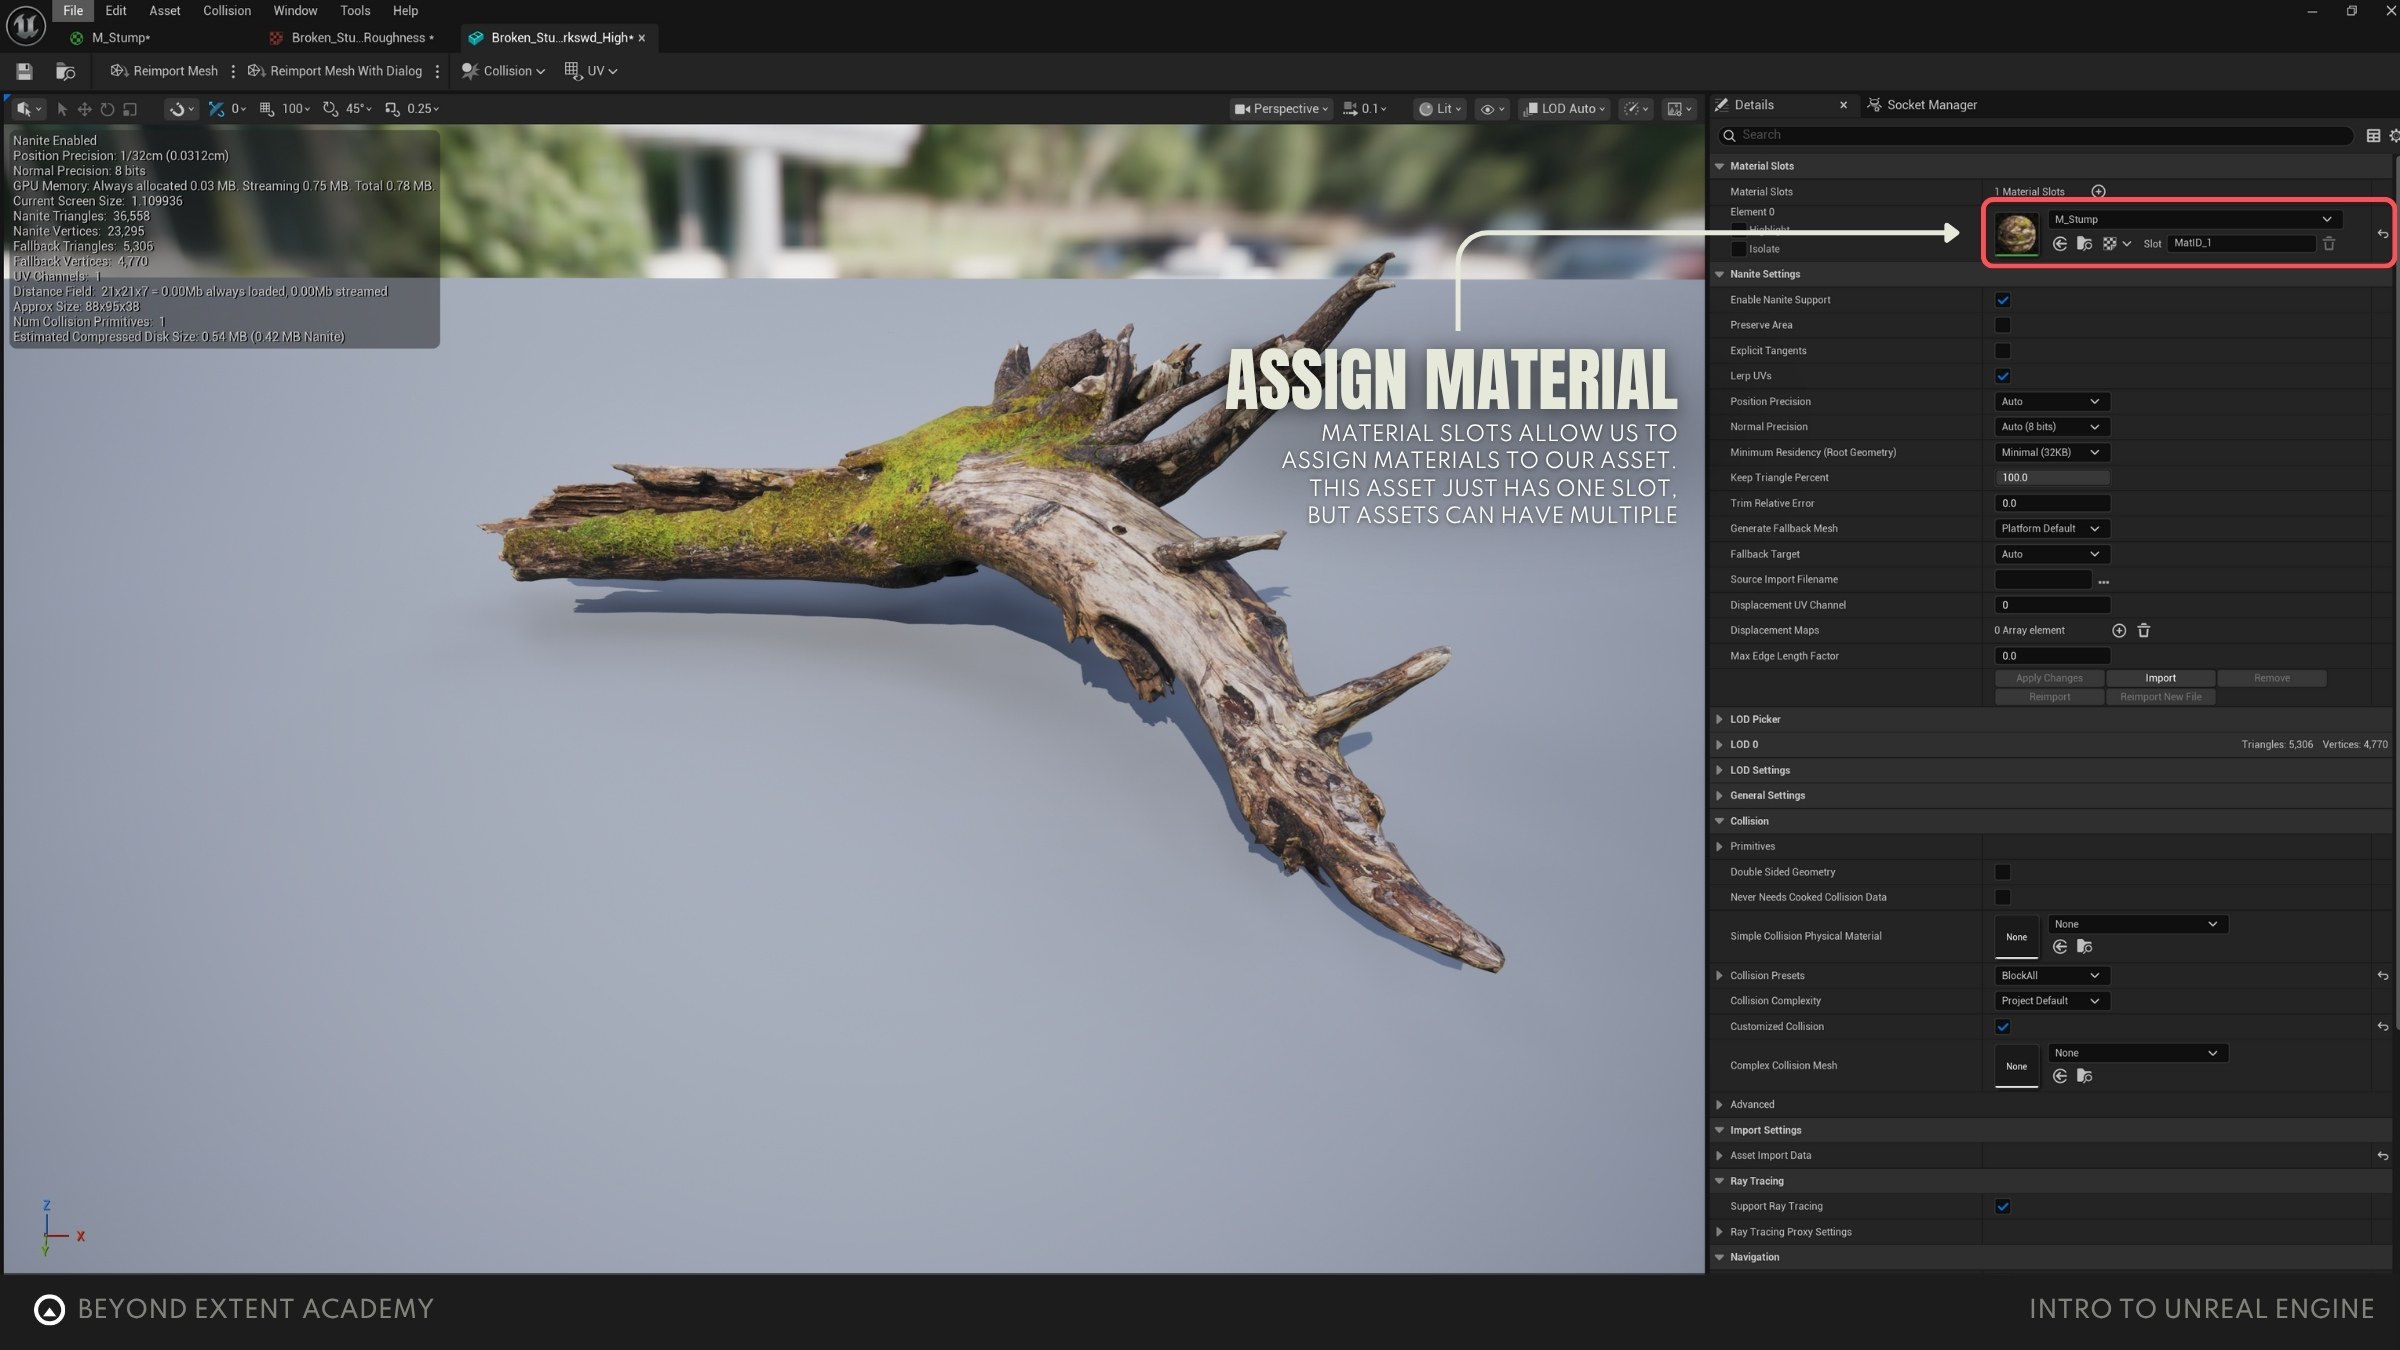
Done! We have our textured mesh ready to be dragged onto our scene!
exercise
Creating your first material
Creating your first material
overview
We will take a look at the Material Editor, understand how the node based system works and how to create a simple material for our stump mesh.
lesson example content
Get into it instantly by downloading the starter content for this lesson
download lesson content