


Hi Lea, tell us a bit more about yourself?
Hi, thank you for having me! I’m Lea and I’m a 3D environment artist from Germany. Since late last year I am working as a 3D Art Lead at Frictional Games, contributing to games I love together with an amazing team of talented people.
In the past, I’ve been contributing to various small game projects at local game companies and also worked as a freelance artist on projects in the game, education and events industry.
My journey to the world of 3D began about 5 years ago, towards the end of my apprenticeship as architectural draftswoman. My day to day work was mostly to create 2D CAD construction plans, but I also got the chance to dive into 3D terrain modelling and experimented a bit with simple 3D shapes in AutoCAD during my lunch breaks. Then I picked up blender in my free time and followed a couple of YouTube tutorials, which really felt super amazing and exciting – at this time I realised that 3D Art is something that I’m very passionate about and that I want to try and make it something more than just a hobby.
I stumbled across the possibility to work in games just by chance and while gaming, painting, digital drawing and handicraft work had always interested me a lot, I didn’t know that this was something you could actually pursue as a career.
Shortly after, I reduced my working hours on the job I had at the time, so I could study Game Art at SAE Institute.
I have always been very self-driven and passionate about my career. Basically, I put all my energy since then into getting better and building a portfolio that would allow me to switch industries. During my studies, I still worked as an architectural draftswoman, until I started to pick up small freelance work as a 3D artist and then got a job offer as a part time 3D artist at a local game company.
The biggest steps for me into the industry were definitely a combination of 2 things. First networking, just being present at as many small and big events as possible and casually chatting with people, staying for a beer, and making friends. Then there’s online communities, which I sadly discovered rather late into my studies, but the knowledge, help and feedback people offer is absolutely amazing. I cannot recommend being a part of this enough! It helped me so much to grow more confident in my skills, giving and receiving feedback and of course it’s so much easier to solve a problem when someone got your back, rather than all alone.
It’s great to see that these days, there’s so many different art communities, podcasts, articles, challenges and lots of online learning content, all of which makes it easier to grow as an artist.
Benefits and drawbacks of Modularity?
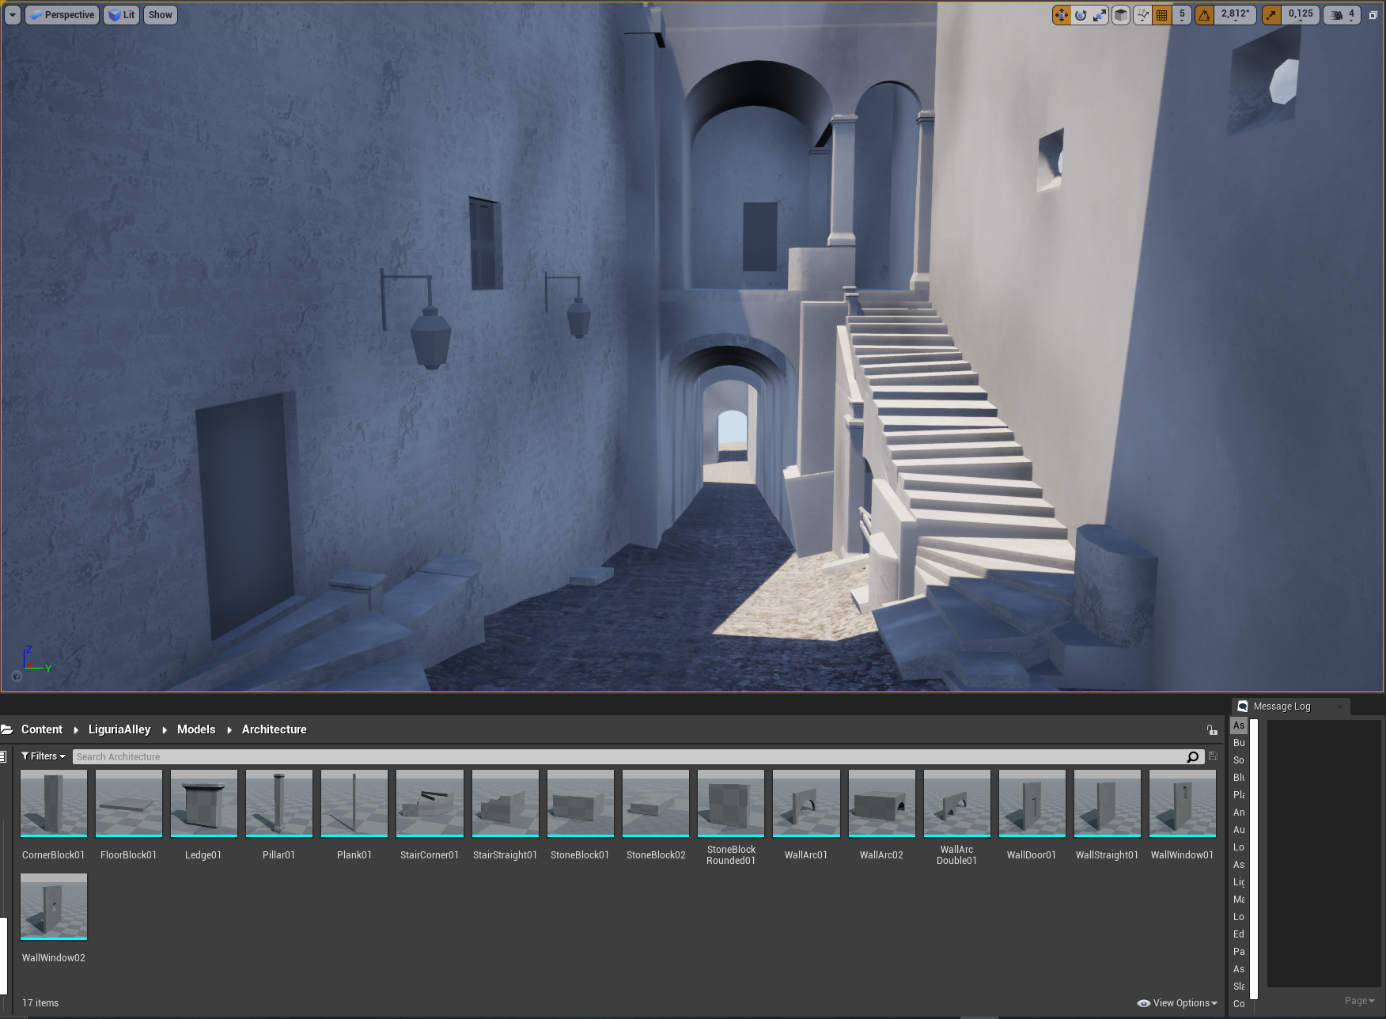
Modular sets have always interested me a lot. I think they are one of the things that are always a challenge to create, no matter how much experience you have, because each project is different and there’s so many things to try out.
I’m still learning every day and am very excited for the next steps on my journey as a 3D artist. With this article I hope to share some of my knowledge with you.
Drawbacks of using modular sets
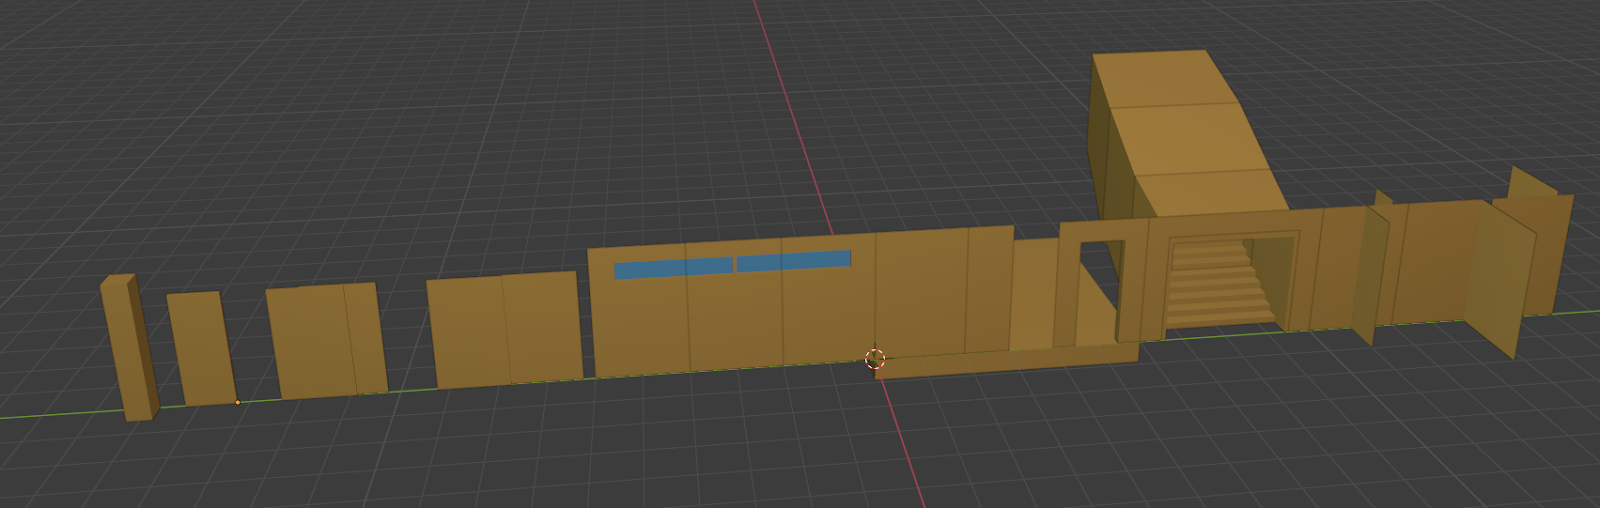
Let’s start by pointing out some negatives about modular sets: They certainly need more planning and experience in a more technical / practical sense. Modular sets require you to think ahead, determine which parts need to be used how, in what way they need to be built to make using them most comfortable and of course what parts exactly are needed.
In my opinion, the hardest part is to try and break down a set planning into only very few pieces and to make them in a way that they can be combined in many ways.
For example, it’s relatively easy to make a staircase to connect 2 floors of a building, but then you realise that this exact stair combination can’t be used for all the other area you need them in, so you need to think of a way to break it down into smaller pieces that can be reused for all areas.
As an example, you could break it into a start, mid and end piece, that connect seamlessly together, so you could build stairs of different lengths with them. Same can be done for more complex stair types, such as curved stairs. This clearly requires more time than building individual stairs though, but it pays off eventually.

Benefits of working with modular sets
And with this I want to discuss the benefits of working with modular sets.
While it requires more time and effort to make things modular than unique (until a certain level size at least), it also allows for lots of different combinations, so basically a sandbox system to build everything you want, not just one specific thing. For production this means saving a lot of time in the long run too, so the extra time you put in at the beginning always pays off.
Modular sets don’t just mean architecture, you can also build one for almost everything else. A good example would be furniture, which can be everything from a modular couch set to desks or shelves – just look at the IKEA planner tools for creating your own desk, tv bank or similar. So if you are planning to create a office scene, why not create a modular desk set instead of like 2 different desks, so that you can build many slightly different variants from that.
"... Building in a modular way allows for lots of different combinations, you're building your own set of Lego's ... "
Using the same set pieces throughout your scene also allows for fast iteration and adjustments, since you only need to change the single pieces.
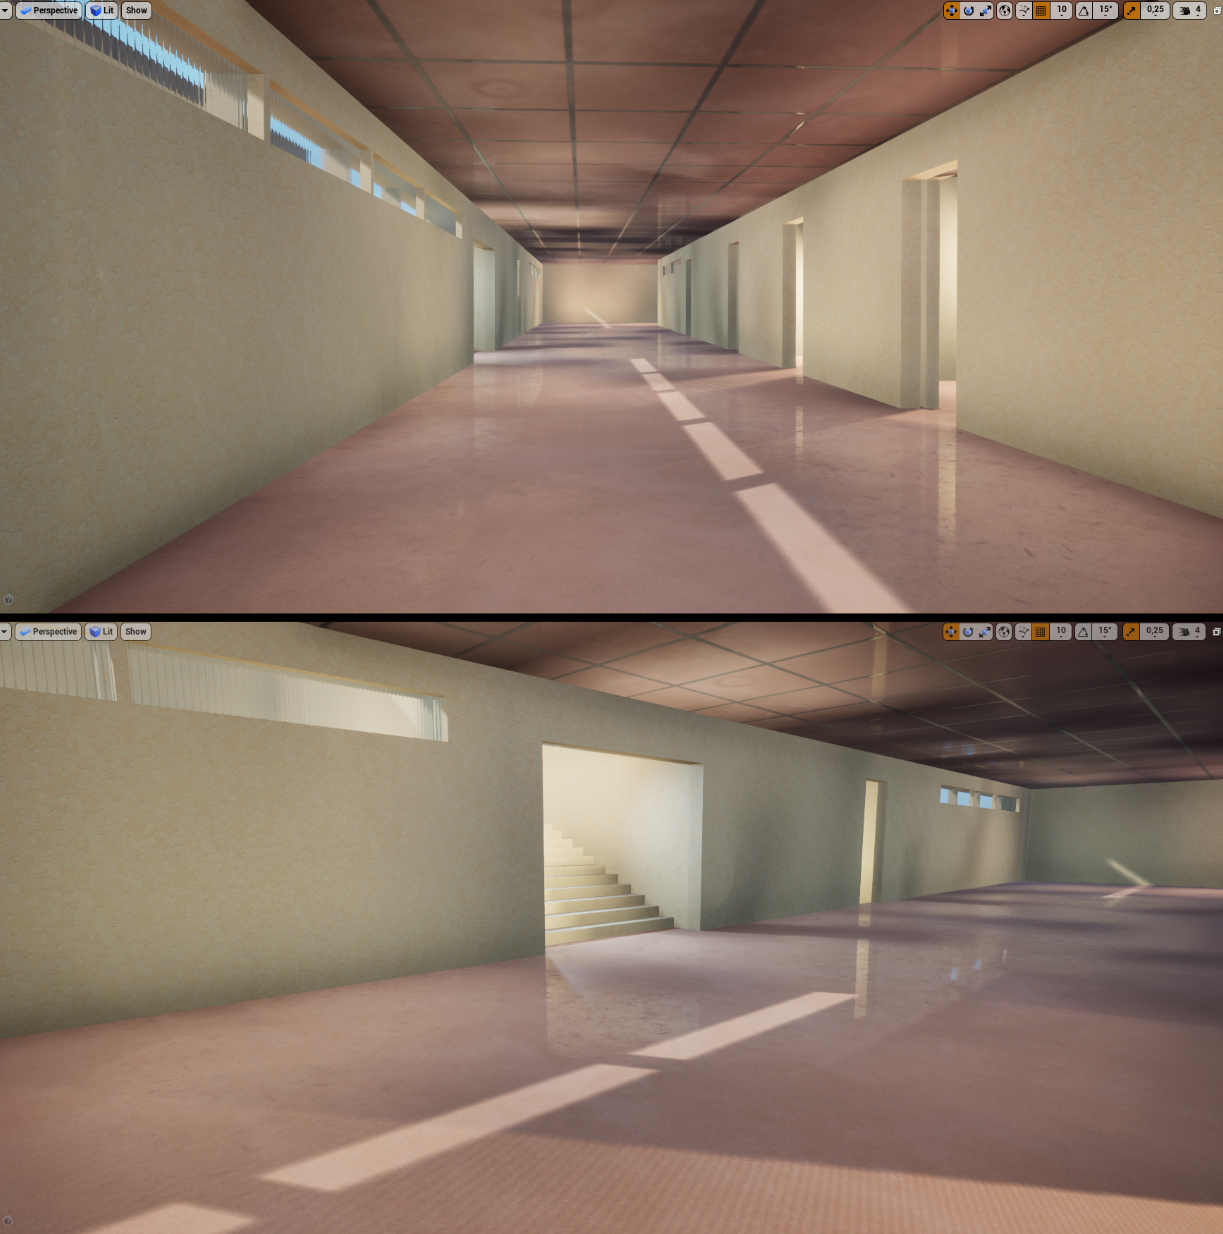
When you have created and used your first modular set, you might notice that repetition can be very noticeable. Sometimes it’s very easy for the viewer to look at something and see immediately each part of the set, which makes the scene appear simpler and more generic. Unless this is something you want to go for, in most cases we do not want to have that. Instead we want our scenes to look complex, unique, but still use the power of modular sets as much as possible. In the best case, you would look at the final scene and can hardly make out reused parts at all. This is a huge part of what I want to cover with this article.
Planning, best practices
In the planning phase, you should think about the specific needs of your project. Modular sets can be vastly different and highly depend on the specific use cases, requirements and technical restrictions. Some examples for important questions here are:
- How frequently will this set be used? Is it maybe just a couple corridors spread out in the game world, maybe just a few handrails that need to be placed in specific locations, or is it rather a hallway that will be used throughout the entire game, a building set for the whole city and so on? The more something is going to be used, the easier it is to see repetition and the more set pieces you might need.
- What exactly needs to be built with this? This may seem like an obvious question, but in production it can easily happen that you build parts to complete a set, but they are never used for the actual level. For example, if you are doing a portfolio scene of an alley, you might not even need corner building parts, so it could make more sense to just focus on different straight building parts instead.
- How big are the biggest pieces? This plays a lot into further planning about what kind of materials you are going to use. If parts are visibly split into smaller chunks, you might be able to use just trim sheets / texture atlases, but if you have very big parts like walls that need to be seamlessly placed, tileable materials make more sense for those parts.
- What basic materials and atlases do I need? This is the part which I personally struggle with the most. In almost all environments, I end up creating more materials or parts on a trim sheet that I never actually needed for the scene (could be that I just enjoy doing materials so much^^). It’s very tricky, especially when planning an atlas or trim sheet, to fill in the space with parts you need, having bigger model parts bigger in the texture respectively without wasting space. It can help to start with textures very early (in the blockout phase!) and just jumping back and forth between modeling and texturing, experimenting with the biggest, most important parts until they feel good and only then start to add additional parts.
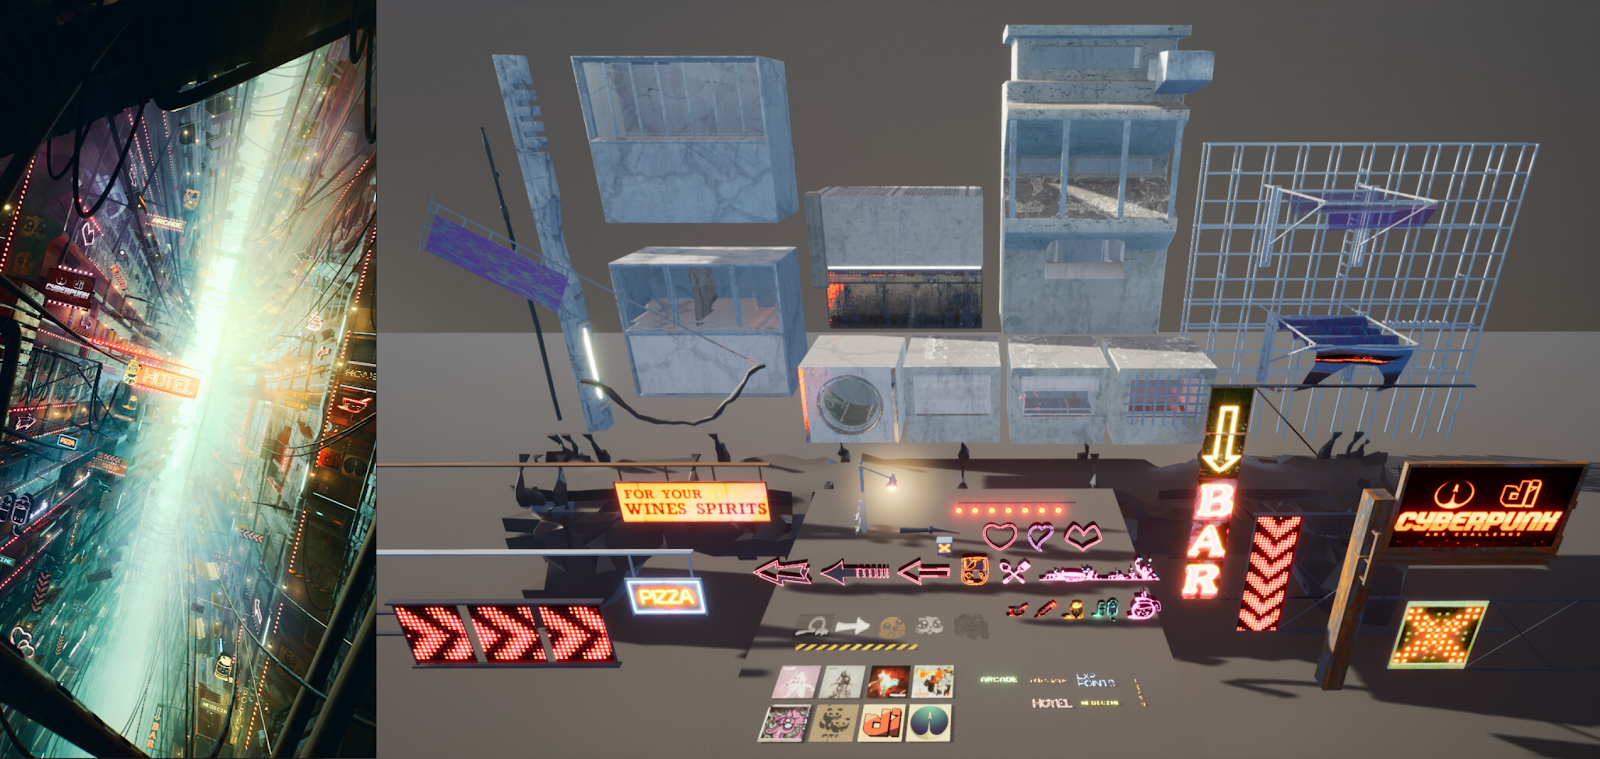
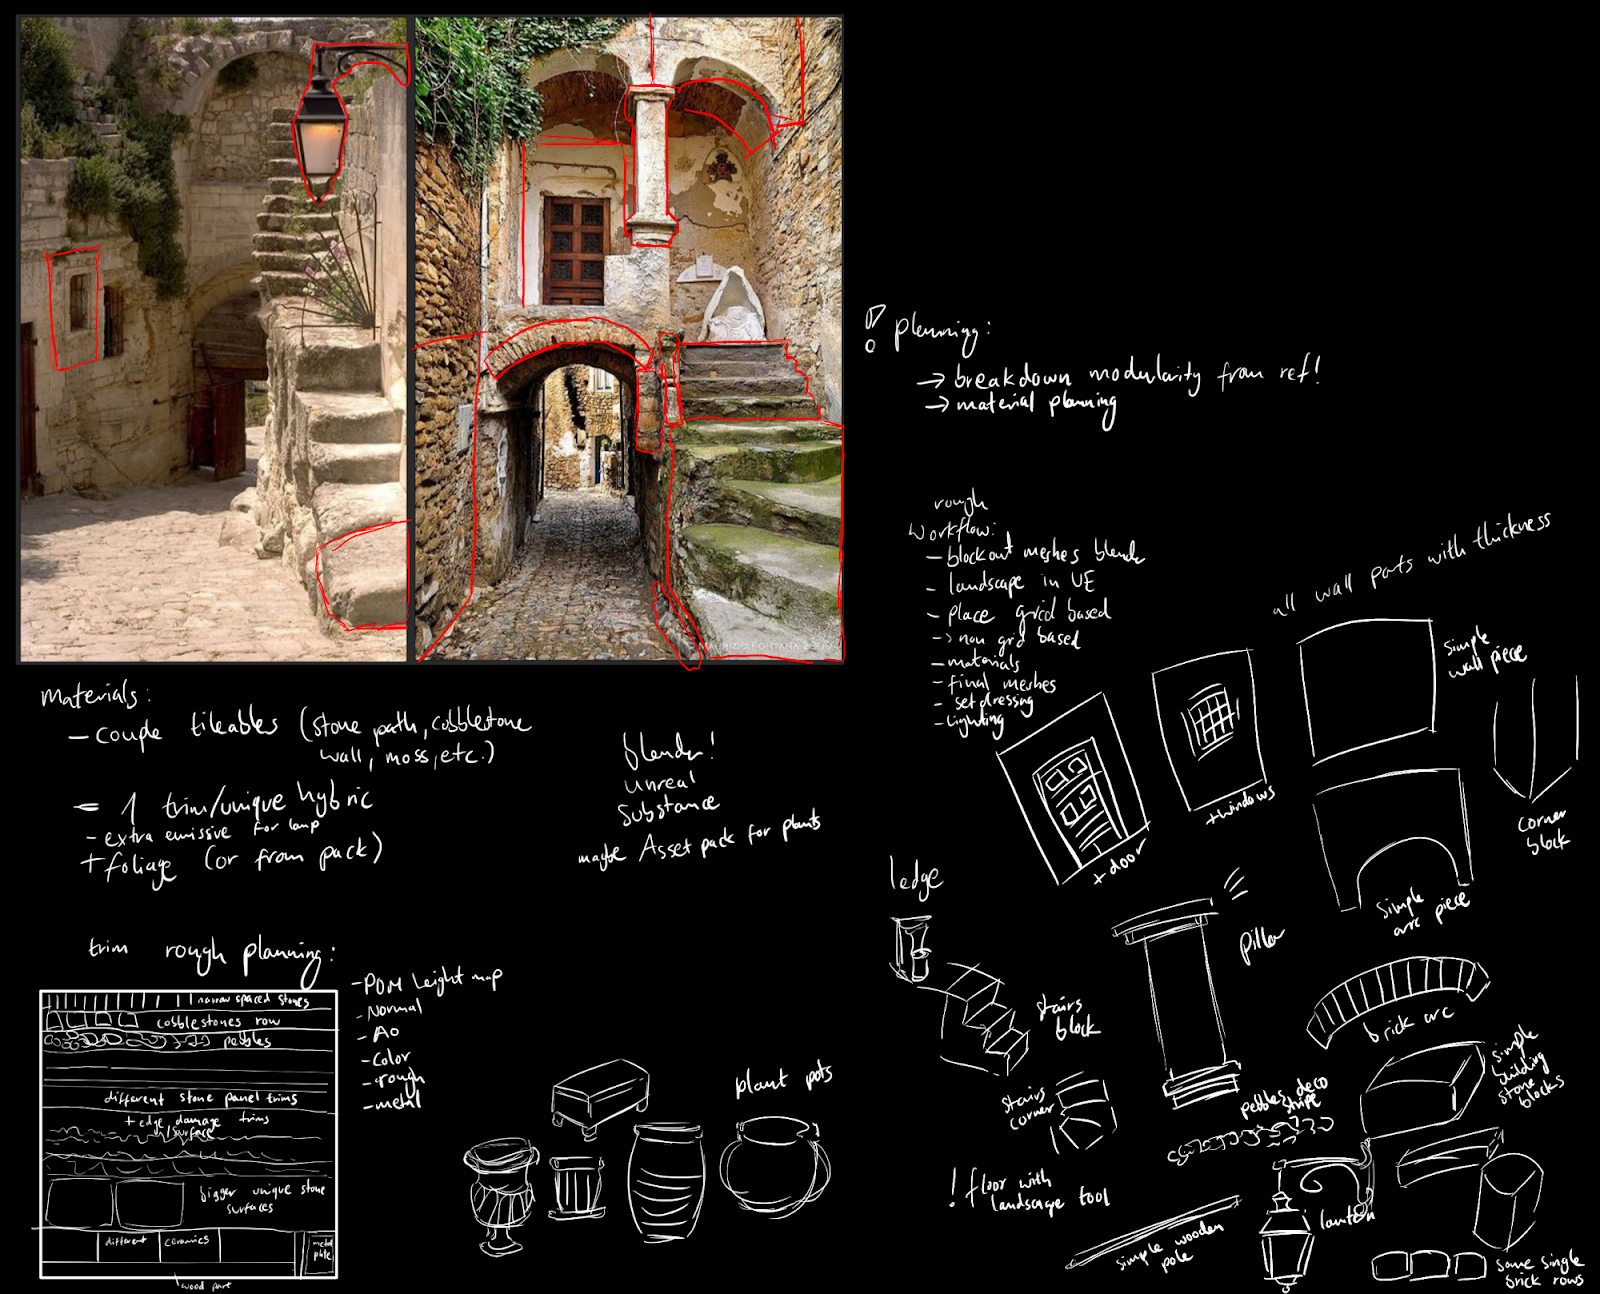
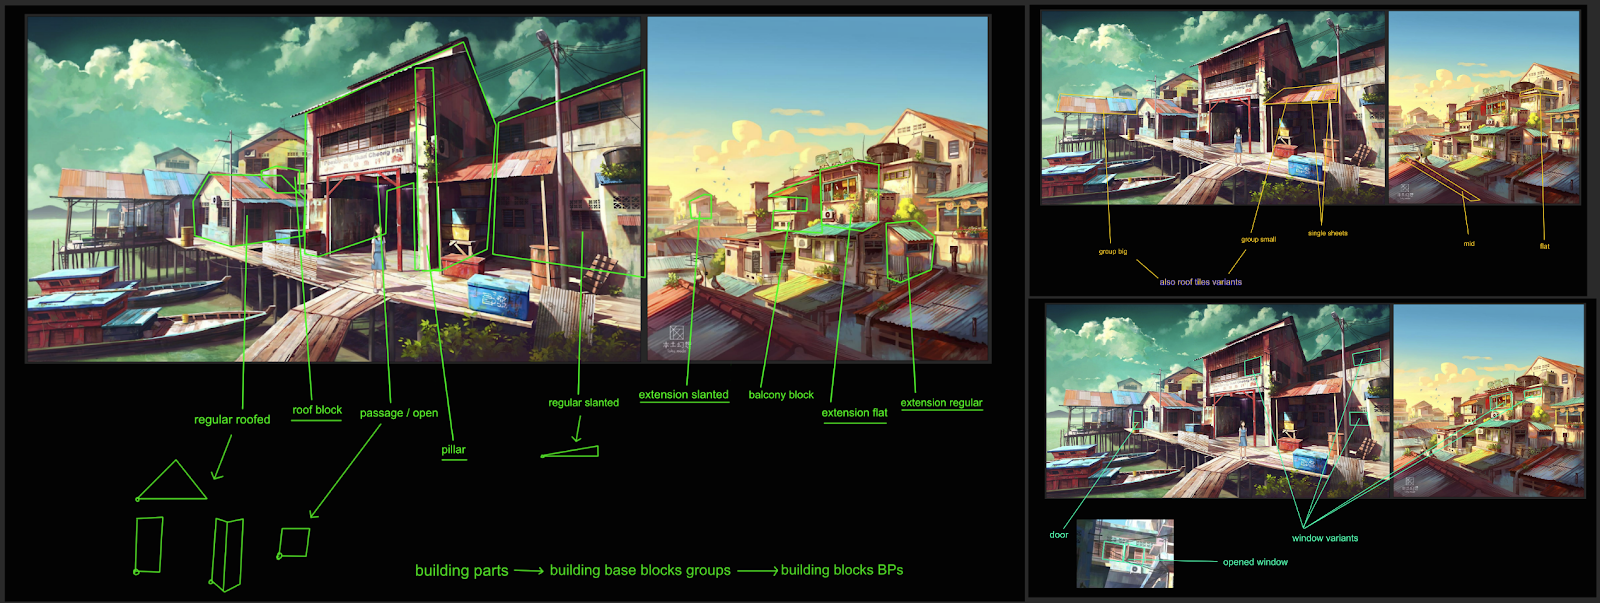
Most of the time you will have a specific concept art or reference board when starting a modular set. The first step is to try and break down the image into simpler chunks, try to see similar shapes and think about how maybe more complex shapes could also be a repetition of some smaller shapes that are used elsewhere.
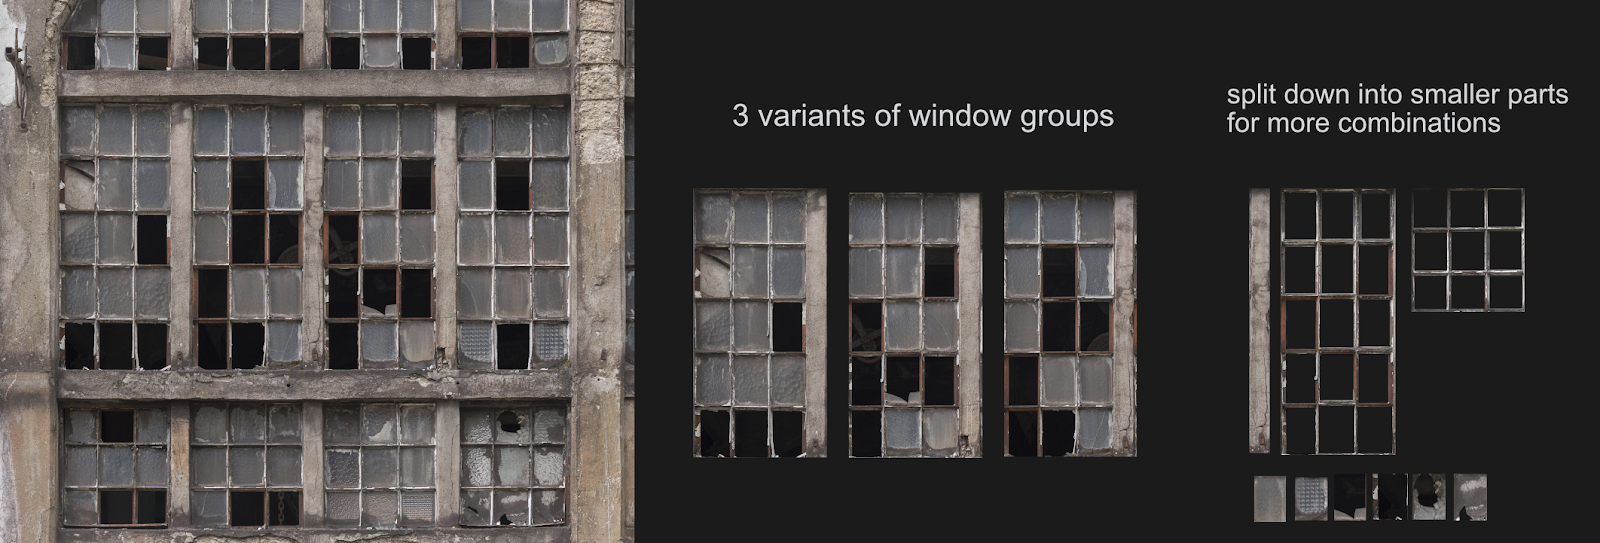
The best practice is to just take a concept into your drawing app and start drawing over similar shapes/patterns with different colors. Especially for environments that look very complex at first sight, this can be very helpful. Try to differentiate between architecture and props, try to see patterns of shapes. Also keep in mind that you don’t need to break down the whole scene into modular parts. In some environments, for example a sci fi scene, it can be easy to see chunks of similar panels for the floor, wall, ceiling and furniture, but in other environments, this is not exactly that easy and maybe the floor feels more like a smooth landscape or every window seems to be shattered in a different way, something like that.
In some cases it just doesn’t make sense to have things modular, if it can be solved much simpler with a landscape, decal or unique piece.
Other times it can help to break down the piece even further. In the example of the shattered windows, it could be that you decide to increasing the repetition a bit by having like 3 different variants of that window, but you could also break it down into a cutout wall part + maybe 2 different frames and then say 6 of different shattered glass parts, so that you can combine those into lots of slightly different window variants instead of just 3.
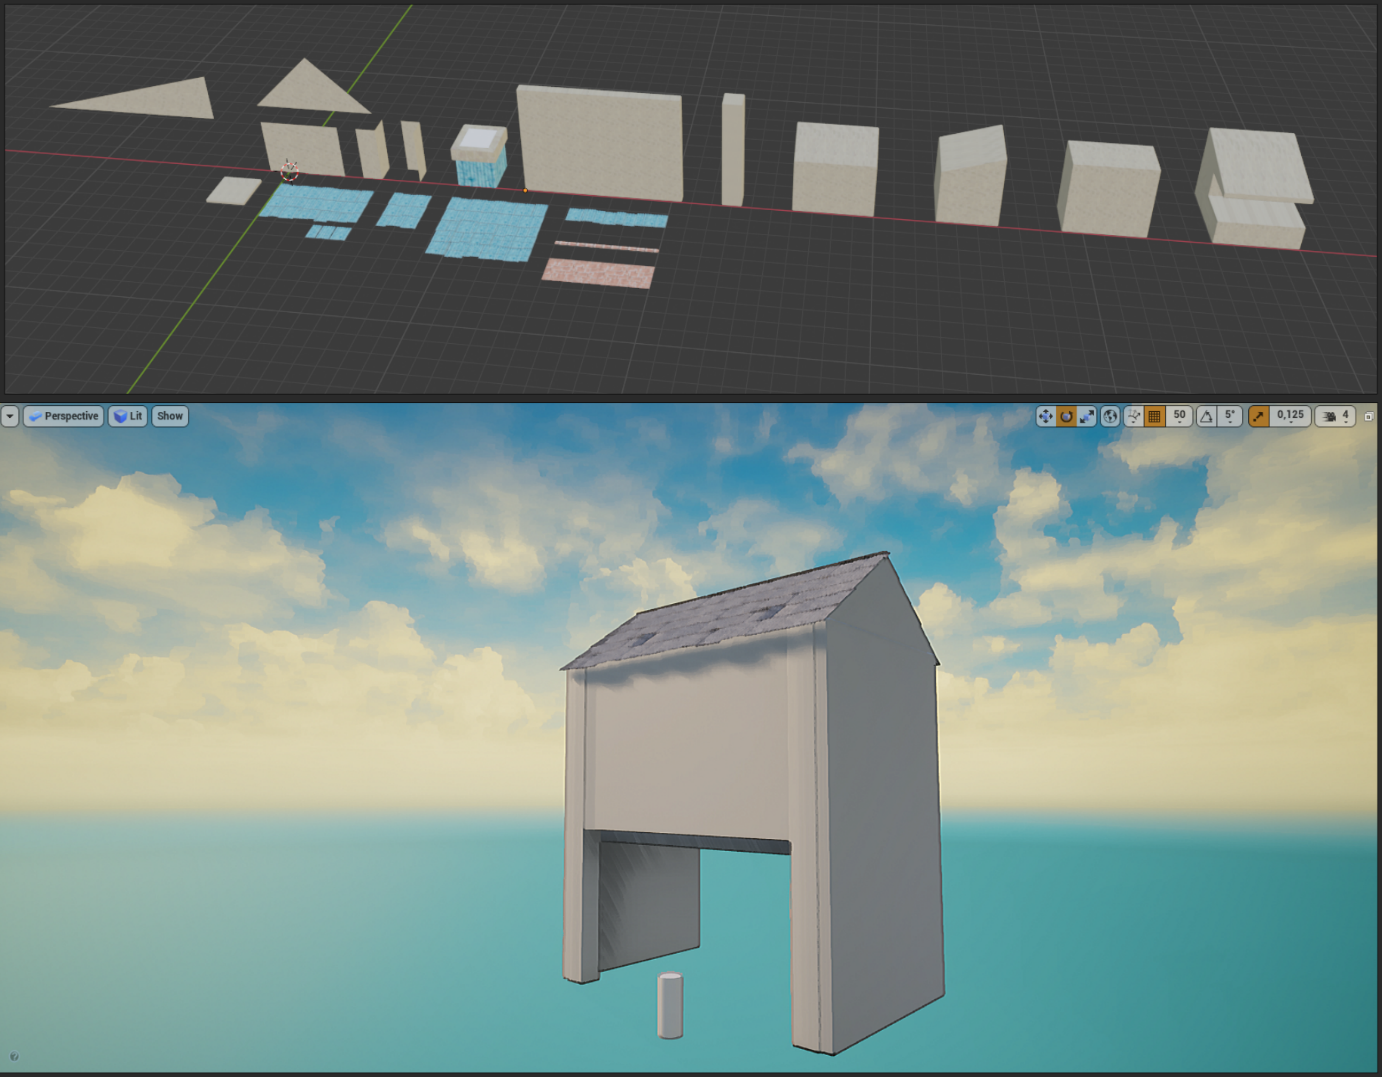
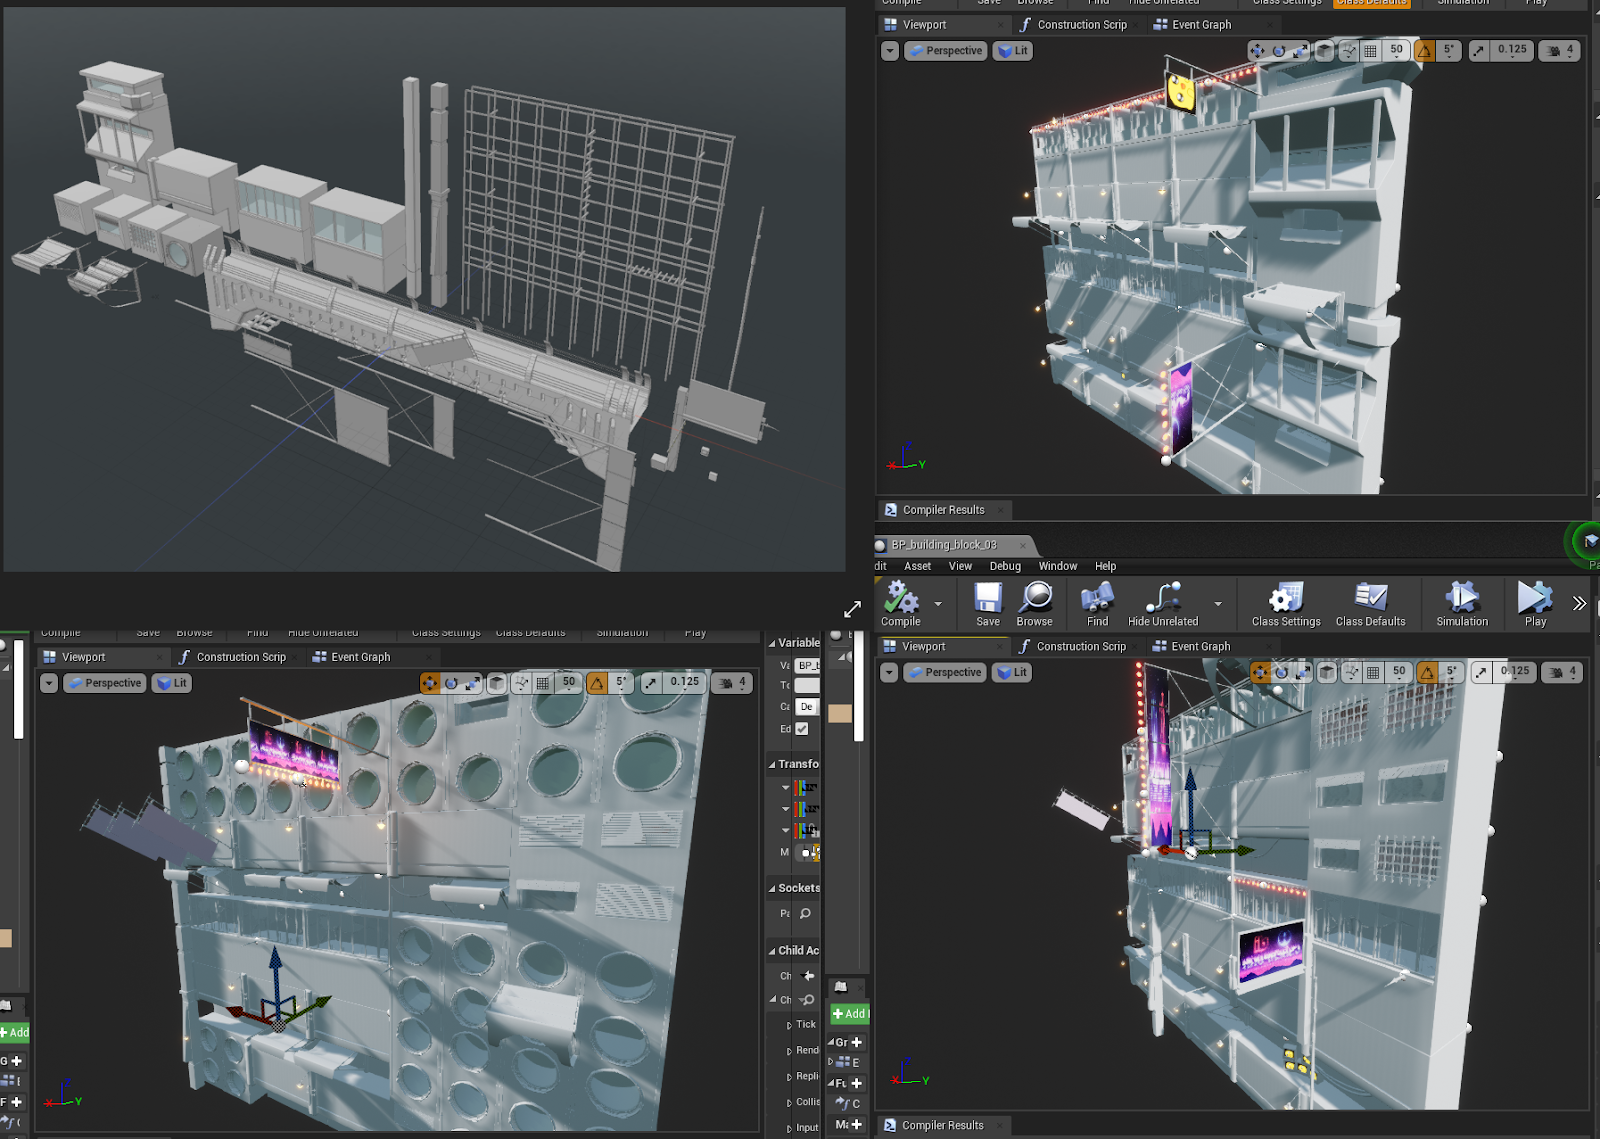
The most important advice of all: Test early! Doing proper blockout for modular set parts is an essential part of the process. In my experience, there’s always something you forgot or at least to improve and it’s so much easier/faster to fix these things on simple blockout meshes than in later stages. Make sure everything that needs to snap together does and that all parts are easy to arrange. Test where parts might need a thickness for easier placement, where you might need additional pieces to close holes and so on.
When testing this for a real level in the engine instead of just some individual pieces, this also helps a lot with new ideas and motivation in my experience. It also helps to test textures early, even if they are just simple placeholder textures.
Building a modular set is an iterative process! I think it’s always overwhelming at first, but as soon as you just start creating and iterating on parts, it gets easier.
Try to create the main parts first. With a solid base the next steps will go much smoother.
It’s always good to keep in mind that you might want to extend your modular set afterwards, so think about where parts could potentially be split up further without breaking the set or where could easily add an extension within the existing set, without the need to start all over.
"...The most important advice of all: Test early!"
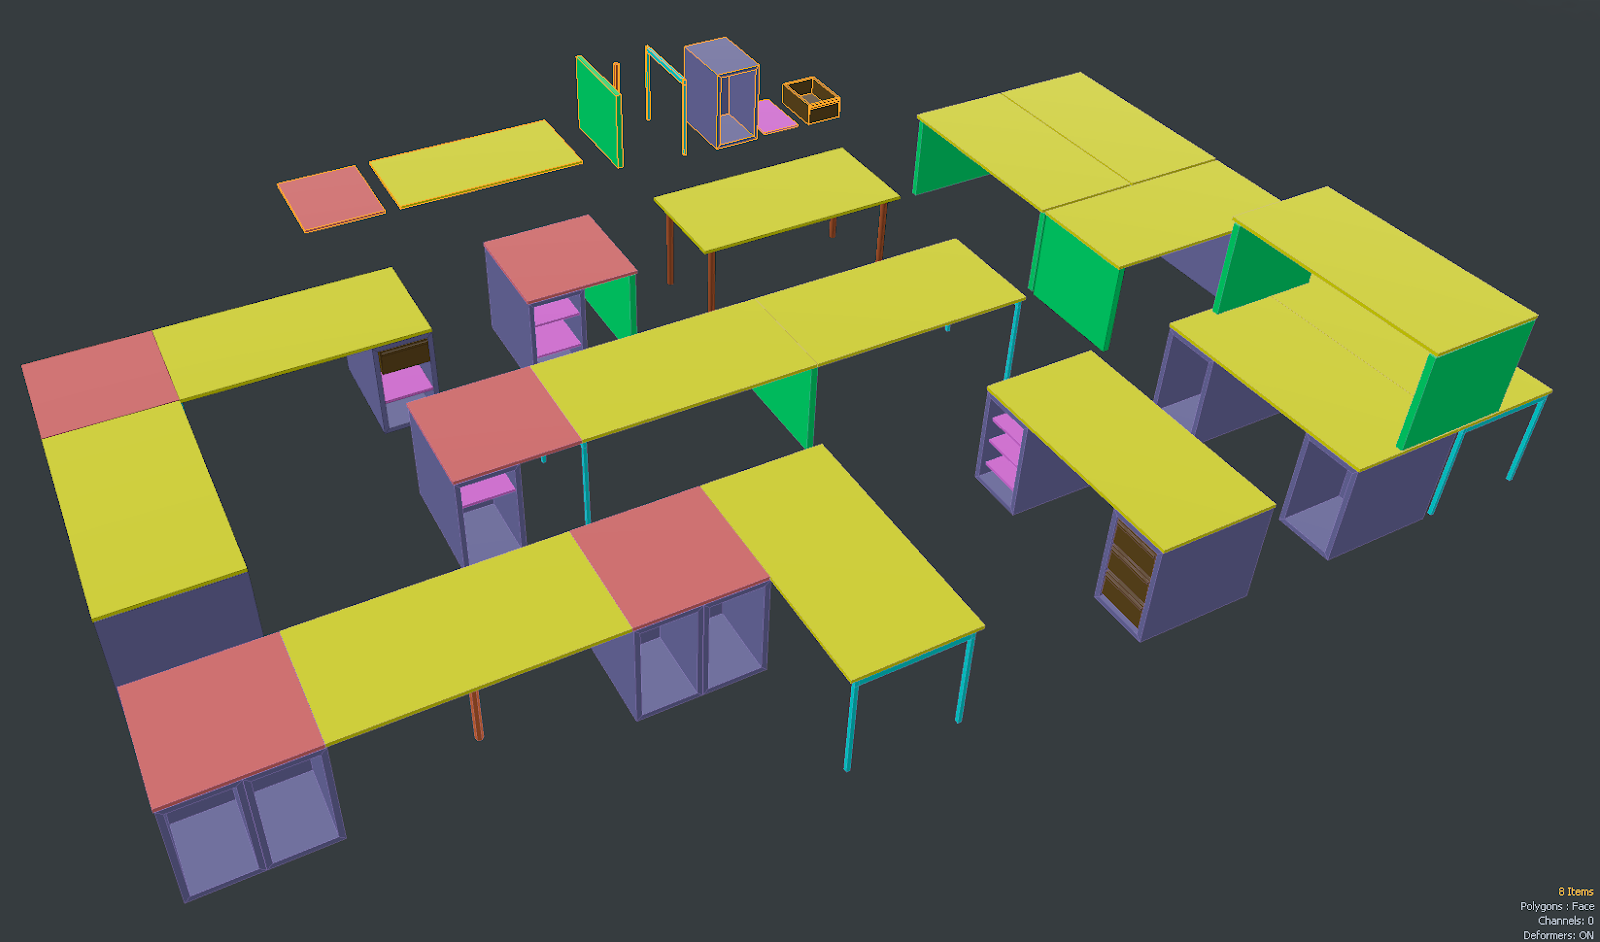
When you are working with smaller set parts, for example single wall parts to build entire buildings, it makes sense to combine those into bigger building parts to reduce the number of single meshes. So i.e. have whole buildings merged, single floors, roof variants etc. and assemble those in different ways to create variation in the final scene. Sometimes it’s good to pre-combine a few variants in the 3D software and otherwise you can also merge them inside Unreal engine.
The reason for this is mostly to not have too many single meshes in the level, which may also result in performance issues at some point. How this is best handled really depends on the project. Sometimes I like to combine a lot of stuff already in the 3D software, say for a modular house set, I would have some pre-combined buildings that would be completely merged, maybe for background buildings for example. Other times, I like to place everything in the level and then merge it later into chunks, if necessary, using merge tools inside the engine, such as ‘convert actors to static mesh’. For the placement itself, it’s nice to use Blueprints, so you can easily duplicate groups that you already assembled.
Combining them with tileables?
As shown in some examples above, bigger surfaces oftentimes go better with tileable textures than unique, trim or atlas textures. Most obvious examples for this are floor parts, but sometimes also parts of walls or similar assets that have a bigger size make sense to texture with tileables, because it is hard to fit them into a trim sheet with an appropriate texture resolution and would also take up a lot of space.
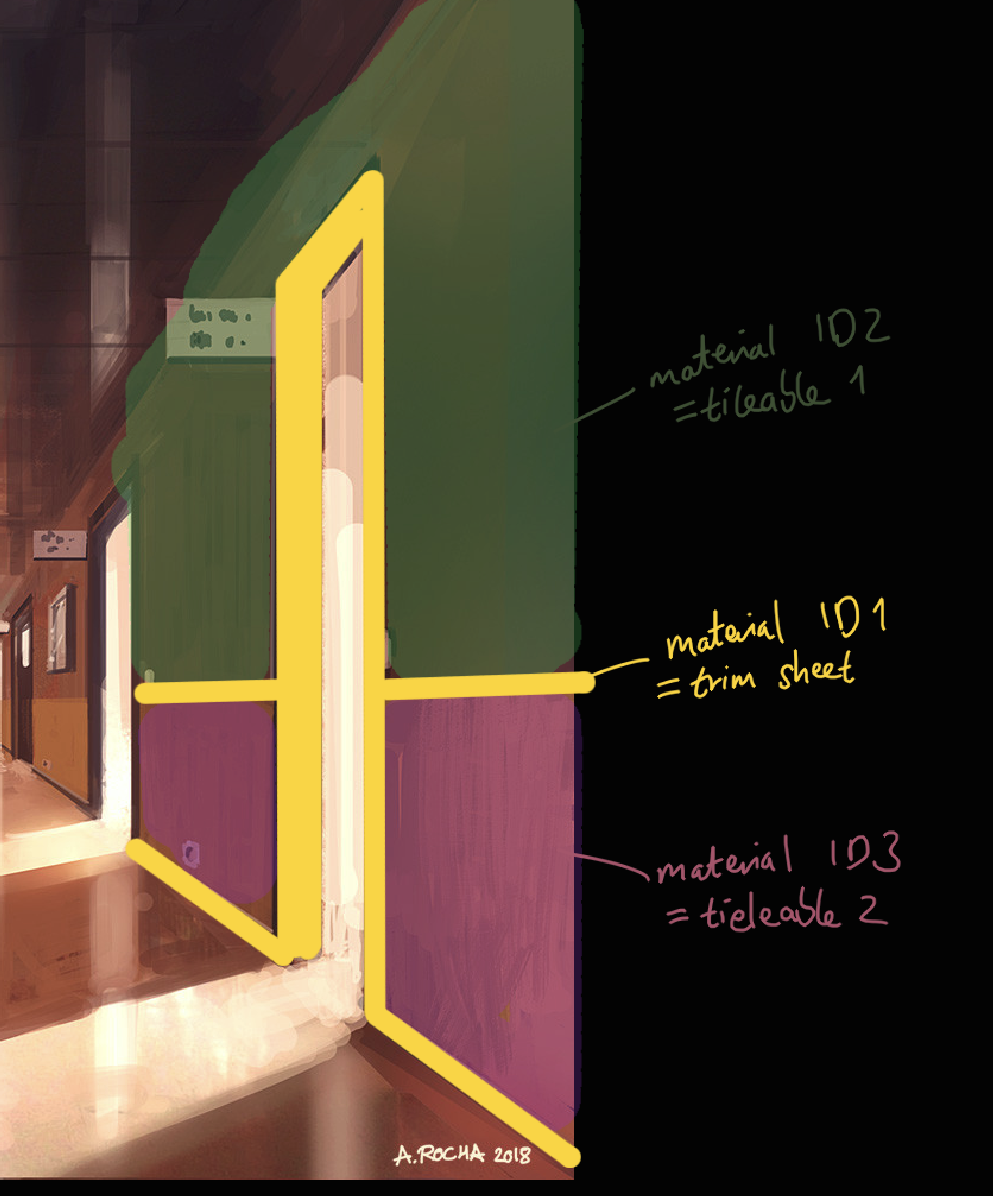
Modular models can also use a combination of different texture workflows by simply assigning different material IDs to the parts. The model is still only one mesh, but you would simply assign different materials on the respective parts in your 3D software.
The use of tileable materials also allows for fast iteration, quickly trying out different textures in the engine and making the process of blending materials via vertex painting easier.
While we should try to minimise the amount of different materials on props for performance reasons, this isn’t as important on architecture parts, because they usually take up way more screen space and are simply not versatile enough if you are restricted to using only one material per part – there are exceptions ofc.
In the example above, you could also combine the 2 tileable material IDs into 1 and simply assign them another texture via vertex paint, so that you would end up with splitting the mesh into only 2 parts, but are also more restricted with vertex blending details on top. There is no right or wrong, It really depends on the project and technical restrictions!
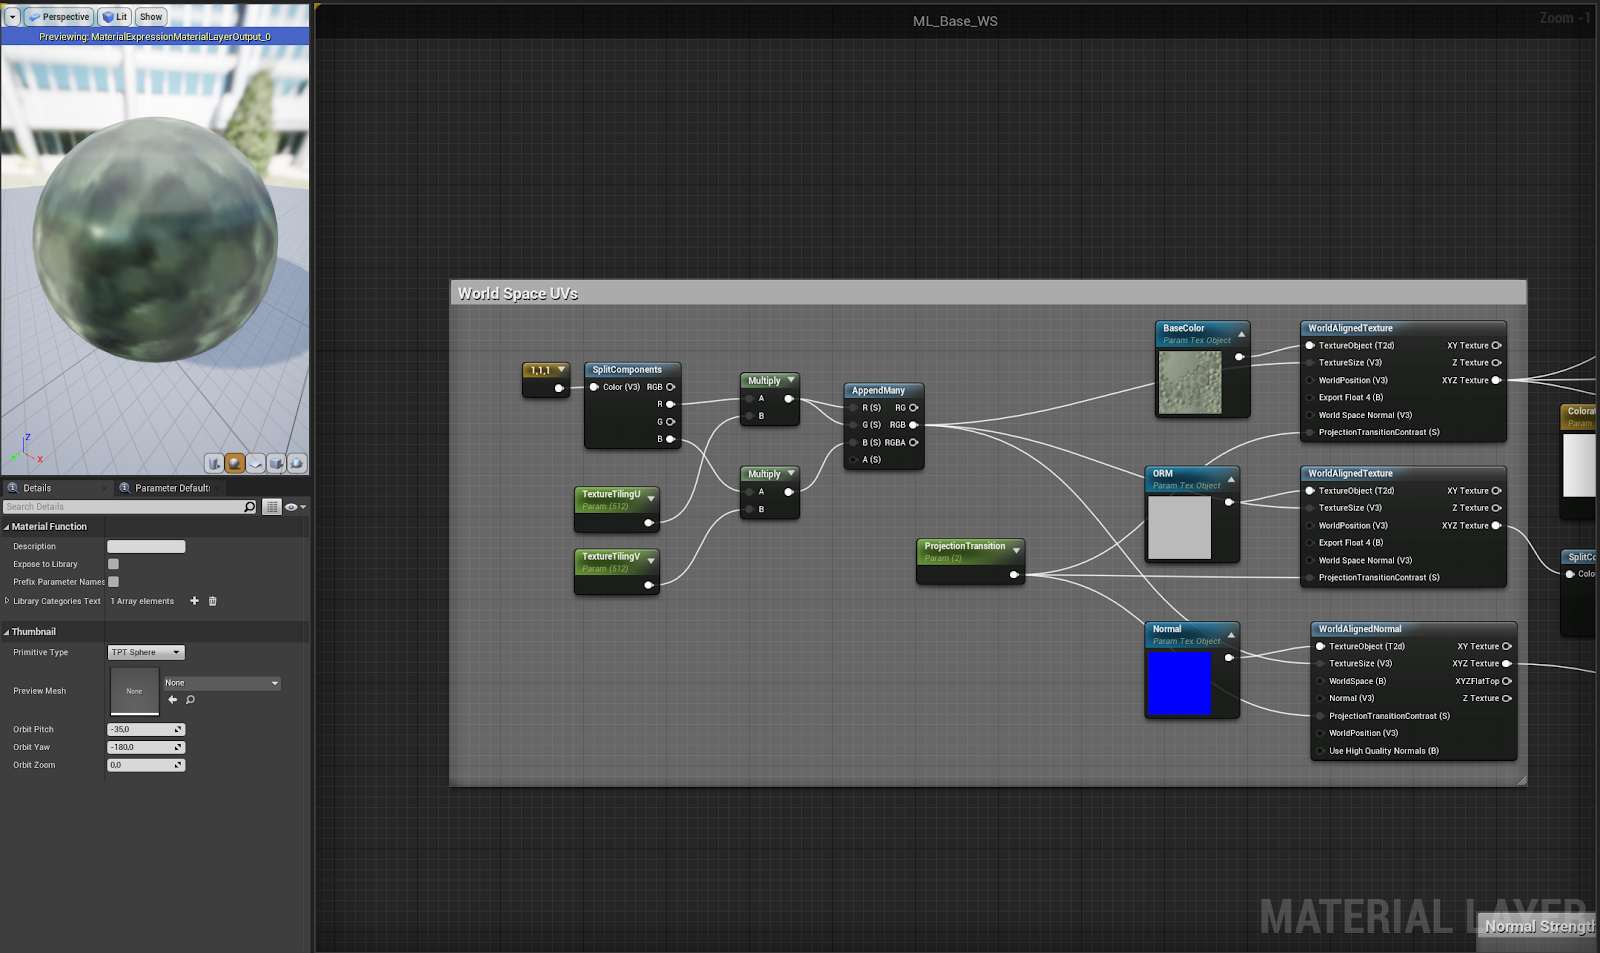
Tileable textures can either be assigned with UV unwrapping the respective faces or triplanar/world space projection in the engine.
For the latter you would need a custom shader, but the good thing about it is that it basically ignores your UVs for texturing, so all tileable materials will always be perfectly seamless on all parts, no matter the scale or rotation. I personally love this workflow a lot, especially because it allows me to be very creative with scaling and reusing the parts (sadly we still have to do lightmap UVs though).
The other option would be to create custom UVs for the tileable parts, that need to match exactly the UV borders of their tile axis to make them tile seamlessly. The UVs can still be scaled larger to make the texture repeat in a smaller pattern, but they have to be scaled by a full factor. For example scaling them 2x bigger out of the UV 0-1 bounds would still be fine, but scaling them 1,4x bigger would result in visible seams. It is still a valid approach and since it doesn’t require knowledge about shader setup a good way to get started!
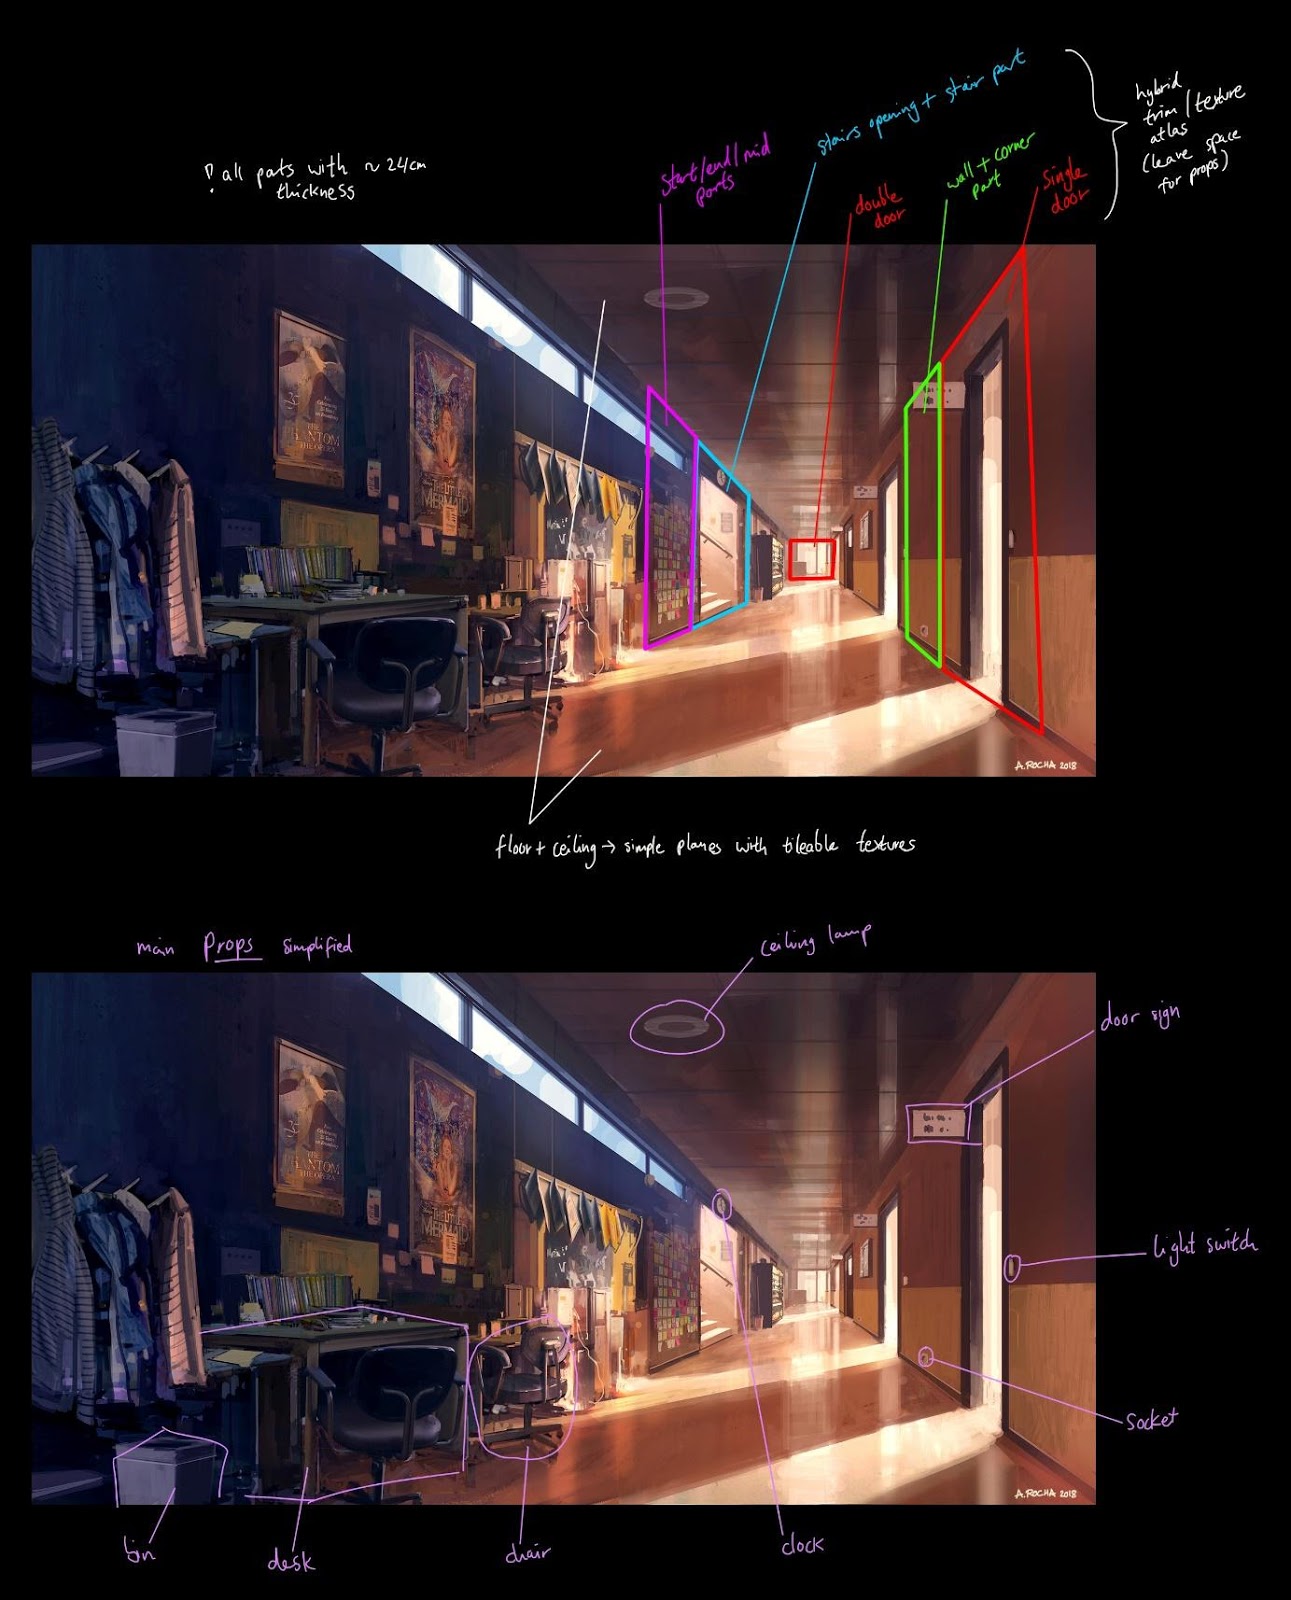
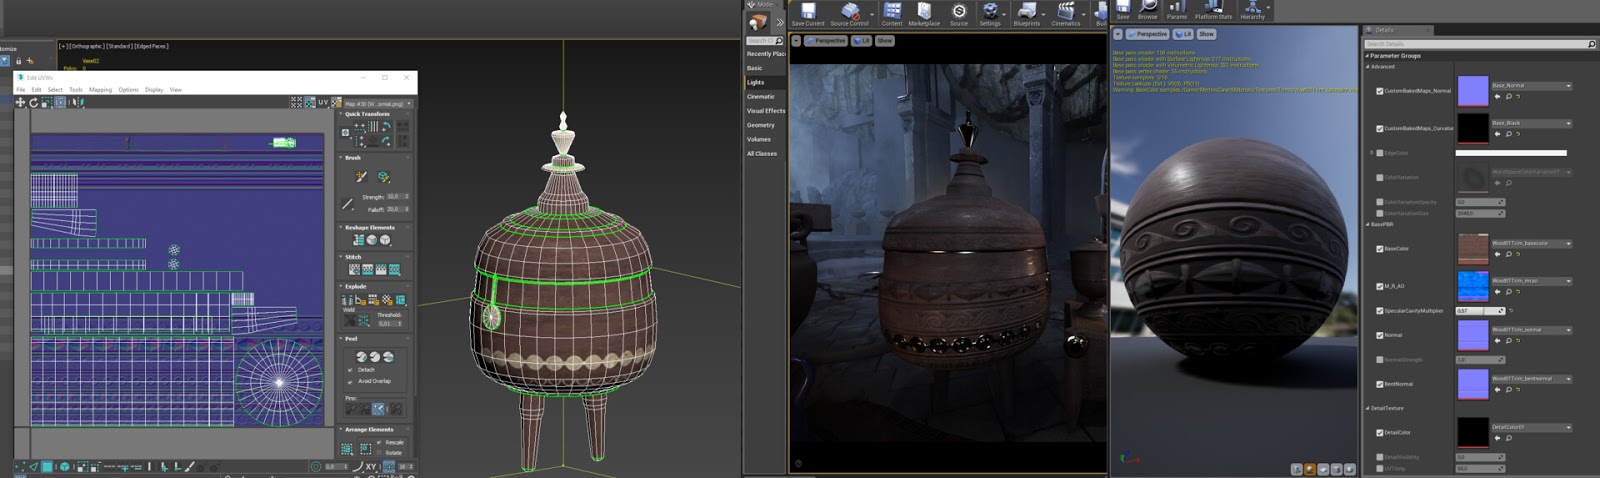
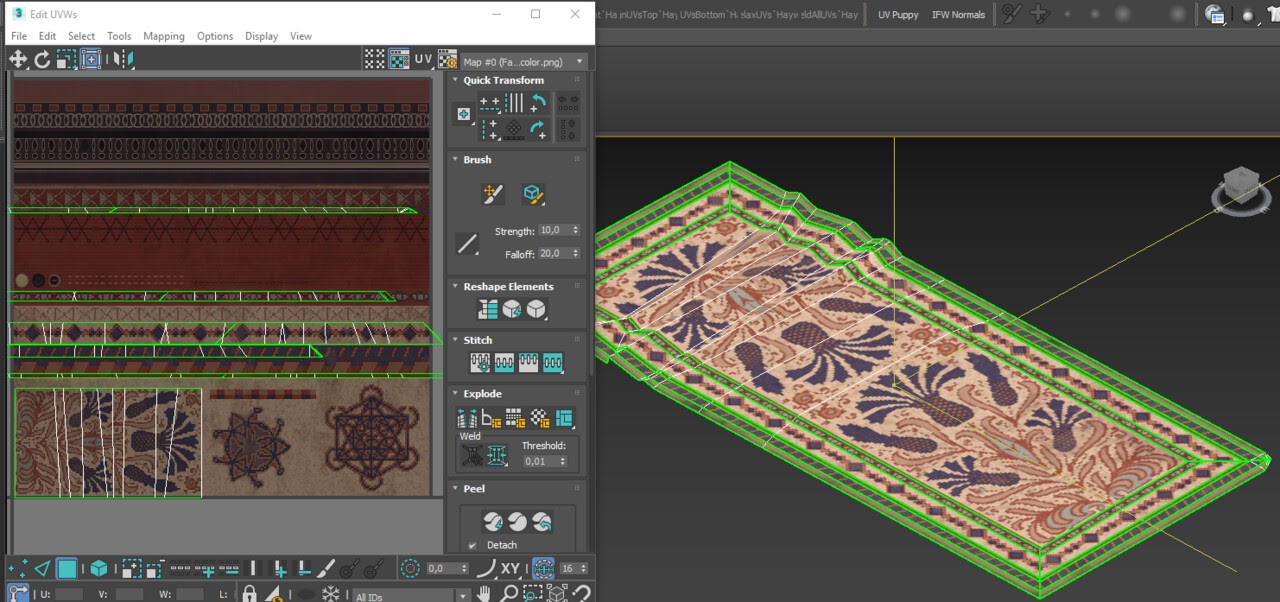
Trimsheets
Trim sheets are texture atlases that tile along one axis, or oftentimes a combination of tiling parts and some unique parts that are shared throughout a scene, so basically a collection of all the stuff you need in one compact texture set.
There are many great tutorials on how to create and use them by now. I have discovered this technique rather late, but it was a real game changer for me!
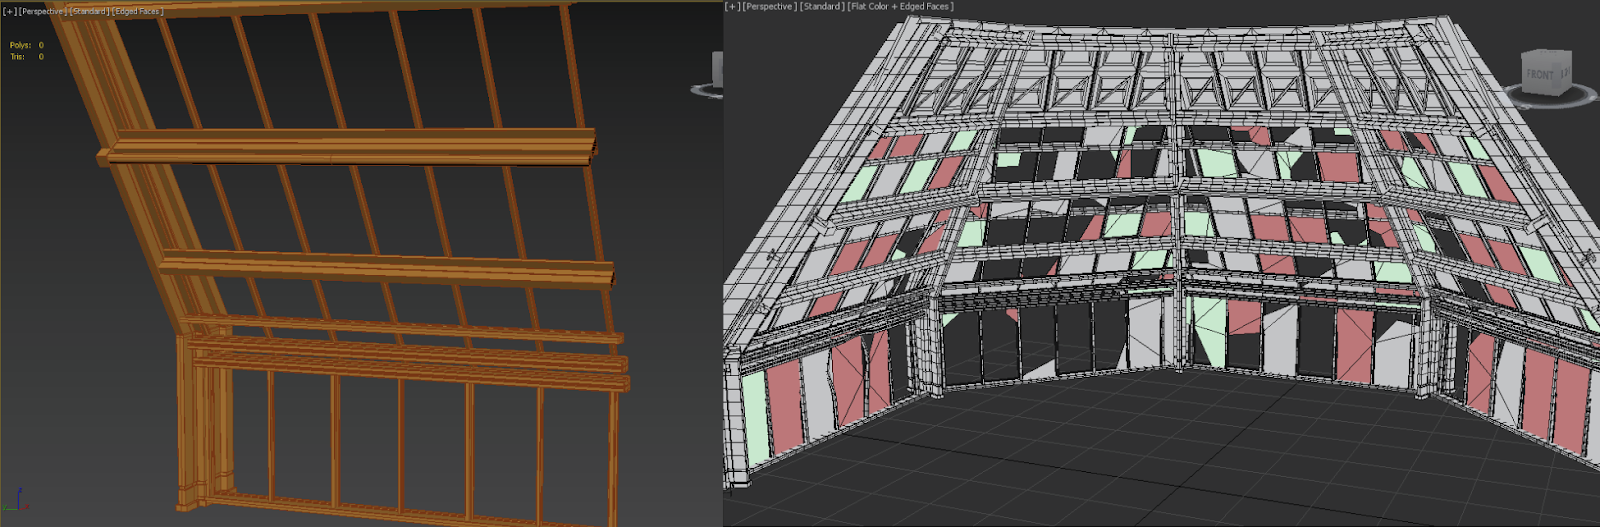
The trick is mostly to split up your meshes into parts that can be unwrapped with rectify/straightened mapping. For example, you can break down circular parts into stripes with different patterns.
Meshes that use trim sheets oftentimes require a couple more segments to unwrap them properly, but don’t worry about that! It’s just like a reversed workflow - instead of creating the model, UVs and then the texture, you would create the UVs as a last step.
For that you can simply load your trim texture into your 3D modeling software, assign it to the parts that should use the trim and then start unwrapping the faces. It’s okay to have a bit of stretching or not always perfect texel density. If you just preview the model on your model while unwrapping, you will notice when anything seems off and can split up the mesh further into smaller parts.
Breaking the modular feel
Here are some ideas on how to break up modularity / visibly repetition in your scene. I’m not going into detail for those, because each could possibly fill an entire article by itself, but hopefully they will help you for ideas on further research.
- Use decals.
Those can be either decal projectors or decals from texture atlases or both, your choice.
- The power of shaders! Here are some ideas that I like to use:
Automatic color variation, i.e. color everything slightly different based on where it’s placed globally.
Use material instances with parameter controls, i.e. have some variants of materials with different color, roughness values or others
Add world space details, possibly combined with a world space mask. So i.e. you could add a simple dirt texture on top of your that is projected in world space, which means 2 wall parts that are placed side by side, would look different now. At some point this texture also repeats obviously, so by blending this dirt texture with a world space mask, you get even more variation. Try blending more than one texture on top in this way and your scene will automatically look a lot more complex, even if you are using only very subtle textures.
This also helps make the environment as a whole feel more grounded.
Blend textures/materials with vertex painting
Edge wear details
- Combine trim sheet UVs with custom baked maps:
You could set up a second UV set for each object that is using trim sheet or tileable textures and bake Normal + AO maps for them and then combine both UV sets with their respective textures back into one within the shader. This way you would get all the benefits of trim textures while still being able to have unique Normal and AO details
- Have a good balance of big and small set parts
- Deviate from the grid where possible
- Make use of creative scaling and rotating
I will elaborate some of these ideas below.
Finding the right balance between bigger and smaller pieces
In general, it’s good to start with the biggest set parts and then work your way through it to the smallest parts.
A set that consists only of big parts is easier to break down at first sight, so it will make the final scene look less complex. When using also smaller set parts, the scene will look more interesting, but you need to be careful to not have too much clutter, because otherwise it can result in too much chaos.
While this can also be achieved by just placing a bunch of props in the final level, I think it’s nice to handle a part of it directly with the modular set.
"When using also smaller set parts, the scene will look more interesting, but you need to be careful to not have too much clutter, because otherwise it can result in too much chaos."
For example, you could add small wall extensions to a set, that can be placed freely on top of the bigger wall parts, like ledges, panels, or such. The benefit of having those separate in opposed to creating a new wall variant with a ledge i.e. is that this smaller part can be placed in a more creative way to allow for more variation too. This means that we can go into a smaller grid size for placing things or sometimes ignore grid snapping completely.
Other examples for smaller sized set parts could also be single bricks. So if you have a big wall out of a tile able brick texture, you could have single parts of those bricks modelled and place some along the big parts in the final scene, to break up the repetition or to construct fitting unique objects from those smaller pieces.
I like to think of it as a Lego block building set. It’s great to quickly construct a castle from pre-existing bigger parts, so that I don’t need to carefully place every single block, but when it’s done I do want to customise it by placing some single blocks where I like.

The importance of the grid, and when to break it
Working with grid-based set parts is great and easy to use, but if you place everything only along the grid, it can become easy to break down the modularity of a scene at first sight. Of course, this isn’t necessarily a bad thing (in some cases it can also make sense to do so, like for prefabricated construction), but in many cases, you would want to make your environment look more complex and avoid having obvious repetition. Even if the main pieces should be visibly modular pieces, it looks always more interesting to break things up on a smaller level.
"... Even if the main pieces should be visibly modular pieces, it looks always more interesting to break things up on a smaller level."
First of all, the dimensions of your modular parts should follow grid rules, otherwise they would be a pain to work with. They need to be built in a way that you can easily snap them together, which goes for different sizes as well. So for example, if your main pieces are 4m long, you can still have 2m and 1m pieces, that fit the same grid and snap them easily together, as well as expand bigger to 8m pieces i.e.
A good rule is to stick to the power of 2 units here. If your main piece would be 5m long i.e., it would still be easy to expand it to 10m pieces, but if you want to split it into 2,5m parts, it might result in snapping issues in the final level, unless you change snapping options.
Worth noting is that you can also change the grid snapping options to have more variety in your set parts and still place them along the grid. I personally like working with 100 units at the basic size, which means that I would create the main set pieces in 1,2 or 4m and use the grid snapping of 100 in Unreal to place them easily without changing settings. For the smallest pieces I like to go down to 50 Unreal Engine Units, so that I could simply turn down the grid snapping one step and still snap everything perfectly.
This also includes the position of pivot points, they need to be placed in a way that you can easily snap parts together. I personally like to have pivots in the left lower corner for most pieces, but it really doesn’t matter that much, as long as the parts can be placed easily, so just try out what you like best.
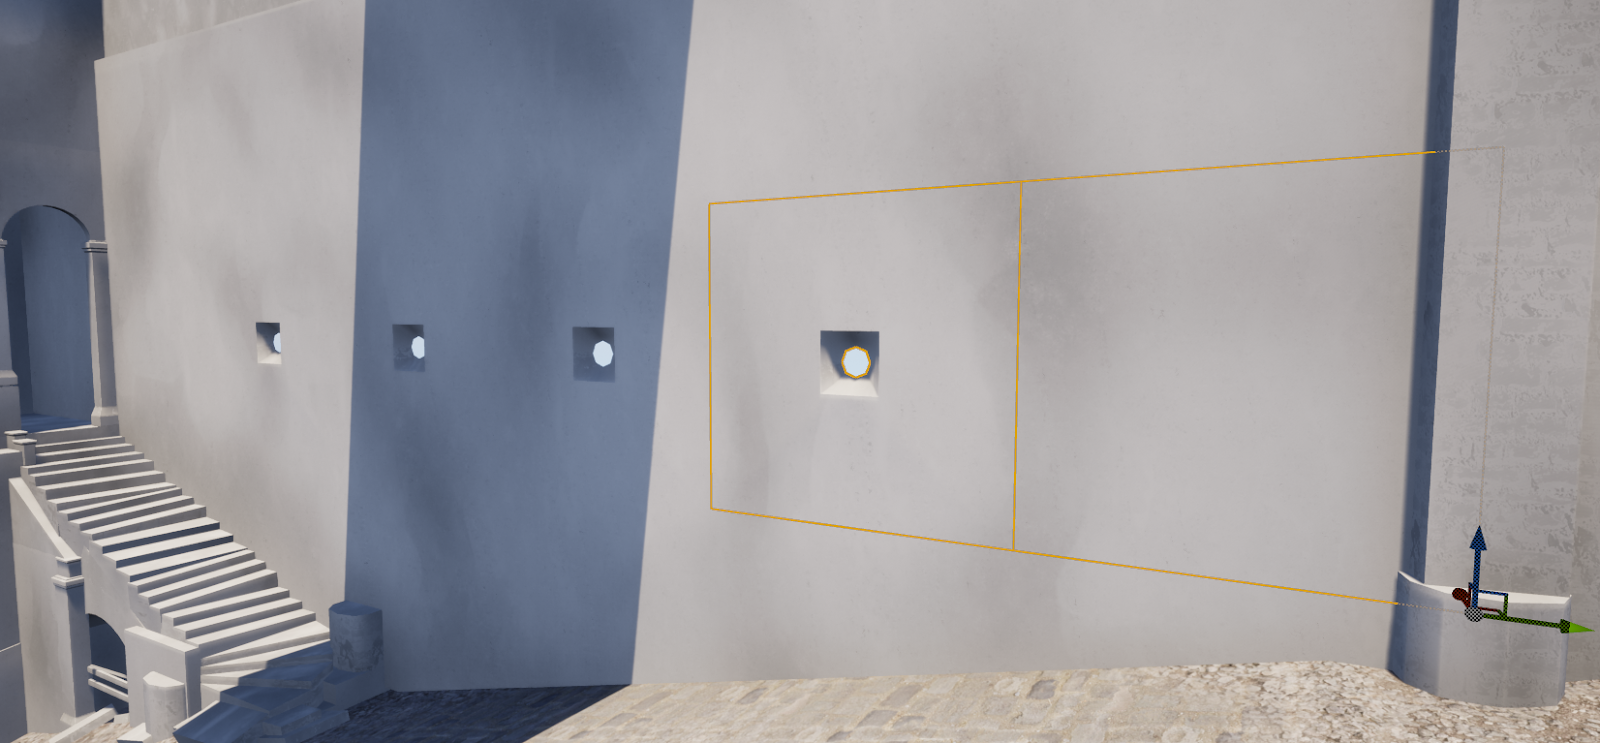
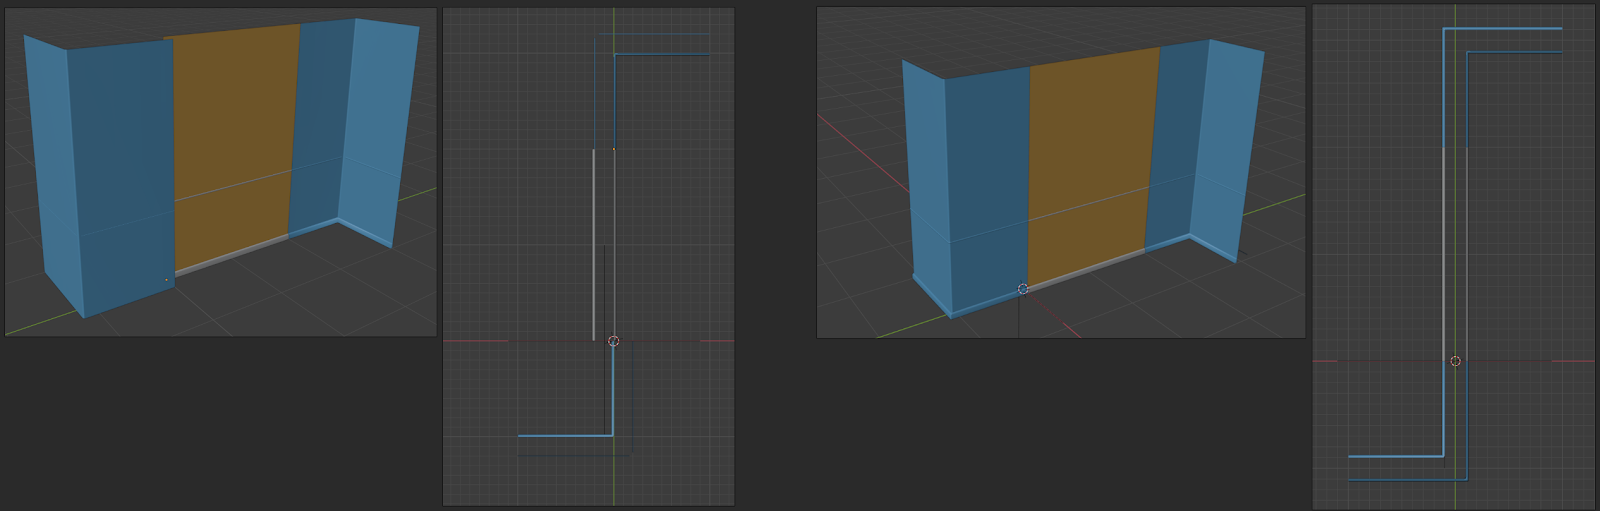
Here is an example of different pivot point locations for wall sets with a thickness. If you put it in the middle of the wall parts, you can use a corner part both as inner and outer corner without worrying about an offset (see right example in the picture below).
The rules of grid and dimensions are most important for corner/curved set parts. For creating those it helps to place straight parts on the grid where the curved part should connect and then make it curved with a bend modifier, while checking that it connects on both sides. In most cases, the bend modifier profile needs to be tweaked a bit to make it fit within the correct dimensions.
Not all parts must follow these rules. In fact, I think it is nice to ignore this rule for smaller parts almost completely. While main parts should follow the grid in all directions if possible, smaller parts can be more free. For example, if you have a wall ledge extension part, you could have it follow the grid in only one axis, having a 1m long mid part and end parts to easily snap them together, while the other 2 dimensions can be any size. They could also have their own grid spacing, since they don’t need to fit with other parts, as long as it’s still a value that can be snapped with the engine grid, for example they could be 3m long while everything else tiles in a 4m grid.
When we talk about the importance of the grid, we mostly refer to the position of objects, but the rotation and scaling play an equally big part here. Oftentimes, we do not touch the scaling of objects to avoid texture stretching and other unwanted things, but there are actually a couple of tricks you can use to make use of object scaling. I love to use triplanar mapping / world space UV's for some parts, so that I can use them in the level building process however I like.
My workflow is to create the parts along the grid as usual in the blockout phase and start placing them in a level, but whenever I think about something like “oh it would be nice to have an arc shaped model here too, but it needs to be bigger or higher etc.” I look if I already have a similar part and try to place it with a different scaling and rotation instead of making a new set part right away. Oftentimes you can get away with minor imperfections and save a lot of time.
For this particular big arc part I might end up creating a unique set piece though, because it could be visibly stretched after adding bevels to it, but the point is that you should try to think “outside the box” and don’t feel too restricted by grid rules.
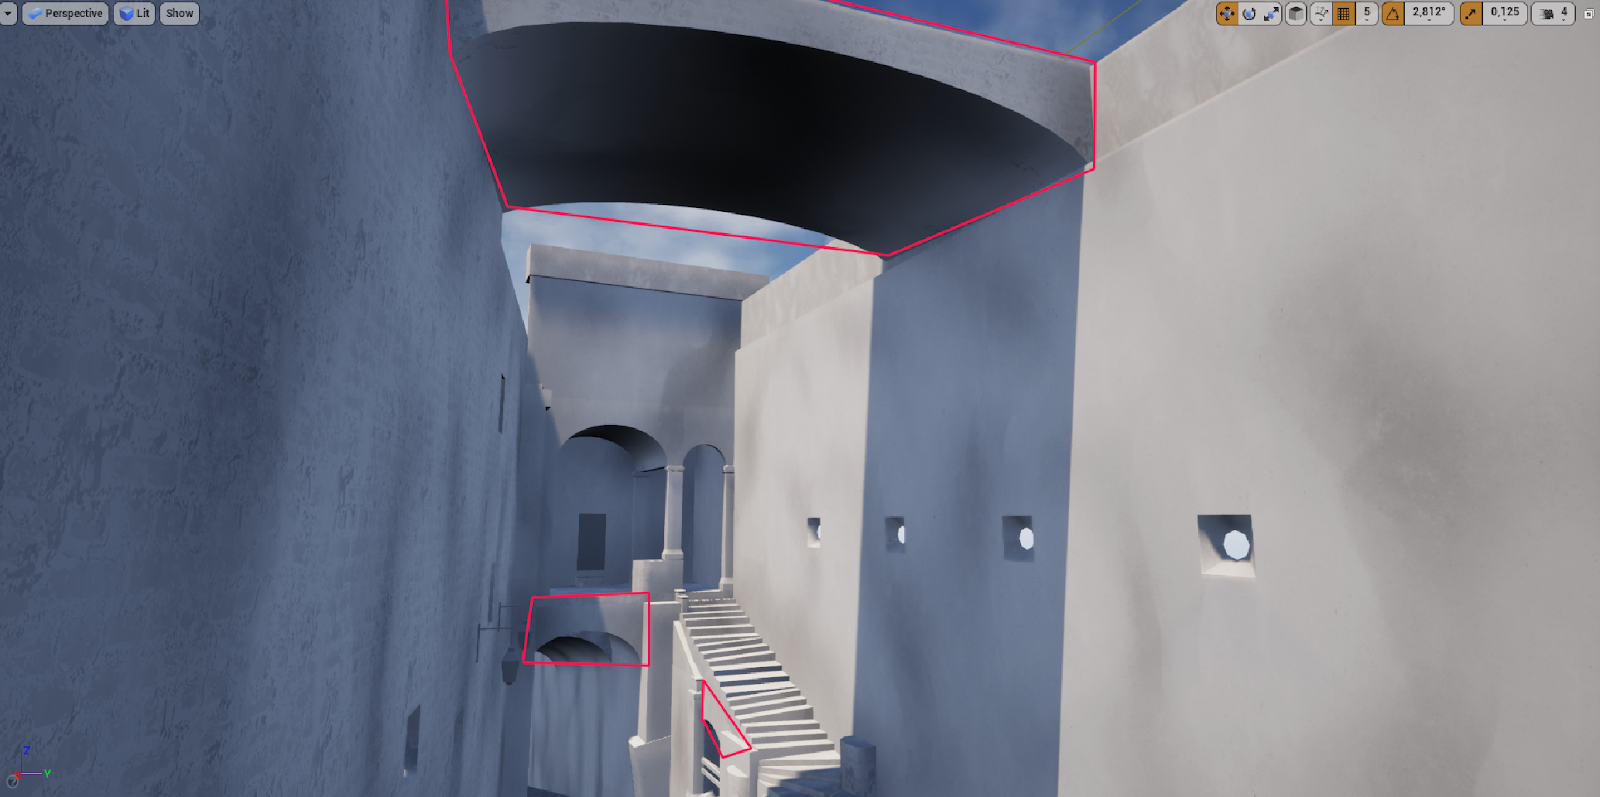
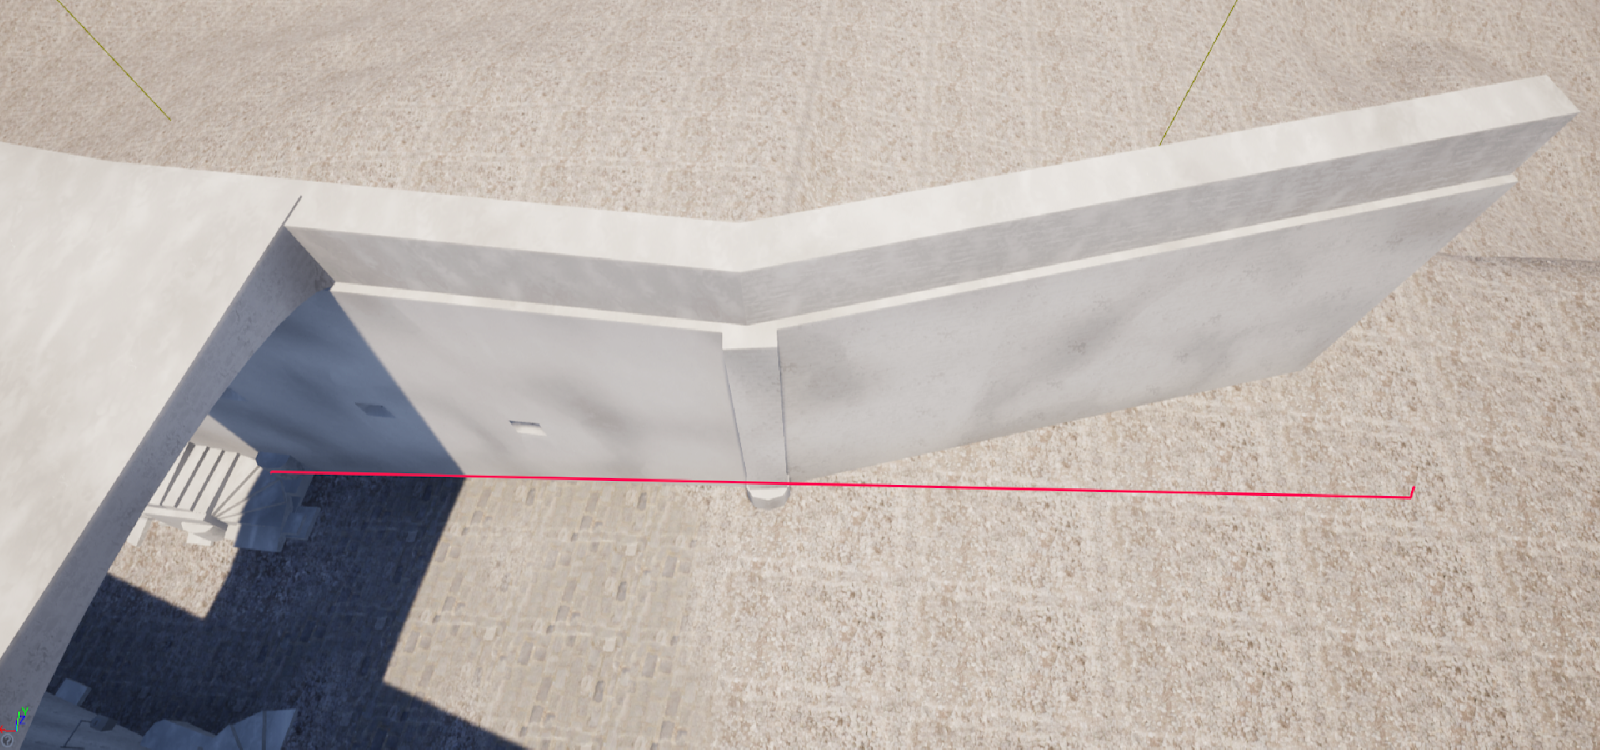
As for the rotation of set parts, you can really be creative here. In the past I used to create straight buildings with corner parts for specific angles, but buildings are not just 90° or 45° in real life. The scene looks a lot more natural, when you consider that as well. The parts can still be snapped together within the local grid and if you run into issues of closing a space, I would suggest trying to fill it with other set parts first, i.e. by using a pillar or fill block with the same material.
All wall segment groups in this project have a little different angle to make the whole thing more interesting

Another example for using rotation and scaling on modular set pieces. For this I used only one straight and one corner stair piece. The upper images show the stairs placed along the grid, while the lower ones show the same space just with a little bit of randomised rotation and scaling to make the staircase as a whole look more natural. Sometimes it’s good to make the geometry a bit thicker for more freedom in placement while avoiding holes.
So not always stick to the grid! Try to use assets, especially smaller ones, in a free and creative way to break things up more.
The finishing touches
"... I just love to get lost in the details!"
This is my favourite part of the whole environment creation part.
I think it feels nice to finish a project with all set parts and props that you have until you are happy with the results, lay back for a moment and then look back at it with fresh eyes to think about the scene in a bigger picture. This is not specific to modular sets though.
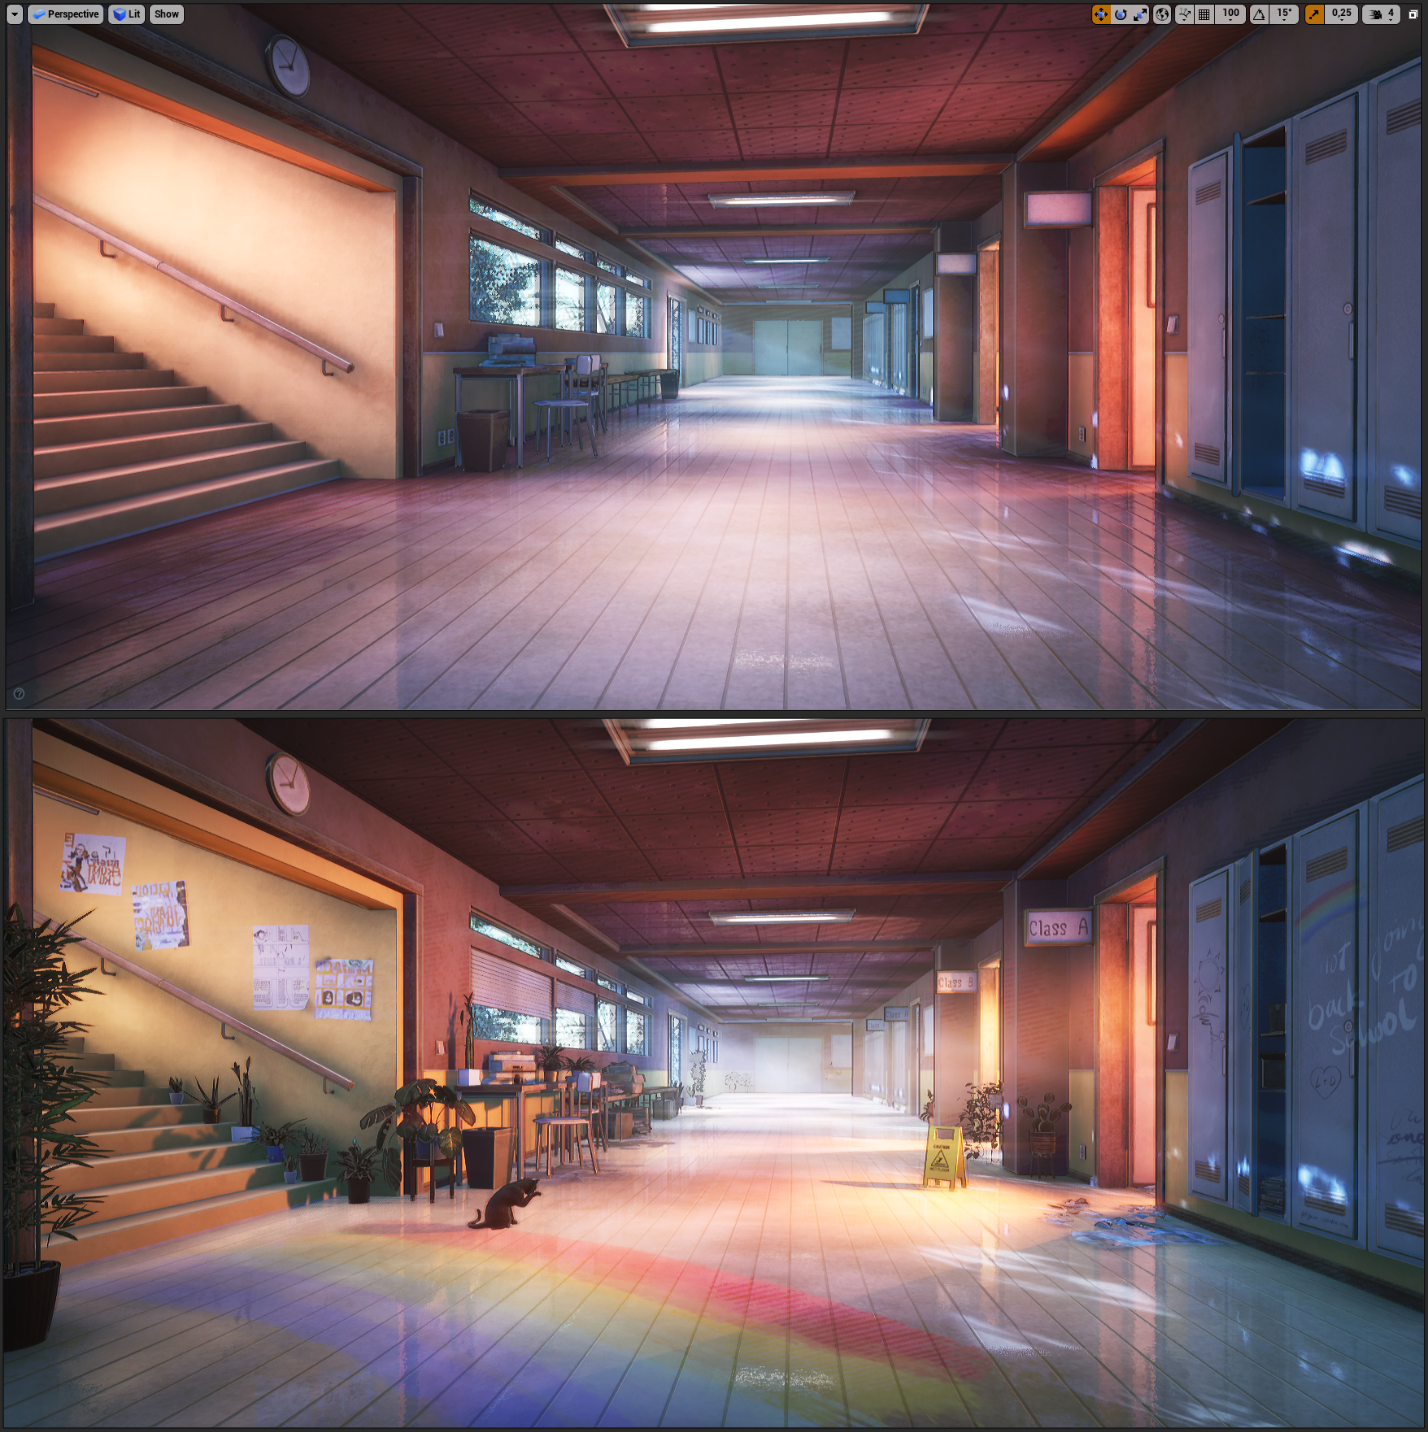
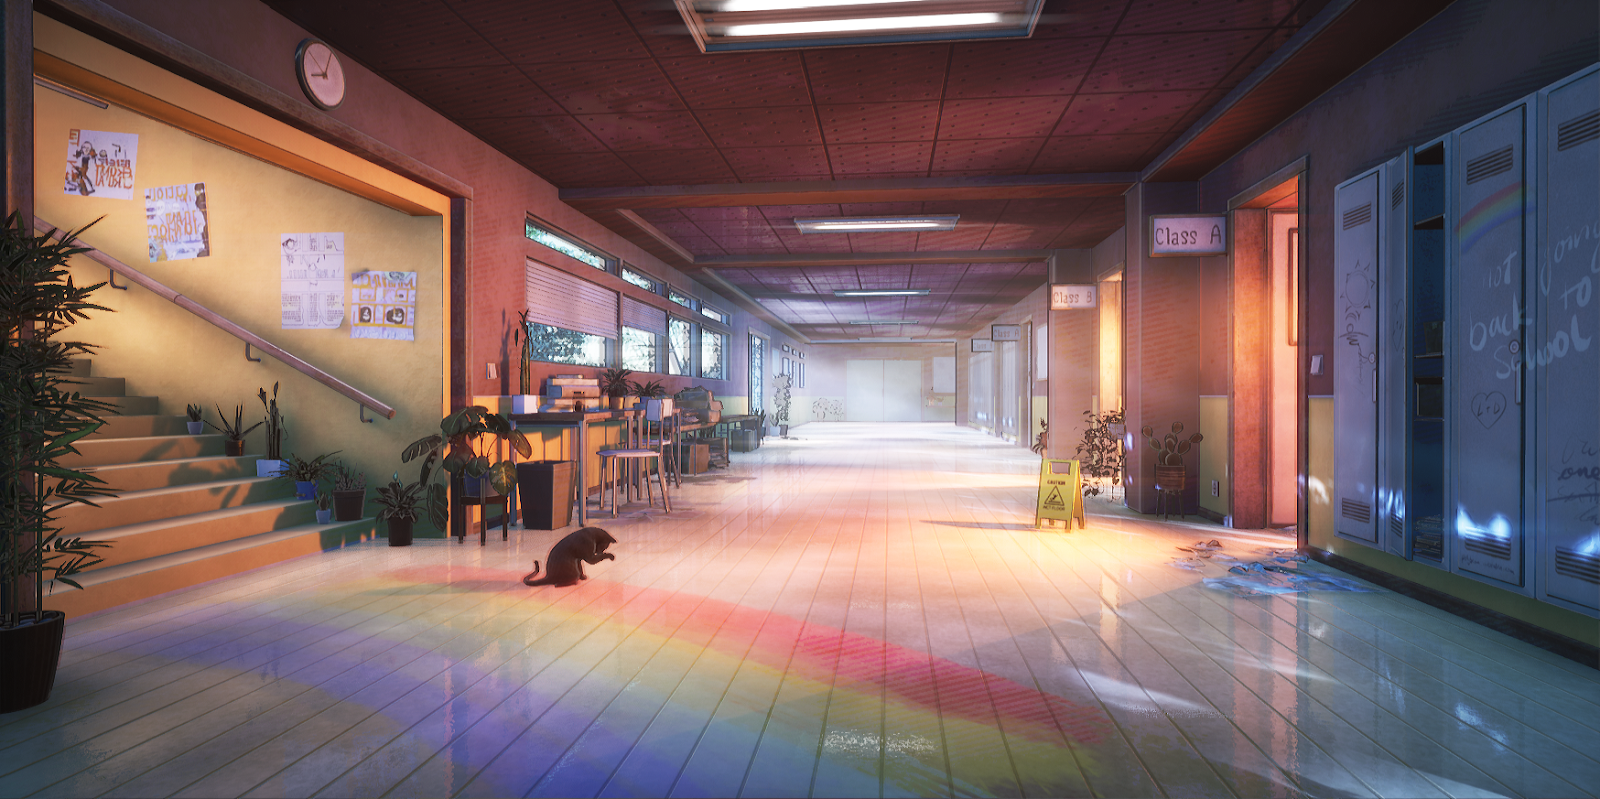
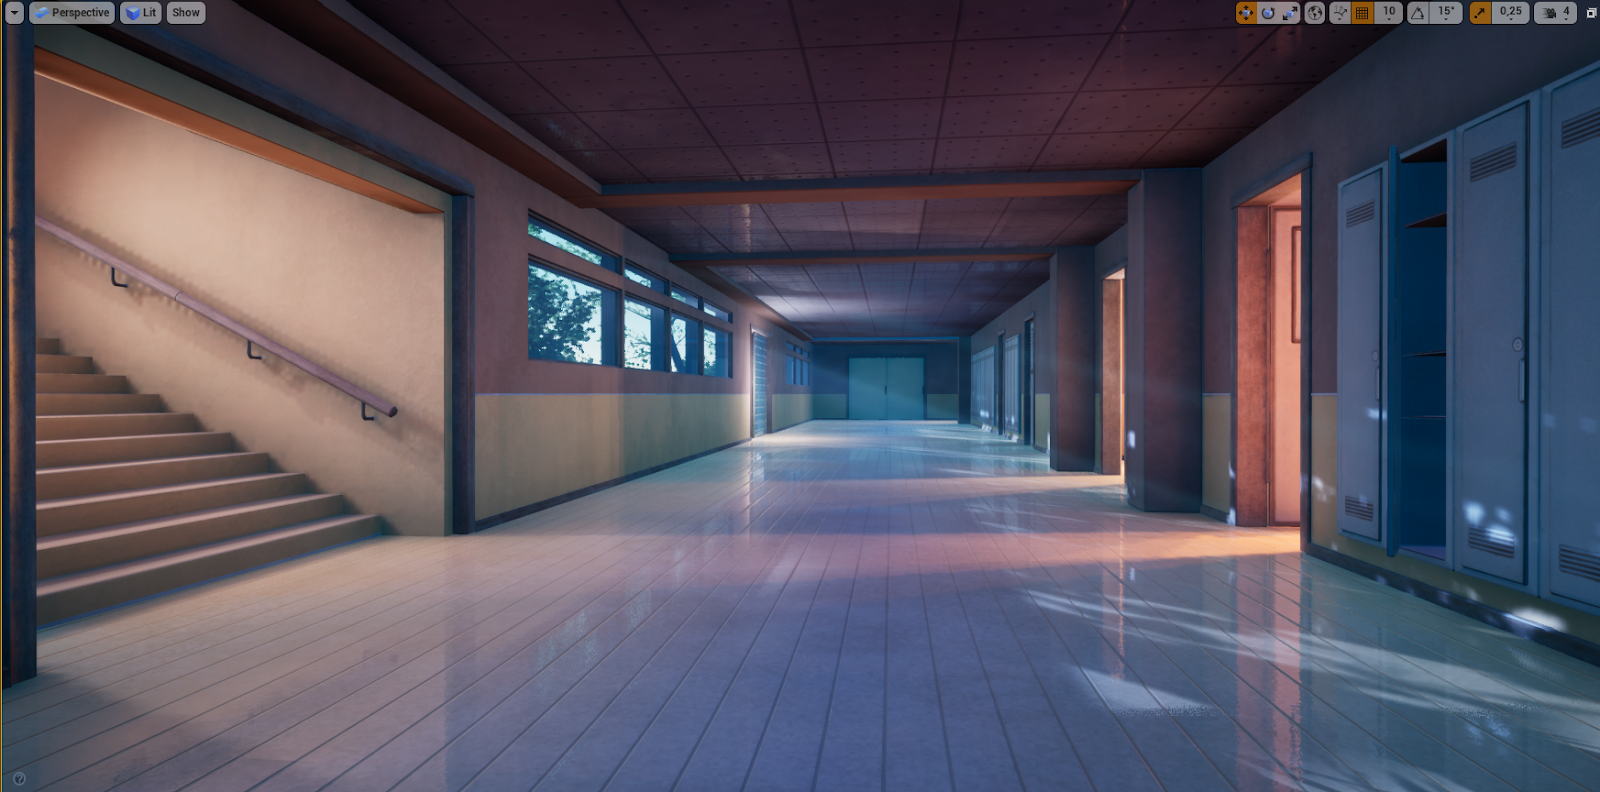
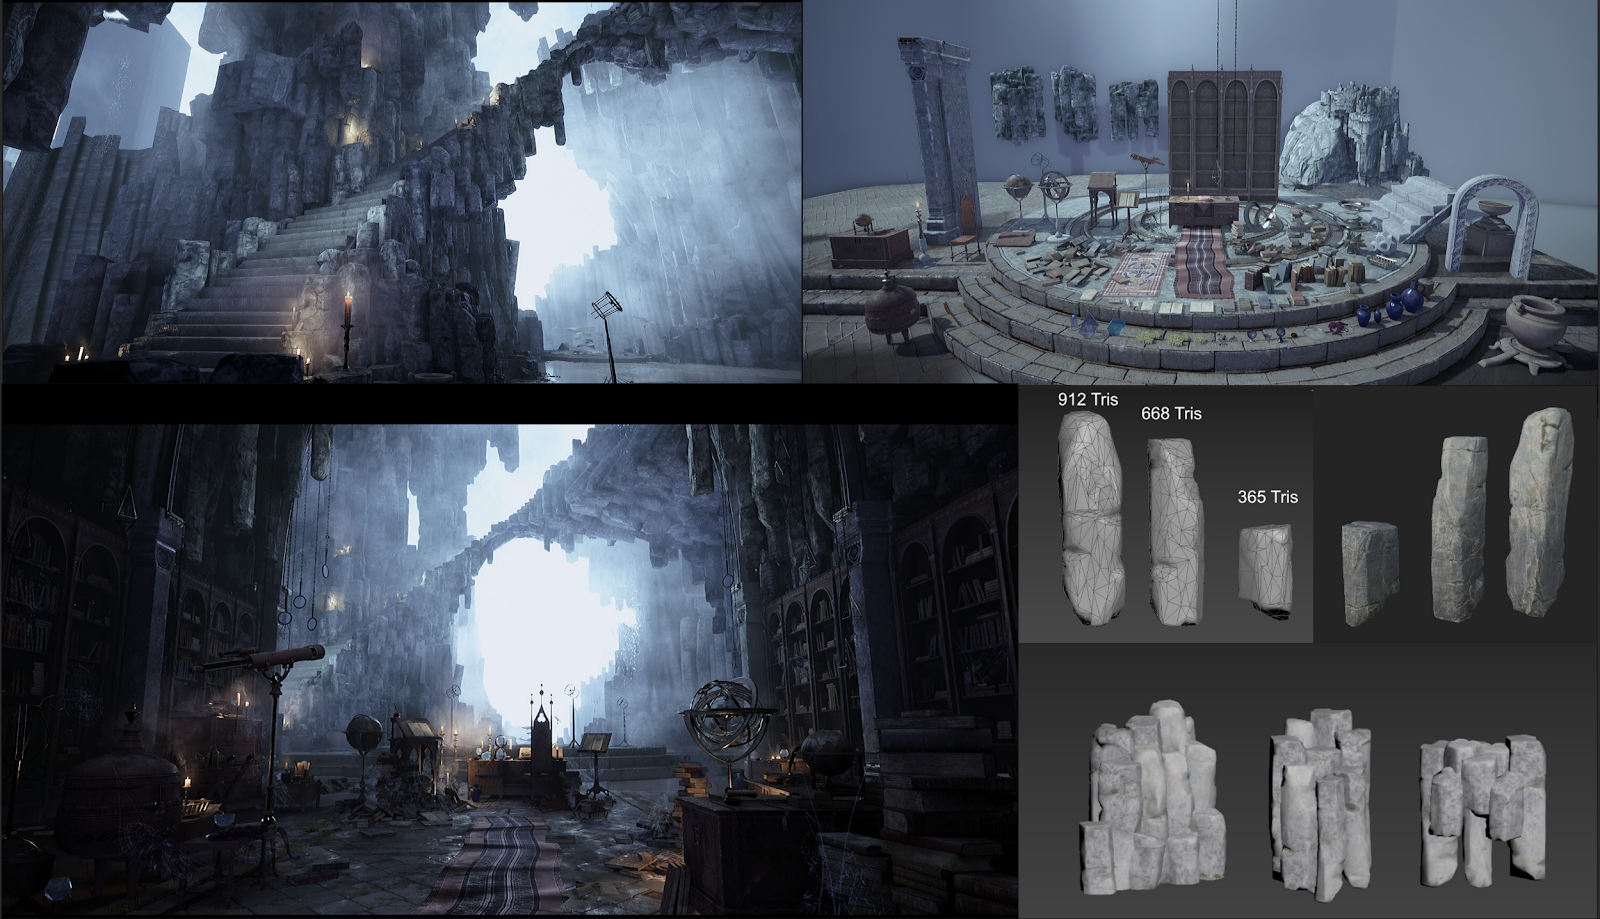
The modular corridor with all modular set parts and props created with the trim sheet (upper) and the same scene tweaked a couple of days afterwards (lower). I created some more props, like the wet floor sign and the decals to break up the tiling, as well as added props from the Unreal Marketplace and a cat model from Sketchfab by mark2580.
What I mean by this is to try and push it these last steps further to make it look more interesting. These things could be storytelling related or simply small details to spice up the scene.
Maybe spice up a point of interest with small additional decals like scratches, or add small foliage meshes to floor cracks to raise the detail level, or add some new props/decals to tell the story of someone who lived in this place and so on.
You can also add global touches to your scene in this stage, i.e. dust on top of everything with a shader function or maybe shader-based curvature details. This isn’t specific to modular parts, but most of this might already be taken care of on uniquely textured objects, while modular parts might look more plain up to this stage.
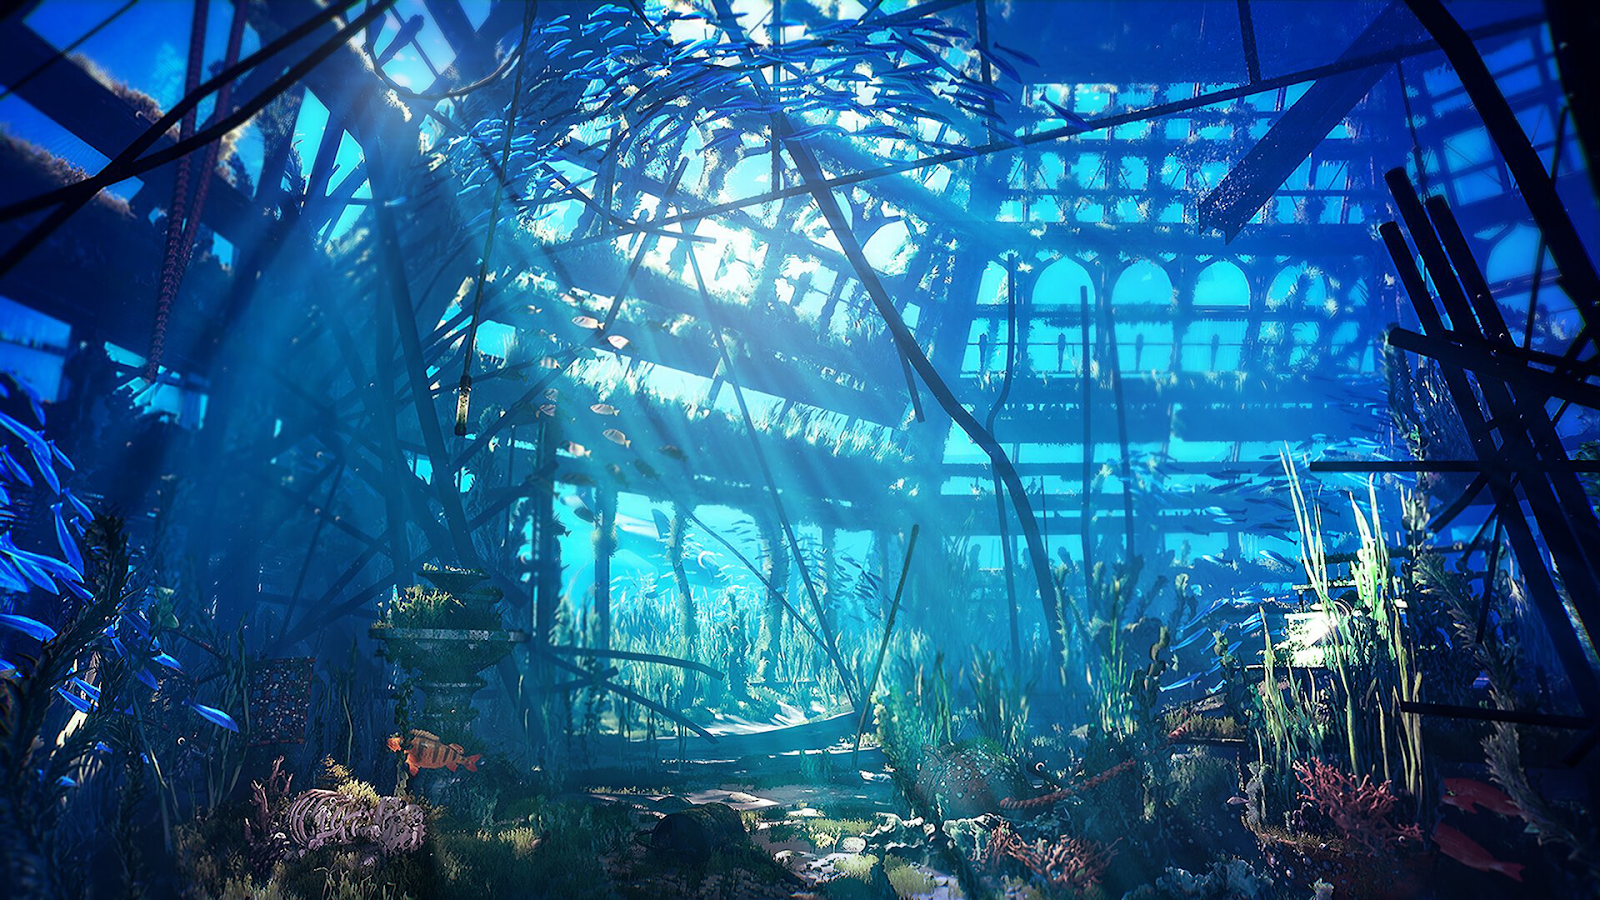
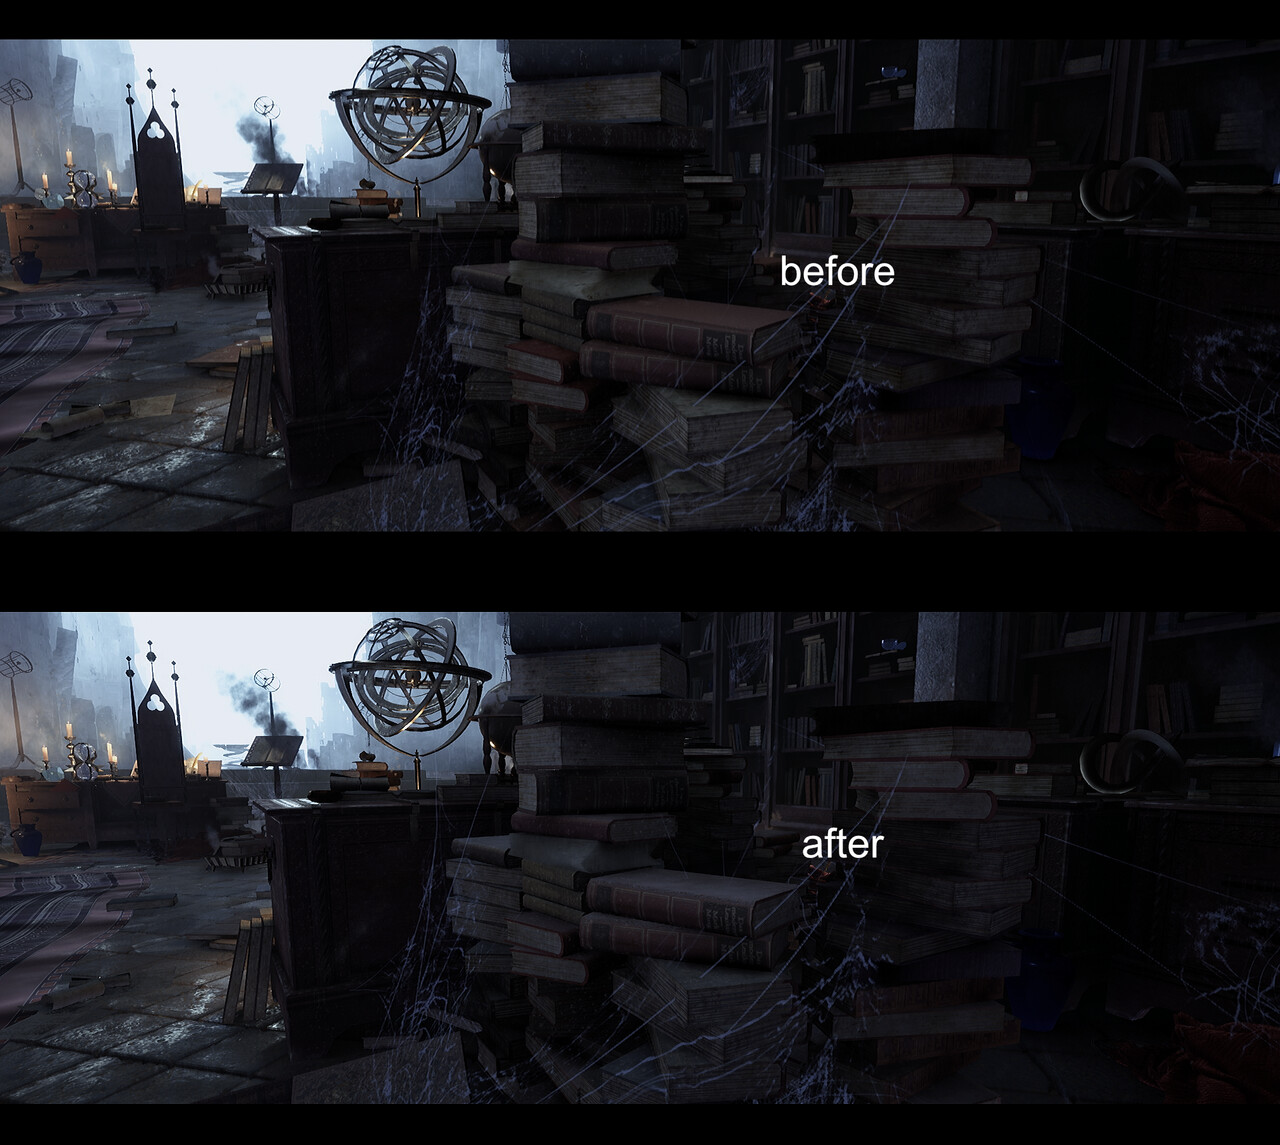
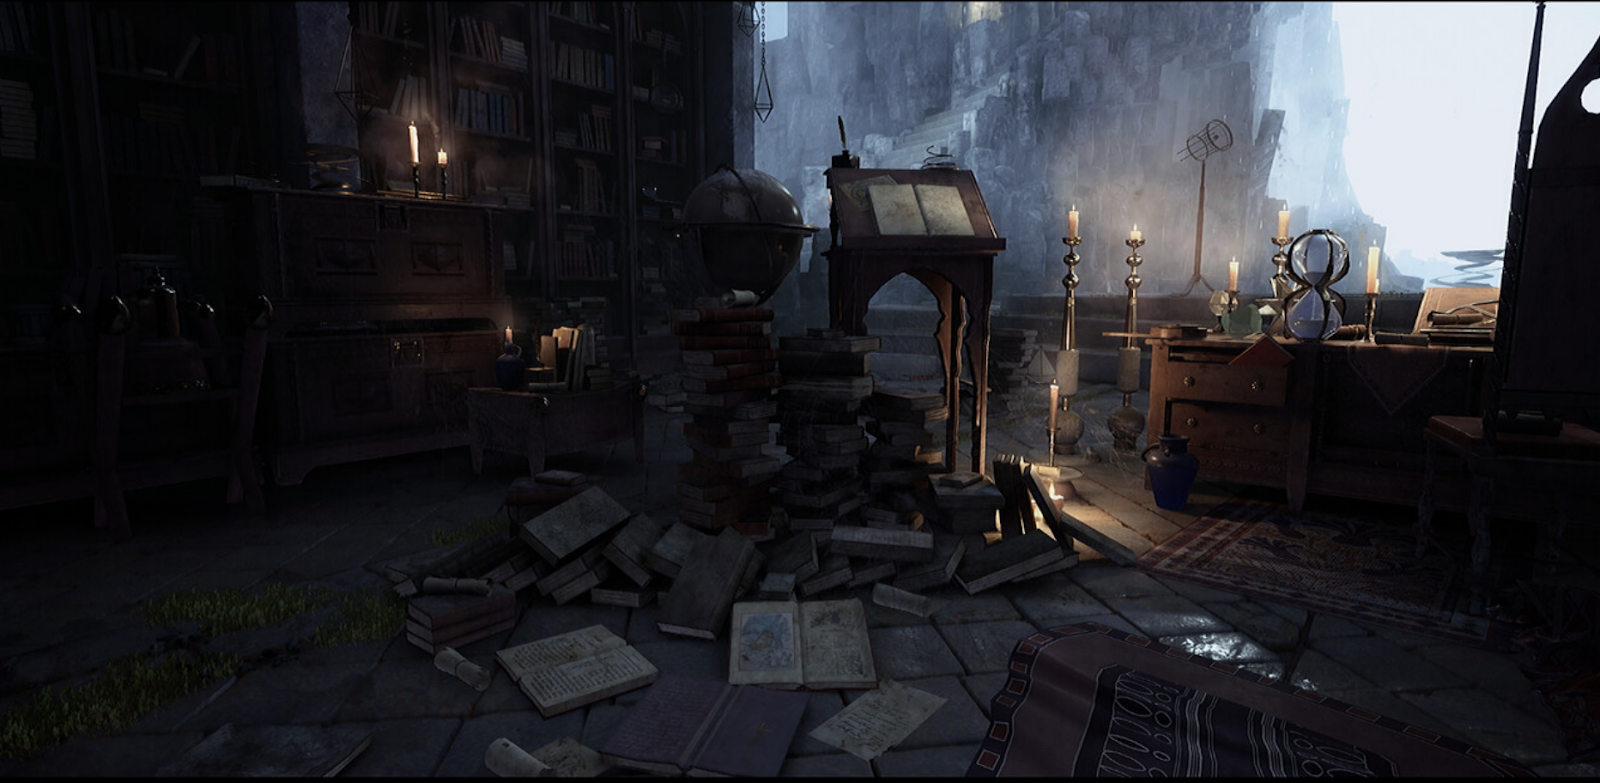
For example, for my Merlin’s Cave environment I added the dust layer at a very late stage to blend everything better together and make it look more believable in this setting.
There’s always things to improve, but this approach helped me a lot to be happy with the last couple of environments I finished. The good thing is also that you will learn from every project and can even reuse a lot of those finishing touches for future projects. Over time I have built my own library of small generic decals, deco meshes and shader functions, so that this last stage feels highly creative and relaxing to me after I put in a lot of effort in it before.
One last piece of advice for other people that read this
"Don’t be afraid to try out things and ask for help!"
Trying something new is always scary, but most of the time thinking about it is scarier than actually doing it. My advice is always: Just start doing it! Even if it’s just a very basic blockout, I think it helps a lot with motivation.
Try to use the advantages of online communities. I heard from quite a lot of people that they have issues with using trim sheets, creating UV's for modular parts and so on – we have all been there! Nobody just knows this stuff, so there aren’t any stupid questions and you are not alone. Just explain your problem and ask for help, I think most artists are happy to help and push you into the right direction 😊
support us
All these resources are curated and made by artists and then made available through the help of all our supporters.
If you want to support us on our mission to make the your journey into environment art as easy as possible then you can do so by joining us, and we will give you a lovely community and more exclusive resources in return.


